Download
1 / 1
10 likes | 400 Vues
SECURE SEAT SM : A SAFE AND SYSTEMATIC APPROACH TO TEACHING RIDING Elizabeth A. Greene 1 and Jana Z. Dawson 2 1 Department of Animal Sciences, Washington State University, Pullman, WA 99164-6310 and 2 The American Association for Horsemanship Safety, Inc. Fentress, TX 78622 DISCUSSION

E N D
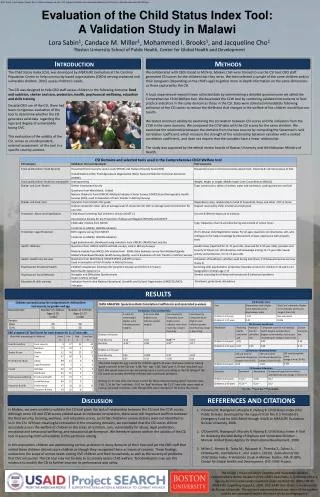
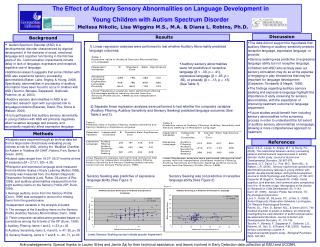
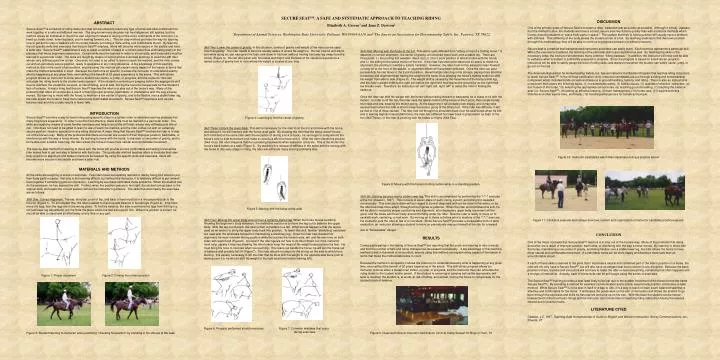
SECURE SEATSM: A SAFE AND SYSTEMATIC APPROACH TO TEACHING RIDING Elizabeth A. Greene1 and Jana Z. Dawson2 1Department of Animal Sciences, Washington State University, Pullman, WA 99164-6310 and 2The American Association for Horsemanship Safety, Inc. Fentress, TX 78622 DISCUSSION One of the primary goals of Secure Seat is to teach a deep, balanced seat as quickly as possible. Although it initially appears that the method is slow, the students will have a correct, secure seat much more quickly than with traditional methods which involve directing students to “place body parts in space.” The student that tries to hold a position will usually have a problem with stiffness. That stiffening of the body places the student at risk of a fall. By teaching students to find their own position through this methodology, they will be able to continue to progress between (or without) lessons. Secure seat is a method that inexperienced instructors and riders can easily learn. Each exercise represents a particular skill. When the exercise is mastered, the learning of the particular skill is accomplished as well. By teaching the skills in the necessary order, the instructor will eliminate many common “riding plateaus.” In addition, the instructor will know and be able to verbalize when a student is sufficiently prepared to progress. Since the program is based on a skill-driven program, instructors will be able to safely gauge the level of riding skills, and always know when the student can safely canter, jump, or go out on the trail. The American Association for Horsemanship Safety, Inc. has an Instructor Certification Program that teaches riding instructors to teach Secure Seat.SM In the 40-hour certification clinic, instructor candidates are put through a riding and horsemanship component which includes hands-on tests and lessons in ground handling, tacking, and riding. There is also an instructional component that covers the following topics: (1) horsemanship safety, (2) liability issues, (3) qualities of effective instructors, (4) the “nature of the horse,” (5) selecting the appropriate school horse, (6) teaching ground handling, (7) teaching the balance seat (i.e. Secure SeatSM), (8) setting up effective lessons, (9) barn management, (10) horse care, (11) equine activities statutes and other equine laws, and finally, (12) Handling emergencies for horses and people. Figure 10: Instructor candidates watch their classmate during a practice lesson Figure 11: Clinicians evaluate and critique structure, content and organization of instructor candidate practice lessons. CONCLUSION One of the major concepts that Secure SeatSM teaches is to stay out of the horse’s way. Many of the problems that riders encounter are a result of improper position, bad habits, or interfering with the way a horse moves. By learning to move with the horse, maintaining a low center of gravity, and being flexible over a stable lower leg, the rider allows the horse to have more natural and comfortable movement. A comfortable horse will be more happy and therefore more safe than an uncomfortable mount. If each of these skills is learned to the point that it becomes a natural and confirmed part of the rider’s position on a horse, the rider will not only have a Secure SeatSM, but will also have an elegant seat that is correct in any discipline. Because the basic position is there, trainers and instructors will not have to make the rider re-learn everything, something that often happens with a change of instructors. Actually, each of these skills can be self-taught using the series of exercises. The Secure SeatSM training provides a seat least likely to be lost due to the sudden movement of the horse (hence the name Secure SeatSM). By providing a method for excellent communication and a stable, secure body position, it becomes a safer method. While Secure SeatSM is not a seat in itself or a way to ride, it is a way to teach or learn a soft balanced seat that is effective and comfortable for the horse. It eliminates the guess work on the part of instructors and allows the student to go back through the exercises and skills he has learned and tune up on his own. With this base the student can be trainer-independent for the most basic things and the instructor can concentrate on teaching riding rather than having the lessons marred due to position faults. LITERATURE CITED Dawson, J.Z. 1997. Teaching Safe Horsemanship: A Guide to English and Western Instruction. Storey Communications, Inc., Pownal, VT ABSTRACT Secure SeatSM is a method of riding instruction that can be utilized to teach any type of horse and rider combination to work together in a safe and efficient manner. The long known ears-shoulder-hip-heel alignment still applies, but this method allows an individual to check his own alignment instead of relying on the voice commands of the instructor (i.e. head up, heels down, lower leg back, you’re leaning forward, etc.). This six-step method provides the way for learning how to get and to stay in balance with the horse, thereby providing a more willing and comfortable mount. By learning the six specific skills and exercises that Secure SeatSM employs, riders will become more secure in the saddle and have a safer ride. Secure SeatSM establishes a way to teach a number of steps in a certain order thus eliminating many of the plateaus that many beginners experience. Certain skills must be learned in order to sit correctly, and these skills must be learned in a particular order. The skills are taught by means of some familiar exercises and help to avoid the stiff rider whose very stiffness puts him at risk. One does not need to be gifted to learn to teach the method, and the rider comes out with an extremely secure position, ready to specialize in any riding discipline. A big advantage of this teaching method is, that in the event of an accident, anyone using this method can explain every aspect of the lesson in terms that make the method defensible in court. Because the method is so specific, it allows the instructor to understand exactly what is happening at any given time, even without the benefit of 20 years experience in the arena. This skill-driven program allows an instructor to know when a student can canter, or jump, or progress, and the instructor thus can articulate the riding levels to the student and/or parent. If the student is cantering or jumping before the appropriate skill level is reached, the student is, at worst, at risk of falling, and at best, forcing the horse to compensate for the student’s lack of balance. A major thing that Secure SeatSM teaches the rider is to stay out of the horse’s way. Many of the problems that riders encounter are a result of their improper position, bad habits, or interference with the way a horse moves. By learning to move with the horse, to maintain a low center of gravity, and to be flexible over a stable lower leg, the rider allows the horse to have more natural and comfortable movement. Secure SeatSM teaches a soft, secure balance seat and this usually results in fewer falls. INTRODUCTION Secure SeatSM provides a way to teach riding using specific steps in a certain order to eliminate learning plateaus that many beginners experience. In order to be the most effective, these skills must be learned in a particular order. The skills are taught by means of some familiar exercises and help to avoid the stiff rider; whose very stiffness puts him at risk. One does not need to be gifted to learn to use or teach the method, and the rider comes out with an extremely secure position, ready to specialize in any riding discipline. A major thing that Secure SeatSM teaches the rider is to stay out of the horse’s way. Many of the problems that riders encounter are a result of their improper position, bad habits, or interference with the way a horse moves. By learning to move with the horse, to maintain a low center of gravity, and to be flexible over a stable lower leg, the rider allows the horse to have more natural and comfortable movement. The step-by-step method for learning to move with the horse will provide a more comfortable and willing horse as the rider learns how to get and stay in balance with the horse. This particular method teaches riders to evaluate their own body position or alignment and make corrections as needed. By using the specific skills and exercises, riders will become more secure in the saddle and have a safer ride. MATERIALS AND METHODS All the skills are taught by a series of exercises. Few riders have successfully learned to ride by being told where to put their body parts in space. Not only is the learning difficult, but without the instructor, it is relatively difficult to put oneself back together if something gets out of position. Learning by exercises eliminates those problems. When the student can do the exercises, he has learned the skill. Further, when the position ceases to feel right, the student can go back to the original skills and regain the correct position without the instructor’s guidance. The skills that accompany the exercises are as follows: Skill One: Correct Alignment. The ear, shoulder, point of hip, and back of heel must be in a line perpendicular to the horizon (Figure 1). To accomplish this, the rider is asked to stand up and balance in his stirrups (Figure 2). If he must move his legs, then the legs are in the wrong place. To find his balance, the rider must move his legs from the hip (i.e. not just lower leg adjustment) until he finds the place where his feet will support him. When his position is correct, he should be able to stand and sit effortlessly at any time or any gait. Figure 1: Proper alignment Figure 2: Finding the correct position Figure 3: Student listening to instructor while practicing “checking his position” by standing in his stirrups at the walk. Skill Two: Lower the center of gravity. In this situation, center of gravity and weight of the rider can be used interchangeably. The rider needs to become acutely aware of where his weight is. He can now sit and stand, and while doing so, can rise up on his toes: sink down in his heel (without moving his lower leg away from the horse) (Figure 4). He can also pinch with his knees and thighs and the back of his calves to experience a raised center of gravity and to note where his weight is located at any time. Figure 4: Learning to find the center of gravity. Skill Three: Unlock the lower back. This skill is necessary for the rider to sit the trot and move with the horse, and without it, he will interfere with the horse at all gaits. By showing the rider that the horse doesn’t move both hind feet at the same time (with the exception of during a kick or buck), he can begin to comprehend the horse’s side-to-side movement and make a conscious effort to move with it. After the rider checks his position (Skill One), the rider imagines that he is pedaling backwards while seated on a bicycle. This is the motion the horse’s back makes at a walk (Figure 5). By teaching this release of stiffness in the spine and the moving with the horse at this early stage in riding, the rider will eliminate many bracing problems later. Figure 5: Moving with the horse at the walk. Skill Four: Moving the upper body around over a correctly placed leg. When the horse moves suddenly, throwing the beginner’s body sideways, the instinctive reaction is to move the leg out to balance the upper body. With the leg out of place, the rider is then vulnerable to a fall. What should happen is that the leg be used as an anchor to bring the upper body back into position. To teach this skill, familiar “stretching” exercises are used with the emphasis focused on maintaining a stationary leg. Once the rider has checked his alignment, he must maintain his leg position while he touches the horse’s ears, tail, and his own toes on both sides with each hand (Figure6). It is best if the rider figures out how to do this himself, but if the instructor must help, usually it requires showing the rider how to keep the mass of his weight balanced over his feet. He must bring his nose to his knee when toe-touching. If he leans out beside the horse, he will pull the horse out of balance and possibly fall off (Figure7). The rider should not step into the stirrup on the side to which he is leaning. It is usually necessary to tell the rider that he must shift his weight to the opposite seat bone prior to leaning over (i.e. he should shift his weight to the right seat bone before leaning left). Figure 6: Properly performed stretch exercises. Figure 7: Common mistakes that occur during exercises. Skill Five: Moving with the horse at the trot. This skill is quite different from “sitting on top of a trotting horse.” It depends on correct alignment, low center of gravity, an unlocked lower back, and a stable leg. There are three parts: 1.) the posting trot (western riders, too), 2.) the 2-point position in lateral motion with the horse, and 3.) the sitting to the lateral motion of the trot. If the rider has learned to stand and sit easily to check his alignment, the posting trot will be a simple transition. However, the rider must not be allowed to lean forward or hang on to the front of the saddle, or alignment efforts will have been defeated. Once the rider can post successfully, he can move to the 2-point position. He will simply stand up in his stirrups, paying more attention to balance and alignment than having the weight in his heels, thus allowing the horse’s trotting motion to shift his weight from side to side (Figure 8). The weight shift is caused by the movement of the horse’s hind leg, and the rider’s weight shifts to the right just before the right hind hoof leaves the ground (or as the right hind toe breaks over). Therefore, an instructor can call “right, left, right, left” to assist the rider in finding the cadence. Once the rider can shift his weight with the horse without falling forward or backward, he is ready to sit with the motion. In order to sit the trot, the rider uses the lateral motion of the horse at the 2-point, then simply bends his knees and sits, keeping the motion going. At the beginning it will probably look sloppy, and it may take several tries before the rider is able to keep the motion going at the sitting trot. If the rider has difficulty, it will be due to one of three causes. The rider has not brought his shoulders back over his seat bones when he sits and is leaning slightly forward (Skill One), the rider has stiffened his lower back in preparation (or fear) of the trot (Skill Three), or the rider is pinching with his knees or thighs (Skill Two). Figure 8: Moving with the horse’s trotting motion while in a standing position. Skill Six: Gaining balance over a stable lower leg. This skill is accomplished by performing the 7-7-7 exercise at the trot (Dawson, 1997). This consists of seven steps of each: rising, 2-point, and sitting trot repeated continuously. This exercise is done without regard to correct diagonals and can be done in the arena, or as the rider becomes more adept, through school figures or patterns. When the rider accomplishes this skill, he will be able to recognize proper positioning and alignment, all unnecessary upper body movement will be gone, and the horse will move freely and comfortably under his rider. Now the rider is ready to move on to cavaletti work, cantering, or trail work. By moving on to these activities prior to mastery of the 7-7-7 exercise, the instructor puts the rider at risk of an accident. Since Secure SeatSM provides a measurable form of skills evaluation, an instructor allowing a student to move on prematurely may put himself at the risk for a lawsuit due to “foreseeable” danger. RESULTS Camps participating in the testing of Secure SeatSM are reporting that the youth are learning to ride correctly and that the number of falls and riding mishaps has decreased considerably. A big advantage of this teaching method is that in the event of an accident, anyone using this method can explain every aspect of the lesson in terms that make the method defensible in court. Because the method is so specific it allows the instructor to understand exactly what is happening at any given time, even without the benefit of 20 years experience in the arena. This skill-driven program allows an instructor to know when a student can canter, or jump, or progress, and the instructor thus can articulate the riding levels to the student and/or parent. If the student is cantering or jumping before the appropriate skill level is reached, the student is, at worst, at risk of falling, and at best, forcing the horse to compensate for the student’s lack of balance. Figure 9: Classroom time at Instructor Certification Clinic at Camp Stewart for Boys in Hunt, TX