Download
1 / 4

E N D
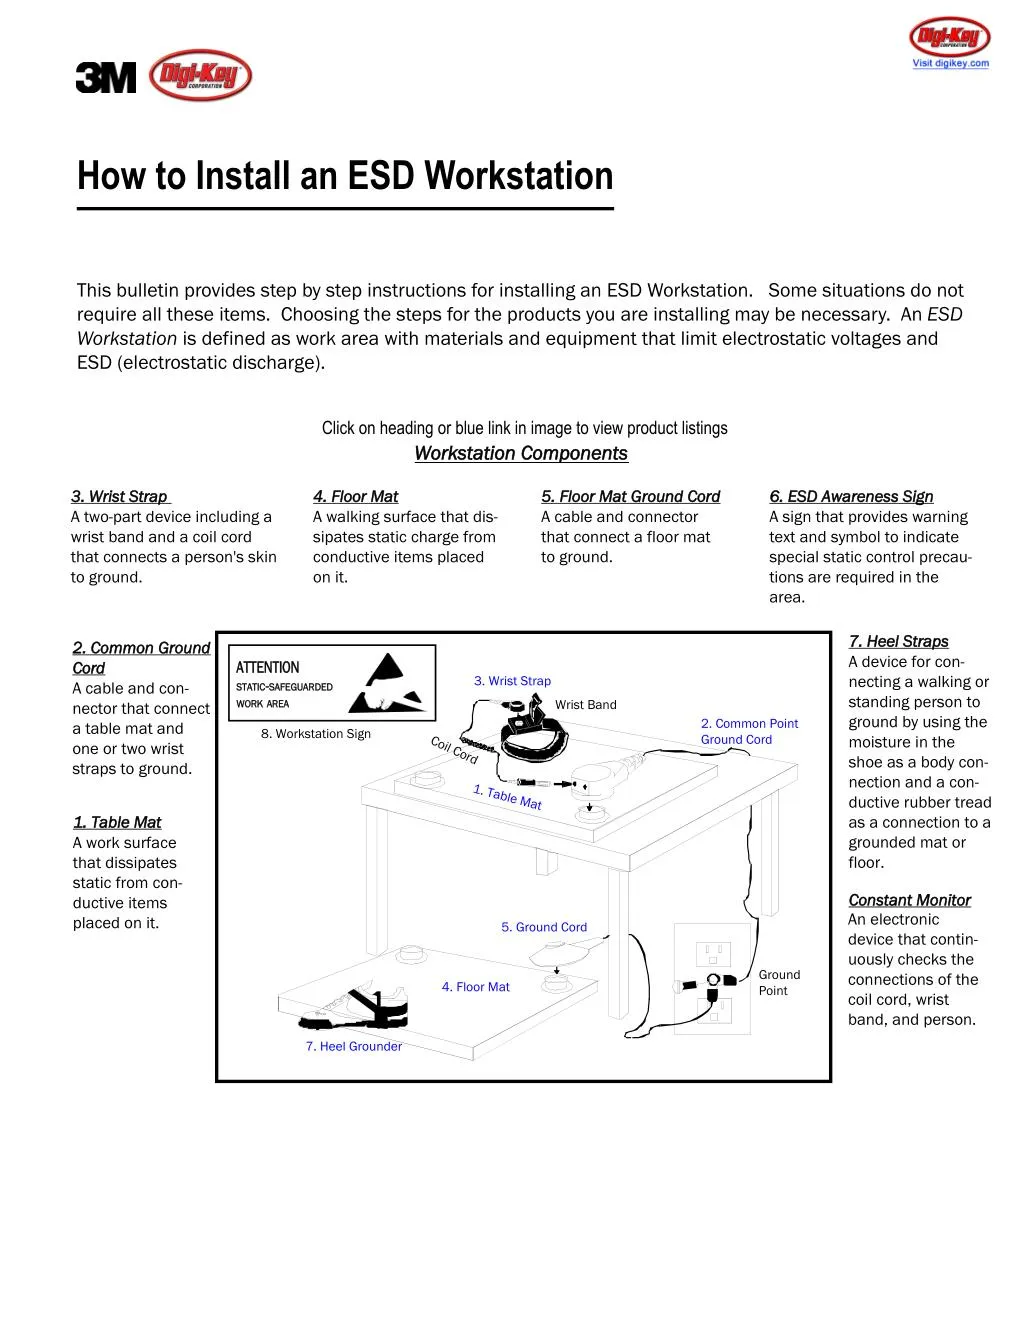
How to Install an ESD Workstation This bulletin provides step by step instructions for installing an ESD Workstation. Some situations do not require all these items. Choosing the steps for the products you are installing may be necessary. An ESD Workstation is defined as work area with materials and equipment that limit electrostatic voltages and ESD (electrostatic discharge). Click on heading or blue link in image to view product listings W Wo or rk ks st ta at ti io on n C Co om mp po on ne en nt ts s 3 3. . W Wr ri is st t S St tr ra ap p A two-part device including a wrist band and a coil cord that connects a person's skin to ground. 4 4. . F Fl lo oo or r M Ma at t A walking surface that dis- sipates static charge from conductive items placed on it. 5 5. . F Fl lo oo or r M Ma at t G Gr ro ou un nd d C Co or rd d A cable and connector that connect a floor mat to ground. 6 6. . E ES SD D A Aw wa ar re en ne es ss s S Si ig gn n A sign that provides warning text and symbol to indicate special static control precau- tions are required in the area. 7 7. . H He ee el l S St tr ra ap ps s A device for con- necting a walking or standing person to ground by using the moisture in the shoe as a body con- nection and a con- ductive rubber tread as a connection to a grounded mat or floor. 2 2. . C Co om mm mo on n G Gr ro ou un nd d C Co or rd d A cable and con- nector that connect a table mat and one or two wrist straps to ground. A AT TT TE EN NT TI IO ON N S ST TA AT TI IC C- -S SA AF FE EG GU UA AR RD DE ED D W WO OR RK K A AR RE EA A 3. Wrist Strap Wrist Band 2. Common Point Ground Cord 8. Workstation Sign Coil Cord 1. Table Mat 1 1. . T Ta ab bl le e M Ma at t A work surface that dissipates static from con- ductive items placed on it. C Co on ns st ta an nt t M Mo on ni it to or r An electronic device that contin- uously checks the connections of the coil cord, wrist band, and person. 5. Ground Cord Ground Point 4. Floor Mat 7. Heel Grounder
W2 How to Install an ESD Workstation View all 3M ESD products at Digi-KeyPage 2 I In ns st ta al ll li in ng g a an n E ES SD D W Wo or rk ks st ta at ti io on n Read Cautionary Notes before proceeding 1. Lay the table mat flat on the workbench with the snaps toward the operator. TIP: Mild heat (sun light) will remove creases caused by shipping. 2. Connect the common point ground cord to the table mat by snapping it to the left or right snap. 3. Connect the coil cord to the common point ground cord by plugging the banana plug into one of the ground cord's banana jacks. 4. Snap the wrist band to the coil cord. TIP: Make sure that the oper- ator wears the wrist band on bare skin and tightens the band so that no gap exists between the skin and the band. 5. Lay the floor mat on the floor in front of the work- bench with the snaps toward the bench. 6. Connect the floor mat ground cord to one snap on the floor mat. 7. Connect the common point ground cord and floor mat ground cord to ground. Use the green wire building ground point as specified in EOS/ESD Standard 6. Connection to this ground point most easily accomplished by removing the center AC outlet plate cover screw, placing the screw through the eyelets from both ground cords, and replacing the screw. The wires can be moved to the left and right sides of the screw so that they do not obstruct the outlet. C Ca au ut ti io on na ar ry y N No ot ti ic ce es s: : W WA AR RN NI IN NG G: : electrician to make ground connection if necessary. AC voltage is dangerous. Only qualified personnel should work with exposed AC outlets. Consult with a qualified C CA AU UT TI IO ON N: : Fault Current Interrupters should be considered to avoid shock. Most static control equipment is not designed to be used near voltages greater than 250 volts. Exercise extreme care when using energized equipment at an ESD workstation. Ground
W2 How to Install an ESD Workstation View all 3M ESD products at Digi-Key Page 3 8. Mount the ESD Awareness Sign above the work area where it is clearly visi- ble to both the operator and anyone approaching the work area. Before hanging the sign, clean any dust or oil from the wall before application for better adhesion. Next, remove the cover tape from the back of the adhesive strips, place the sign on the wall, and press firmly across the entire sign so that all of the adhesive contacts the wall. A AT TT TE EN NT TI IO ON N S ST TA AT TI IC C- -S SA AF FE EG GU UA AR RD DE ED D W WO OR RK K A AR RE EA A 9. Heel Grounders: Open the velcro strap. Remove foot from shoe and insert tab. Trim excess tab material with scissors if necessary. Place foot back into shoe and slip rubber cup onto the shoe's heel. Close velcro strap. Repeat procedure for other shoe. Newly installed work stations should be tested for continuity. A surface resistivity meter with a "resistance to ground" function can be used to test continuity from the ground point to all part of the workstation. I In ns st ta al ll li in ng g a a C Co on ns st ta an nt t M Mo on ni it to or r Coil Cord 1. Check that you have received all parts: - Monitor unit and attached power/ground adapter - 2 - mounting screws. Wrist Band Monitor AC outlet 2. Using the 2 mounting screws, mount the Monitor unit under the work bench. (Other suggested mounting locations include the bench top, and under bench shelving) 3. Plug the power/ground adapter into a 3-prong 120VAC outlet. The Monitor will sound a warning and display a red light when first plugged in. NOTE: Do Not use a 2- prong adapter. This will prevent the Monitor from being grounded. C Co on ns st ta an nt t 4. Place a wrist band on your wrist and plug the coil cord’s banana plug into the Monitor’s banana jack. The Monitor will display a green light when a functional wrist strap with good skin contact is connected to the unit. M Mo on ni it to or r More Information on next page.
W2 How to Install an ESD Workstation View all 3M ESD products at Digi-Key Page 4 W Wo or rk ks st ta at ti io on n D Do o''s s a an nd d D Do on n''t ts s D Do o D Do on n''t t Test the wrist strap/operator combination for continuity daily or install constant monitors. Do not ground the mat by one snap and connect the wrist strap to the other snap. This adds the resistance of the mat to the ground path. Test the mats quarterly. Do not "daisy chain" mats together. Each mat must be connected to the ground point. Not con- nected to the ground point through another mat. Clean the mats with a cleaner designed for static mats. Remove all nonessential plastic items from the workstation area. Insulative plastic items can store large amounts of static charge that is not removed when placed on a mat or grounded. Examples include: Styrofoam cups, plastic lunch bags and containers, combs and brushes. Do not use commercial cleaners on mats. The cleaners may leave a residue that prevents the mat from draining away charge. Require personnel that wear heel grounders to also wear a wrist strap when they sit at a workbench. Most people lift their feet or heels off the floor at some point while seated. B Br re en nt t B Be ea am me er r - - 3 3M M Use GFCI outlets when working with energized items. Avoid parallel ground paths. The only connection to ground for an operator at an ESD workstation should be the wrist strap, heel grounders or work surface. Other uncontrolled ground paths could create a shock hazard. Electronic Solutions Division Static Control Products 6801 River Place Blvd. Austin, TX 78726-9000 1-866-722-3736 www.3Mstatic.com