Download
1 / 16
160 likes | 169 Vues
A Bluetooth battery monitor is a very useful device when it comes to managing and monitoring battery levels with convenience and ease. This allows you to keep track of your battery's performance and make informed decisions, whether you're using it for a car, boat, RV, or other applications.

E N D
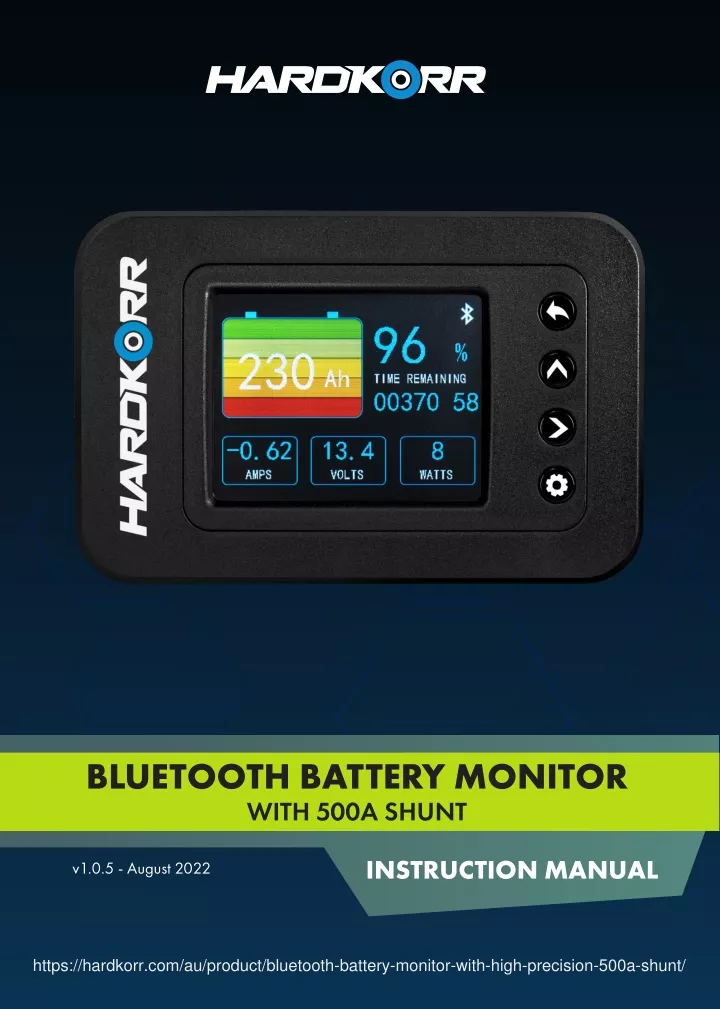
BLUETOOTH BATTERY MONITOR WITH 500A SHUNT INSTRUCTION MANUAL v1.0.5 - August 2022 https://hardkorr.com/au/product/bluetooth-battery-monitor-with-high-precision-500a-shunt/
INTRODUCTION Congratulations on purchasing this high quality Hardkorr product. In doing so, you now have the assurance and peace of mind that comes from purchasing a product that has been manufactured to the highest quality standards. Our aim is for you to be completely satisfied with your purchase, and therefore your new Hardkorr product is backed by a comprehensive 2-year warranty and an outstanding after-sales customer service team. We hope you will enjoy using this product for many years to come. If you require technical support, or in the unlikely event your purchase appears to be faulty, please contact our support team for immediate assistance. Contact details for each country are contained within this user guide. General Information and Safety Instructions .................................. 4-6 Contents........................................................................................ 7 Specifications................................................................................ 8 Overview ..................................................................................... 9 Wiring Diagram .......................................................................... 10 Operation ................................................................................... 1 1 Frequently Asked Questions .......................................................... 12 Warranty ............................................................................... 14-15 2
GENERAL INFORMATION & SAFETY INSTRUCTIONS GENERAL PRODUCT INFORMATION Our Bluetooth Battery Monitors offer unrivalled quality, durability and value for money. This battery monitor, also known as a coulometer, displays essential battery information through a dedicated monitor or by connecting your phone via Bluetooth. By using a 500A shunt (350A continuous), highly accurate data is collected such as charge level (Ah and %), live current draw (A), live voltage (V) and live watts (W). The apparatus also includes an integrated alarm function to alert you when your battery is discharged to a set level, and short circuit and reverse polarity protection technology. This Battery Monitor is suitable for all common battery types including AGM, wet, gel, calcium and lithium. PLEASE KEEP THIS MANUAL FOR FUTURE REFERENCE This manual contains important safety instructions for your Bluetooth Battery Monitor. Do not operate the Battery Monitor or modify the installation unless you have read and understood this user manual. Pay particularly close attention to CAUTION and WARNING statements. Hardkorr recommends that the battery be installed by an appropriately qualified professional. 3
GENERAL INFORMATION & SAFETY INSTRUCTIONS DISCLAIMER While caution has been taken to ensure the accuracy of the contents of this guide, Hardkorr assumes no responsibility for errors or omissions. Please note that specifications and product functionality may change without notice. WARNING • DO NOT alter or disassemble the battery monitor under any circumstances. Any effort made to modify, repair or attempt to gain access to the electronics may void the unit warranty. • Avoid all contact with water, rain, snow or spray. Failure to do so may lead to permanent irreparable damage to the internal electronics and may void the unit warranty. CAUTION The battery monitor should not be used by persons (including children) with reduced physical, sensory or mental capabilities, or lack of experience and knowledge, unless they are supervised or have been instructed on how to use the appliance by a person responsible for their safety. Mounting the battery monitor in a location that is exposed to sunlight may shorten the lifespan of the LCD screen. 4
PACK CONTENTS 1x LCD display module 1x 100V/500A shunt 1x 6m shielded cable 1x 6m B+ wire 1x Mounting indicator card 1x Set of mounting screws and pad 5
SPECIFICATIONS Supply voltage 10-120V Battery capacity 10-1000Ah Max measured current 500A Power consumption < 1W Voltage accuracy ±1% Current accuracy ±1% Capacity accuracy ±1% Operating temperature -20°C to 50°C Bluetooth Yes Weight (LCD screen) 1 10g Dimensions (LCD screen) 125 x 82 x 21mm IP rating IP20 Standards CE, RoHS, RCM 6
OVERVIEW Bluetooth Connection Dynamic Charge Indicator Capacity (%) Live Battery Capacity Time Remaining Live Current Live Power Live Voltage Max Capacity Voltage Quit Battery Capacity Select Modify Value Low Capacity Alarm Exhausted Capacity Voltage Enter/Set/Confirm 7
INSTALLATION & OPERATION CONNECTING TO YOUR BATTERY 1. Connect the shunt to the LCD monitor using the supplied shielded cable. 2. Connect the shunt to the positive circuit of the battery by running the supplied cable from one of the two terminals marked “B+” on the shunt to the positive terminal on your battery. Ensure you keep this cable as short as possible i.e. cut it to suit the length you require. 3. Connect the shunt to the negative circuit of your battery. Run a cable from the terminal marked “B-” on the shunt to the negative terminal on the battery (keep this cable as short as possible), and from the terminal marked “P-” on the shunt to your system ground. +POS 6m B+ Wire (Supplied) P- B+ B+ B- Shielded Wire (Supplied) -NEG CONNECTING TO MULTIPLE BATTERIES IN SERIES Connect your battery monitor to multiple batteries wired in series as shown below. Ensure you use cables of appropriate gauge for your system. -NEG +POS -NEG +POS P- B+ B+ B- +POS -NEG +POS -NEG 8
INSTALLATION & OPERATION CONNECTING TO MULTIPLE BATTERIES IN PARALLEL Connect to multiple batteries wired in parallel using busbars, as shown. All cables connecting batteries to the busbars must be of equal length. Ensure you use cables and busbars of appropriate size for your system. Busbar -NEG +POS -NEG +POS P- B+ B+ B- -NEG +POS -NEG +POS Busbar CONTROL PANEL OPERATION 1. When asleep, press any button to wake up the battery monitor to enter the main screen showing battery capacity, capacity percentage, voltage, current, and remaining time. 2. On the main screen, press the button to enter the setting screen. a. On the setting screen, press the button to return to the main screen. You can also press and hold the button to see the ID of the device to which you are connected. b. On the setting screen, press the button again to start editing settings. Doing so will highlight the first editable setting by changing the number to flashing red. c. Press the button to select setting you want to edit and then the button to modify its value. d. Once you have finished altering the settings, press the button to save all changes and return to the main screen. 3. On the main screen, long press the button to clear the battery capacity calibration, or long press the button to set the battery capacity to 100%. 9
INSTALLATION & OPERATION INITIAL CONFIGURATION When you first install the battery monitor or connect it to a new battery, you will need to configure it to match the parameters of your battery. NOTE: you must ensure your battery is fully charged before you commence the battery monitor setup process. 1. Press any key to wake up the monitor screen (if required), then enter the settings screen by pressing the button. 2. Press the button again to highlight the first digit in the “CAPACITY (Ah)” section (it will start flashing red). Use the button to change the value and the button to move between digits. 3. After setting the capacity, press the button again to move to the “MAX VOLT (V)” section. Use the process described above to set this to the float voltage of your battery. 4. Continue to the “ALARM (Ah)” section. The battery monitor will sound an alarm when your battery is discharged to the value you set here. 5. Set the value in the “MIN VOLT (V) section. This setting will depend on your battery type and represents the voltage at 0% capacity. The recommended settings for common battery types are as follows: Li-ion: 10.0V AGM, Gel, Wet, Calcium: 10.8V Finally, return to the main screen by pressing the button, hold down the button to clear any previous battery capacity calibration, and hold down the button to set the new battery capacity full calibration. CAUTION On the setting screen, if you press the button before saving, all changes will be discarded. 10
FAQs & TROUBLESHOOTING Q. What types of battery will this battery monitor work with? A. This battery monitor will work with all types of batteries and battery banks between 8V and 100V, providing the settings are calibrated correctly. Q. Why is my monitor not working? A. Your monitor may not be receiving power. Check the shunt and battery connections, check the connection between the monitor and shunt, and check that the battery voltage is above 8V. If your monitor is still not working, refer the matter to our warranty department for assessment. Q. Why is my current reading reversed (positive when discharging and negative when charging)? A. Your shunt is connected in reverse. Make sure the terminal marked “B+” on the shunt is connected to the positive terminal on your battery and the “B-” terminal on the shunt is connected to the negative terminal on your battery. Q. Why is the State of Charge or Time Remaining reading not accurate? A. You may need to reset the calibration. Charge the battery to 100%, then from the main screen hold down the button to clear the previous battery capacity calibration and then the button to set the new battery capacity full calibration. Q. Can I use this monitor for banks comprised of multiple batteries? A. Yes you can, as long as the total system voltage and maximum current draw do not exceed those stipulated in the specifications table. 11
BLUETOOTH APP The ‘HK Battery Monitor’ app is available on iOS through the App Store and Android on the Google Play Store. The app synchronises with the battery monitor to display battery information. DOWNLOADING THE APP Navigate to the App Store for iOS devices or the Google Play store for Android devices and search for “Hardkorr Battery Monitor”. CONNECTING YOUR BATTERY MONITOR Check the back of your battery monitor’s screen for a label which contains your battery monitor’s device ID - it will start with “BTMON-HK” followed by a 5-digit number. We suggest you write it down here: HKMON- _ _ _ _ _ Open the app and it will automatically detect all Bluetooth devices that are within range. Locate your battery monitor’s device ID and click on it to initiate connection. 12
BLUETOOTH APP NAVIGATION The information available in the app is broken up into two tabs: State and History. The State tab shows the current State of Charge (expressed as a percentage and Ah), plus the live voltage, net current inflow (+) or outflow (-), power remaining (A x V) and an estimate of time remaining at current discharge level. The History tab shows historical data since last reset, including maximum and average charge current, maximum and average discharge current, minimum and maximum battery voltage, time since last full charge and estimated time remaining until the battery is fully depleted. SETTINGS To modify the battery settings, select the “Settings” button from the top-right of the screen. Here you can edit settings in a similar manner to the operation panel. Refer to page 10 for more information on configuration. ERROR MESSAGES OR UNUSUAL BEHAVIOUR If the app stops working or displays any error messages or other unusual behaviour, please contact us for assistance. 13
WARRANTY Our goods come with guarantees that cannot be excluded under the Australian Consumer Law. You are entitled to a replacement or refund for a major failure and compensation for any other reasonably foreseeable loss or damage. You are also entitled to have the goods repaired or replaced if the goods fail to be of acceptable quality and the failure does not amount to a major failure. 2 Hardkorr warrants that this product will be free from defects in material and workmanship for five years. The warranty commences on the date of purchase by the original purchaser, and is not transferable. To access the benefits of this warranty, you must retain your proof of purchase and follow any other direction we reasonably give you (e.g. completing and returning your warranty card if applicable). TO BEGIN YOUR WARRANTY CLAIM If you believe your Hardkorr product is defective, it must be returned to Hardkorr for inspection by our warranty claims department. 1. You must have a Return Authorization (RA) number. To get your RA number, please complete the form found on our website and wait for the warranty team to contact you. Once you have an RA number, you must arrange for the product must be shipped at your own expense back to Hardkorr (keep your receipt). The address for shipment will be provided when we issue your RA number. Please be sure that your RA number is clearly marked on the outside of the packaging used for shipping. 2. 3. Completing the steps as mentioned will ensure a faster process of your claim, so that Hardkorr can get your product back to you as soon as possible. Once we receive your returned product, our technicians will inspect it. We will then notify you of the outcome of your claim. If we accept your warranty claim, we will either repair, replace or refund the goods at our discretion. We will also reimburse you for the shipping costs you incurred in sending the goods back to us. Any products that we choose to replace or refund become the property of Hardkorr. If we do not accept your claim, we will advise you of the reason and hold your product for collection. You will need to arrange and pay for the product to be shipped back to you. If your product is not collected within 30 days of your claim being finalised, we may destroy it. 14
WARRANTY Your warranty is voided if we (at our sole discretion) determine that there is evidence of one or more of the following: • Negligence: Improper installation, improper or extreme use, use that contravenes this instruction manual, etc. • Abuse: Road hazards, Damage beyond the limits of “normal wear and tear.” • Unauthorized Repair: Repair service performed by an unauthorised service centre. • Disassembly: Any attempt to open, tamper with or otherwise compromise the integrity of the product. • Consequential damage: damage to this product caused by the failure of another component of the vehicle or device in which this product is installed. Additionally, in the case of battery monitors, the following will void your warranty: • Over-voltage: applying an input voltage that exceeds the maximum stipulated in the specifications table. • Incorrect installation: installing the shunt contrary to our instructions. • Over-current: sending a current through the shunt that exceeds the maximum stipulated in the specifications table. • Water ingress: your battery monitor is not designed to be installed in an area that is subject to water ingress. Exterior Finish: We use the highest quality materials available, but depending on location, environment and exposure, the colour of exterior surfaces can fade. We will not approve any warranty claims that relate to fade. DISCONTINUED ITEMS Discontinued items that are still under warranty will be reviewed by Hardkorr. If a discontinued item is covered under warranty it may be replaced by an equivalent or superior item. If an equivalent item is not available Hardkorr will determine terms of resolution on a case-by-case basis. 15