Download
1 / 53
530 likes | 921 Vues
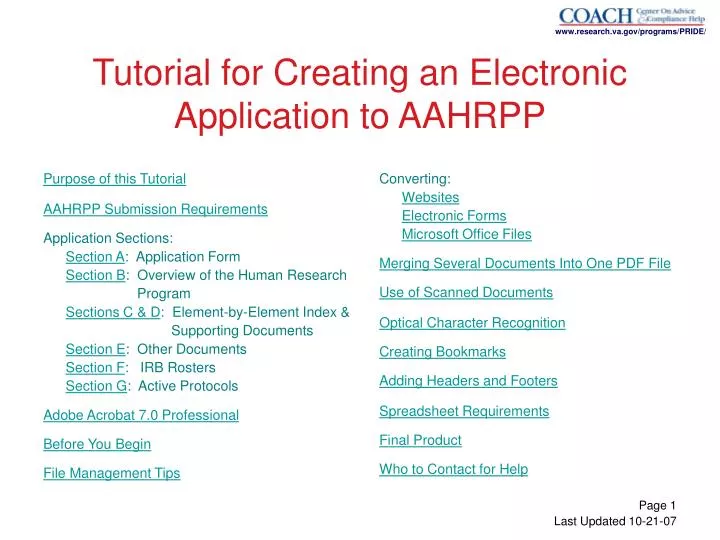
Converting: Websites Electronic Forms Microsoft Office Files Merging Several Documents Into One PDF File Use of Scanned Documents Optical Character Recognition Creating Bookmarks Adding Headers and Footers Spreadsheet Requirements Final Product Who to Contact for Help.

E N D
Converting: Websites Electronic Forms Microsoft Office Files Merging Several Documents Into One PDF File Use of Scanned Documents Optical Character Recognition Creating Bookmarks Adding Headers and Footers Spreadsheet Requirements Final Product Who to Contact for Help Purpose of this Tutorial AAHRPP Submission Requirements Application Sections: Section A: Application Form Section B: Overview of the Human Research Program Sections C & D: Element-by-Element Index & Supporting Documents Section E: Other Documents Section F: IRB Rosters Section G: Active Protocols Adobe Acrobat 7.0 Professional Before You Begin File Management Tips www.research.va.gov/programs/PRIDE/ Tutorial for Creating an Electronic Application to AAHRPP Last Updated 10-21-07
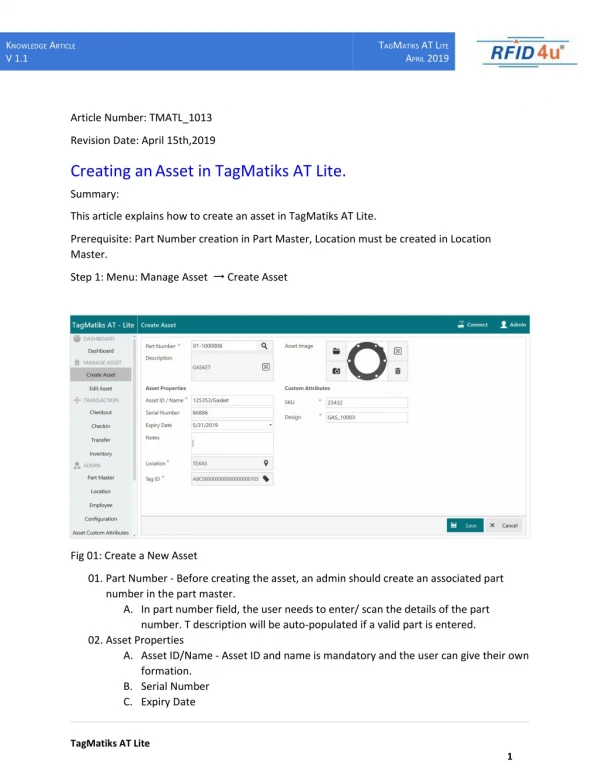
Purpose of this Tutorial AAHRPP requires PDF files to be submitted as specific sections of the electronic application where you submit one PDF file containing Sections A-D and one PDF file containing Section E. Requirements for the PDF files in these sections include: • All files must be converted into PDF • All electronic forms (electronic application forms and review systems) must be converted into PDF • Each PDF file must be readable and searchable • Each PDF file must contain page numbers (You want two sets of page numbers. One is for each individual document used within your Supporting Documents so that they can be referenced in your element-by-element review. The second is the complete file for Sections A-D and Section E.) • Each PDF file must be bookmarked The purpose of this tutorial is to show you how to create PDF files using Microsoft Office files, websites, electronic forms, and scanned documents. These instructions are based on AAHRPP’s Instructions to Apply for Accreditation (June 1,2007), Adobe Acrobat 7.0 Professional and Microsoft Windows XP Professional Version 2002. Last Updated 10-21-07
This diagram shows the seven sections comprising an AAHRPP accreditation application (see blue shading). In your AAHRPP application, you will submit an electronic copy of all the materials and hard copies of sections A-D. Adobe Acrobat 7.0 Professional will be used to create two separate files in your application. Documents that were created in another type of computer program, such as word processing software, are converted into PDF files with Adobe Acrobat. Your application will contain two PDF files and two spreadsheet files that are readable by Microsoft Excel: One PDF file contains Sections A-D One PDF file containing Section E One spreadsheet containing Section F One spreadsheet containing Section G We will now briefly discuss each section and describe how to create PDF files. AAHRPP Submission Requirements Last Updated 10-21-07
Section A: Application Form Section A is the AAHRPP application form, downloaded from AAHRPP’s website. It is a two-page document that needs to be completed and signed as the first section of your application. Also, send the original signed copy to AAHRPP. It is best to paper clip this and put it in a separate folder. As part of the application, you will include the name of the primary contact individual as well as the name of the responsible organizational official. The application also asks you to list the number of active protocols. To qualify as active, the protocol must be reviewed and approved by the IRB. Include all exempt determinations made in the past 12 months prior to the application submission date. For example, if a protocol was reviewed by a fully convened IRB committee three months prior to the application but had not been approved pending approval of modifications, it is still defined as an active protocol and should be included on your application. Last Updated 10-21-07
Section B is the second part of your AAHRPP application. It is an overview of your institution’s human research protection program. It needs to contain the following in no more than 10 pages: Name Overview and purpose Responsibility Key representatives Types of Research Involving Humans Conducted by Your Organization Other organizations Other relevant background Use a font that is easily readable for the final document, such as Arial 12 point font. Section B: Overview of the Human Research Program Last Updated 10-21-07
Other Organizations: List and describe other organizations whose research is overseen by your HRPP. Include those organizations that abide by your policies and procedures. Examples include: CBOCs that are listed on your FWA Divisions within your healthcare system (e.g. another campus that is listed on your FWA) A smaller VA that uses your R&D Committee as well as the IRB Do not include a VA that you serve as the IRB for but who has their own R&D Committee. Section B: Overview of the Human Research Program Last Updated 10-21-07
Sections C and D are the self-assessment parts of the AAHRPP application. There are 77 elements in the AAHRPP accreditation standards. Section C is the element-by-element index to the supporting documents included in Section D. Include in this section the headers for each domain (without commentary), standard, and element as this will make bookmarking easier later on. Do not use more than one page for each element and do not separate elements with page breaks. The description for an element can roll over to the next page, just keep the length to under a page. Use a font that is easily readable for the final document, such as Arial 12 point font. In Section D, include a copy of each supporting document referenced in Section C. If a supporting documents addresses multiple elements, only include one copy of the supporting document. Sections C & D: Element-by-Element Index and Supporting Documents Last Updated 10-21-07
Section E consists of agenda, minutes, and correspondence with oversight agencies about problems or their resolution in the year prior to the AAHRPP application submission. Include the following documents: Agendas and minutes for the three most recent meetings of each IRB. (If you use the IRB of another institution, you do not need to submit IRB agendas and minutes if they are undergoing their own AAHRPP review.) Also, you will need to include agendas and minutes for the three most recent R&D Committee meetings. Correspondence with oversight agencies in the past year about problems or their resolution. Internal and external audits or reviews within the past year. (Only include those that pertain to the overall institution's HRPP, not individual investigators. Do not include anything with PHI.) Section E: Other Documents Last Updated 10-21-07
Section F in your AAHRPP application includes a list of IRB members. It needs to be in a single file in a form readable by Microsoft Excel. (If you use the IRB of another institution, you do not need to submit IRB rosters if they are undergoing their own AAHRPP review.) If you have multiple IRBs, you may want to have a separate sheet for each IRB. You could also choose to include a column indicating the IRB in which the member has an appointment. The following information must be included for each IRB member: Name Earned degree Scientific status Representative capacity Indications of experience Relationship of the member to the organization Affiliation status IRB position Membership status Alternate status Section F: IRB Rosters Last Updated 10-21-07
Section F in your AAHRPP application also includes a list of R&D Committee members. This can be submitted as a separate sheet within the spreadsheet containing the IRB Roster. The spreadsheet needs to be readable by Microsoft Excel. The following information must be included for each R&D Committee member: Name Earned degree Scientific status Area of specialty Section F: R&D Committee Rosters Last Updated 10-21-07
Section F: IRB and R&D Rosters Below is an example of how your spreadsheet could be set up with a separate sheet for the IRB and R&D Committee Rosters. Click here for the sample template and instructions for the IRB Roster and R&D committee roster. Last Updated 10-21-07
Section G in your AAHRPP application is a list of active IRB protocols (do not include those that have been reviewed but not approved by the IRB). This needs to be in a single file, using software readable by Microsoft Excel. The following information needs to be included : Title IRB tracking number (when used) Investigator (or investigator code number) Date of initial approval Type of sponsor or funding entity Type of initial review (e.g., full, expedited, or exempt) Only include all exempt determinations made in the 12 months prior to the application submission date. Section G: Active Protocols Last Updated 10-21-07
Section G: Active Protocols Below is an example of how your spreadsheet could be set up. Click here for the sample template and instructions for the active protocol roster. Last Updated 10-21-07
Adobe Acrobat 7.0 Professional Information on the Adobe Acrobat 7.0 Professional product can be found here. If you would like to give the product a try, you can create five Adobe documents for free by downloading the software here. Remember- all VA software must be purchased and installed on VA computers by your IT staff. It may take a lengthy amount of time to order, receive, and install the software. Please allow yourself time for this process. Last Updated 10-21-07
Before You Begin Important: Before beginning this project, do not add any headers, footers, or other text to scanned documents at this time. This will be addressed when you create your final document. • Allow yourself at least one week to assemble the AAHRPP electronic application. • Avoid use of “funny fonts” in documents to be converted to PDF. • There should be few scanned documents in the application submission. • Do not scan in grayscale or color, use black and white when scanning. • Scan in 300 dpi or better. • If you want page numbers in your individual documents, create these in the original before converting to PDF. • Avoid having other programs (such as your email and Word documents) open when converting documents into PDF files using Adobe Acrobat 7.0. Last Updated 10-21-07
File Management Tips • Keep all documents related to your application in one place. • Name the documents so that everyone is clear which document it is. • Date each document after its name so that you can keep up with versions. If you make another change on the same day, add a letter at the end of the date. For example: AAHRPP Application.60606B. • You may want to save each of the documents used for your Supporting Documents with both the number and title (e.g. Document 1- FWA). This makes it easier to write your element-by-element index and merge the documents into the A-D pdf file. • If there are documents on several computers, you may want to keep them all on a removable source, such as a USB Memory Key, an external hard drive, or a rewritable CD-ROM. • Remember to back up your files. Make a habit of backing them up at the end of each day. Last Updated 10-21-07
Converting Websites You can download and convert web pages from the top level of a URL, with each web page becoming multiple PDF pages if necessary. You can determine whether to download pages from the top level of a site, from a specified number of levels below the top level, or the entire site. Note: Some websites have hundreds of pages and can take a long time to download, as well as use up your systems hard disk space and available memory, causing your system to crash. Begin by downloading only a few levels at a time. Last Updated 10-21-07
Open the Adobe Acrobat software program. From the menu, select File Create PDF From Web Page Converting Websites Last Updated 10-21-07
Enter the Web site URL Enter settings 5 levels (depending on how many pages you want) Stay on same path Stay on same server Click Create Note: Word documents on the website will need to be converted using the instructions “To Convert Files”, described in the previous screens. Converting Websites Last Updated 10-21-07
Let’s say you want to convert the AAHRPP Application Form into a PDF. The first thing you need to do open a Internet browser window (Explorer or Netscape) and bring up a web page. Note: This conversion technique could also be helpful if you want to reference a specific policy posted on a webpage. Converting Electronic Forms Last Updated 10-21-07
From the menu select: File Print Converting Electronic Forms Last Updated 10-21-07
Click on the Properties button Converting Electronic Forms Last Updated 10-21-07
Click on the Adobe PDF Settings tab Make sure the Adobe PDF Page Size is Tabloid Converting Electronic Forms Last Updated 10-21-07
Click on the layout tab Make sure the orientation is landscape Click OK Converting Electronic Forms Last Updated 10-21-07
Make sure the printer is “Adobe PDF” Click OK Converting Electronic Forms Last Updated 10-21-07
Save the file with a descriptive name and today’s date Converting Electronic Forms Last Updated 10-21-07
Open the Adobe Acrobat software program From the menu select file Converting Microsoft Office Files You can convert your Microsoft Office Files either individually or in the process of creating your PDF from multiple files. If you want to convert them individually, follow these directions. Last Updated 10-21-07
Then select: Create PDF From File Converting Microsoft Office Files Last Updated 10-21-07
Lastly, browse to select the files to be converted and click OK. Converting Microsoft Office Files Last Updated 10-21-07
Use of Scanned Documents A few documents will require scanning as part of your application submission. Documents that need to be scanned include those that have a signature, such as the AAHRPP application or a Memorandum of Understanding (MOU). Every AAHRPP application will include a completed scanned application form as Section A. Do not use scanned documents when an electronic version is available. For example, do not scan an investigator’s handbook when it is available as a word document. Convert the word document into a PDF file using Adobe Acrobat. Do not scan policies and procedures even if they are signed individually. Send unsigned copies in the AAHRPP application. Signatures will be verified during the site visit. Do not use grayscale or color scanning, use black and white when scanning.Scan in 300 dpior better. Last Updated 10-21-07
Compiling Your Application Sections A-D • It is best to have this organized prior to merging your files into a single PDF. • Have your application form signed, scanned, and converted to a PDF document. • You may want to view the margins of all your documents. You will want to have your final document show page numbers on all the pages. You will need at least 0.25” of space as either a header or a footer for your page numbers. Last Updated 10-21-07
You can convert different types of files and combine them into one PDF file. This is what is expected for application sections A through E. Open the Adobe Acrobat software program From the menu select File Create PDF From multiple files Merging Several Documents Into One PDF File Last Updated 10-21-07
Click Browse to select the files to be added. You will do this several times, until all the files you want are in the list. Note here that you can directly import your Microsoft Word files. They do not have to be converted to PDF first. Tip: You can add files multiple times. For example, you might want to add blank pages between sections. To arrange files, use Move Up and Move Down buttons. Click OK Merging Several Documents Into One PDF File Last Updated 10-21-07
Optical Character Recognition You can create an Adobe PDF file directly from a paper document using a scanner. During scanning, you can specify whether to create a searchable PDF file by applying optical character recognition (OCR), or create an image-only PDF- that is a bitmap picture of the pages that can be viewed but not searched. If your scanned document is the latter, you will apply OCR in your PDF file. Either way, for AAHRPP’s application purposes, a file with OCR is required. Note: This process may take a long time based on the size of the document. Last Updated 10-21-07
Open the Adobe Acrobat software program Open a previously scanned document: File Open Select a document Double click on the file you want opened Optical Character Recognition Last Updated 10-21-07
Once your document is open, select document from the top menu in Adobe Click Recognize Text Using OCR Click Start Optical Character Recognition Last Updated 10-21-07
In the “Recognize Text” dialog box, Select All Pages and click OK. (If the file is very large, you may need to do 500 pages at a time.) If you get the error “Acrobat could not perform recognition (OCR) on this page because “This page contains renderable text” first check that you have not added headers, footers, or other text to any scanned pages. If not, check “Ignore future errors in this document” and click OK. After completing the OCR, you can check to see the process worked by trying to highlight the scanned pages. Optical Character Recognition Last Updated 10-21-07
Creating Bookmarks Bookmarks are created to make navigating through a large document easier. Bookmarks must be created for each section of the application (A, B, C, D, and E). Within sections C, D, and E, sub-bookmarks need to be created. There is a specific format that AAHRPP would like you to use for the sub-bookmarks. The sub-bookmarks are created by clicking and dragging the bookmark you want to make a sub-bookmark underneath the appropriate bookmark in the hierarchy. You WILL NOT need to make hyperlinks to exactly the place in the document you want reviewed. The following slides will show how to create bookmarks and provide examples of how AAHRPP would like your bookmarks to be formatted. Last Updated 10-21-07
To create a new bookmark: Open the page where you want the bookmark to link to (your final document), and adjust the view settings to about 55%. Click the select tool and drag to select text where you’d like your bookmark to be. The selected text becomes the label of the new bookmark. The bookmark will appear wherever on the page you began, thus you may want to align the page at the top prior to selecting and dragging your text. Creating Bookmarks Last Updated 10-21-07
Click the bookmarks tab, and click the bookmark under which you want to place the new bookmark. (This example does not have a list of bookmarks yet.) If you do not select a bookmark, the new bookmark is automatically added at the end of the list. Choose New Bookmark from the Options menu, or click the New Bookmark icon at the top of the Bookmark tab. Type or edit the name of the new bookmark, and press Enter. Creating Bookmarks Last Updated 10-21-07
Create bookmarks for each Domain, Standard, and Element in Section C as shown here. Note the hierarchy used for the sub-bookmarks. Creating Bookmarks Last Updated 10-21-07
Create bookmarks with the document number and title for each document in Section D as shown here. Creating Bookmarks Last Updated 10-21-07
Create bookmarks with the document number and title for each document in Section E as shown here. Creating Bookmarks Last Updated 10-21-07
Headers and footers are used to present information, such as the date, page numbers, or the title of the document, in the top or bottom margins of the document. Open the Adobe Acrobat software program Open the FINAL document (the one you plan on submitting): File Open Select a document Double click on the file you want opened Adding Headers and Footers Last Updated 10-21-07
After the document is opened, select “Document” from the top menu Click Add Headers & Footers Adding Headers and Footers Last Updated 10-21-07
In the dialog box, click the Header tab. Page numbers: Click in the right-hand box Select a style from the insert page number menu Click insert Select Arial 14 as the font Apply to all pages Set the right-hand margin at 0.5. Click OK Adding Headers and Footers Last Updated 10-21-07
Repeat the same procedures for the footer so that you have page numbers at the top and bottom of each page If you need to renumber the pages later because you added or deleted pages, repeat these steps replacing the existing header or footer. Adding Headers and Footers Last Updated 10-21-07
Spreadsheet Requirements Sections F & G consist of the IRB & R&D rosters and the active protocol list. These sections are to be completed as a spreadsheet (Excel or Access). You do not need to submit paper copies of the spreadsheets in your AAHRPP application submission. However, they must be on the CD-ROM with the other sections of the application. Last Updated 10-21-07
Final Product On a single CD-Rom you will have the following 4 files: • One Adobe PDF containing Sections A-D. • Each section will be bookmarked. • Page numbers will be added to header and footer. • One Adobe PDF containing Section E. • Each section will be bookmarked. • Page numbers will be added to header and footer. • A spreadsheet containing IRB and R&D rosters as Section F. • One spreadsheet containing a list of active protocols as Section G. Last Updated 10-21-07
Final Product The entire application packet will consist of: • The original signed two-page application form (Section A) (It is best to put this in a separate folder.) • Paper copies of Sections A-D • One CD-ROM containing Section A-G Make sure all bookmarks work before sending the CD-ROM in your application. Send in the appropriate number of paper copies. How many paper copies do you need? This depends upon the total number of active protocols your site has. (This is calculated as the sum of protocols reviewed by the full IRB, the number reviewed by the expedited procedure, and the number granted exemption in the previous 12 months). 1 – 500 protocols = 3 paper copies 500 – 4000 protocols = 5 paper copies > 4000 – protocols = 7 paper copies Last Updated 10-21-07