Download

1 / 108
1.11k likes | 1.17k Vues
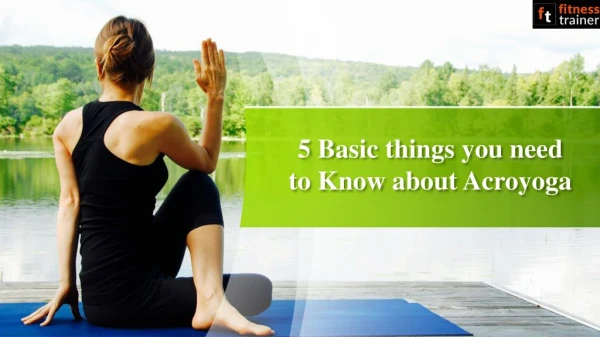
At its very root, AcroYoga is a practice of trust. Another basic human need is the ability to put faith in another human being. AcroYoga merges Yoga, Acrobatics, and Thai Massage seamlessly through communication, support, strength, and flexibility of the body and mind. Whether this is your first time hearing the term "AcroYoga" or you are a seasoned practitioner, join us to explore the fundamentals of movement, through dynamic transitions, creative sequencing and elaborate connections.<br><br>This manual is an invaluable investment in any personal and professional capacities that you continue to pursue this practice in.We are excited to go on this journey with you, as we take each other where we couldn't go on our own.<br><br>Enjoy the ride!<br><br>Best Slava & Devon<br><br>www.vancityacro.com

E N D
WELCOME TO THE TRIBE At its very root, AcroYoga is a practice of trust. Another basic human need is the ability to put faith in another human being. AcroYoga merges Yoga, Acrobatics, and Thai Massage seamlessly through communication, support, strength, and flexibility of the body and mind. ? Whether this is your first time hearing the term "AcroYoga" or you are a seasoned practitioner, join us to explore the fundamentals of movement, through dynamic transitions, creative sequencing and elaborate connections.? Our intention is for you to have all the tools you need to not only understand this beautiful discipline, but most importantly, to share it with your community and spread the message of connection through this practice. It is only with people like you devoting themselves to such disciplines that these vital lineages are able to remain intact and continue evolving? We are pleased to welcome you to the VanCityAcro Tribe. Let’s get started. ? ?
INDEX ? POSTURES • SPOTTING • SHAPES • FLEXIBILITY ? ? CORE • PARTNER STRETCHING • COMMUNICATION • TRIBE ? ?
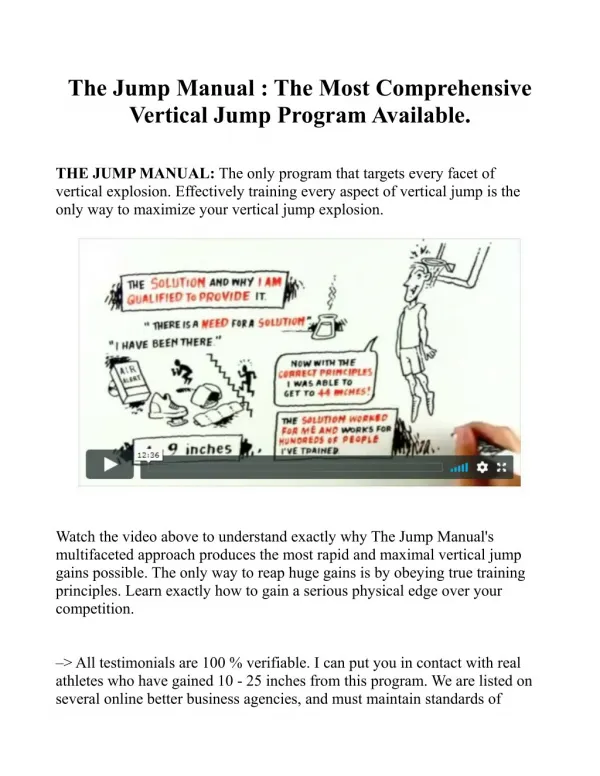
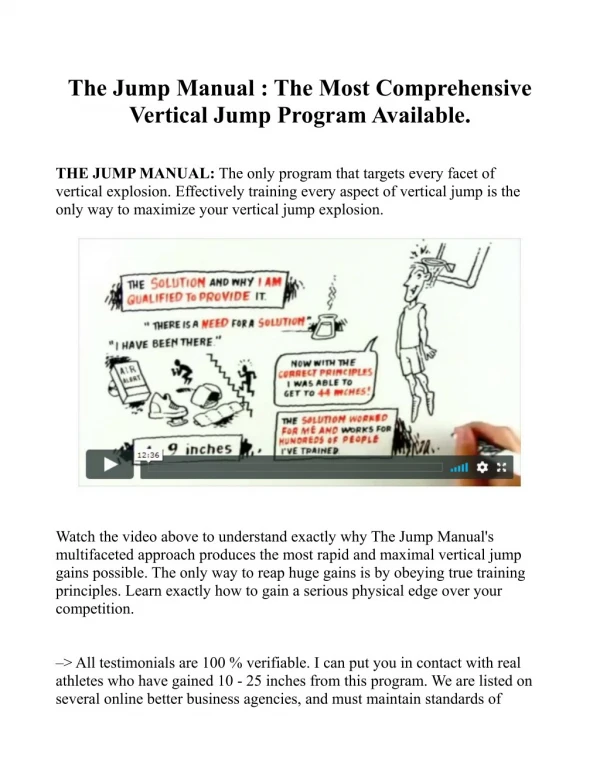
THE POSTURES ? ? ? This manual is designed to give you potent information in a simple and digestible manner. Please follow the written cues and the visual references for the following postures. On the the first page of every posture, you will find step-by-step written instructions on the most important body mechanics of the Acro shape. Follow them closely, from the beginning to the very end. As you know, this practice takes two to tango, so you will be given two sets of guides - one for the Base and one for the Flyer. Reference them when you need guidance. ? When looking at the picture diagrams, pay close attention to the body intersections represented by the circles. The arrows give you insight into the direction of the kinetic energy flowing through the body and they will also show you the exit points of said energy. The short and simple instructions will give you the most important things to keep in mind while practising a particular posture. ? Have fun, be safe, and let’s begin the Acro journey.
The name of the Acro shape you will be learning PASCHIMO Body intersections The direction of energy through the body This star rating lets you know the difficulty level Different shapes of the Base, take note of the body position End points of the directional force moving through the body Different shapes of the Flyer, differs for every posture
FLYER ? BASE ? Stand with your feet about 6 inches from the Base’s hips. Place the Base’s feet onto your hipbones with the Start lying flat on your back in the L basing position. Place your feet parallel on the Flyer’s hips with the toes just past the hipbones. The Flyer will need some support both below and above the hipbones to balance effectively. ? Next, connect hands with the Flyer. As a Base, you will have your hands like crab hands, with fingers out the side. It is important not to interlace fingers. ? Then, you will bend your knees into your chest, taking the Flyer’s weight onto your legs, Next you will straighten your legs and stack them over your hips. It is very important to find your stack. If this position is feeling very challenging, it could be that your legs are not stacked properly (refer to picture.) Find your stack and sink into stability. ? ? toes resting just above them. Next, connect palms with the Base with your fingers facing forward. Do not interlace the fingers. ? As you feel the Base bending their knees, you will press your hips into their feet and begin to lift your legs up together. At this point, it will be important to keep your arms straight and stacked over the Base’s shoulders. ? Once you are feeling very stable with the hands, you might try to go hands-free. In order for this one to balance, you will need to lift your chest higher. If you are able to release the hands, take your arms to your sides next to the hips for stability. Enjoy the ride. ?? ? “It all starts here”
FOLDED LEAF BIRD Point your toes to keep your form Press your hips down Straight legs Stack your arms above your wrists Feet flat or slightly tilted up Strong pressure down, make sure not to pull Legs straight as much as you can Stack the bone for more stability Ground your pelvis Press your shoulders down
FLYER ? BASE ? Start by taking hold of the Flyer’s ankles, positioning your thumbs on the inside of each ankle. Next, place your feet on the Flyer’s upper back, with toes pointing out and heels touching. If you can’t reach the Flyer, ask them to bend their legs and lean back into your feet. ? Follow by bending your knees into your chest and then straighten your legs slightly off of stacked, feet pushing away from you. Hold your arms overhead at about a 45-degree angle. ? You can add to the backbend by pointing your toes. You can lessen the backbend by pressing more into your heels. Be sure to communicate with your Flyer to find the position that is right for your unique conditions as a pair. Start by standing over the Base’s shoulders, facing away. Bend your knees and lean back until you feel the Base’s feet touch your upper back. Relax into a nice backbend. If it's comfortable, take your arms overhead. Make sure you are breathing deeply for the best results during this back-opener. ? If you feel there's too much pressure in your back, you can keep your palms resting on your belly or off to the side. Keep in mind you can always communicate with your Base if you want more or less of a backbend. ? Safety is the top priority in all postures. It is better to have a more “shallow” backbend than a deeper one that lacks proper integrity. Enjoy the posture wherever you are in it right now, knowing that we are constantly evolving through this practice. ? “Trust and set your back free”
BACK WHALE Reach your hip flexors up Keep your legs straight Reach back with your palms together Thumbs in, fingers out Straight and strong legs Pull back Keep your legs slightly off-centre
FLYER ? BASE ? Start by standing with your heels about 1 foot away from the Base’s hips. Bend your knees and lean back until you Start by placing the feet parallel with your toes just above the Flyer’s bum. Wait until there is a substantial amount of pressure on your feet before reaching for the Flyer’s hands. Connect the palms tightly using a V-grip. As the Flyer leans back, press through your heels and scoop them up, pressing their weight forward and then up to ensure safety. Make sure not to stay too long on the entry as this is a tricky posture to hold with bent legs. ? Keep your arms stacked over your shoulders and make sure to give your Flyer a steady pressure upwards with your hand. Only if the shape feels steady and the Flyer is ready, start by releasing one hand, then the other. Be sure to tilt your feet so that your toes are higher than your heels. ? When dismounting, communicate with your Flyer. Grab their hands and reverse the entry to exit safely. Once their feet touch the floor, release the hands to avoid shoulder strains. can feel the Base’s feet firmly on your bum. Once their feet are positioned on your bum, reach back and connect hands with the Base with a V-grip. Keep a strong core to avoid back-bending on the way up. ? On your way up, straighten and bring both legs together. Squeeze them tightly, like you’re holding a book between your knees. Push back through your arms and keep them straight in one line from your wrists to your shoulders. It is very important that you don't pull your hands, but rather, push firmly down to feel the support. ? Once balanced, if you and the Base feel safe, you can release your hands and place the palms to your sides. A Spotter is always recommended if there is any uncertainty. Be smart, safe, and patient through the process to promote the longevity of your practice. “Tight is light”
FOLDED LEAF BACK PLANK Look forward Straight legs Keep the arms sealed tight to the body Reach forward with pointed toes Stack to keep the Flyer safe Press palms down for stability \
FLYER ? BASE ? Start in Bird position. Lift your chest up until there is very little pressure left in the hands. Release one hand at a time to come into Free Bird. ? From Free Bird, it will be very important to move more slowly. Start by bending one knee at a time and grab your own feet from the outside, with the thumbs pointing down. ? After grabbing both feet, you may kick them into your hands, all the while being mindful of your centre of balance, as lifting the legs too high can cause tipping. Once you arrive, enjoy the peak of this posture. When you are ready to come out, be sure to release one hand at a time and not to let the legs spring out of your hands. To assist the Flyer in lifting their chest, push the ball of the feet up similar to pushing a gas pedal. Once you feel the hands become weightless, release them into Free Bird. ? From Free Bird, it is very important that you are focused on the Flyer’s centre of balance, as it becomes the job of the Base to keep the Flyer balanced. ? As the Flyer begins to kick into Bow, you may need to adjust the foot pressure. For example, you may find that you need to give more toe pressure or less, depending on each Flyer’s individual needs. When the Flyer is releasing their hands, have your hands up and ready to catch them in case of any forward tipping. “Get higher than usual”
BOW Arms straight Kick firmly into the hands Try to lift your knees up Tilt your feet up Straight and strong legs Keep your pelvis on the floor
FLYER ? BASE ? Start by standing 6 inches behind the Base’s hips with your feet in a wide stance. Squat and lift your toes with your feet turned out. ? Connect hands with the Base with your fingers positioned forward. You will keep your arms straight in order to lift your upper body. Press the backs of the legs into the Base’s feet and lean forward. As you feel lift-off, you will have to sit your bum low and avoid bringing your legs back. ? Wrap your legs around the fronts of the Base’s shins and hook your toes behind their calves. Then, sit tall while slowly releasing hands. In the peak of the posture your arms will sit straight and relaxed, shoulders back, palms upon the knees. Start by bending your knees and placing the ball of your foot on the Flyer’s inner knee. It’s important that it will be just the ball of the foot, and not the entire foot, otherwise the Flyer will just slip off of your feet on the way up. ? Connect hands. The Base will have crab hands, with fingers out to either side. As the Base, you will keep your arms completely straight in both the entrance and exit to this posture. ? As the Flyer leans their weight forward you will push into your feet and begin lifting them up and over top of your hips. Keep your arms straight and your knees bent until the Flyer is sitting upright, then release the hands. Slowly straighten your legs and take your arms down beside your body for extra support. ? “The basics are everything”
THRONE Keep your shoulders back Arms straight and relaxed Open your knees wide Stacking the bone Externally rotate the legs Press your hands down firmly
FLYER ? BASE ? Start by standing with your feet slightly wider than hip distance apart and about 6 inches away from your Base. Place the Base’s feet into your hip crease. Connect hands with your fingers forward. ? Next, feel for the Base’s lifting motion. As you are being lifted up, fold forward, bringing your chest toward the Base’s legs. Use your arms to stabilize this motion by slowly bending your elbows as you fold forward. ? You will need to keep your legs open wide and to hold a good “shelf.” This means to keep the toes reaching down towards the floor. This one is very important because if you lift your legs up, you will slide off of the Base's feet. Once you feel comfortable and stable, you may release hands. Start lying flat on your back in the L basing position. Place your feet in the Flyer’s hip crease. Heels will be in and toes will be out. Be sure that the heels do not touch, as it will be uncomfortable for the Flyer. Connect hands like in Bird. ? Next, bend your knees to bring the Flyer’s weight onto your legs, then straighten and stack them above your hips. It is very important to keep the legs stacked, as much like in Folded Leaf, there is the danger of dropping the Flyer overhead. ? Once you feel stable through the legs, you can release the hands. First place your palms lightly on the Flyer’s shoulders. After the shaking settles and your Flyer feels comfortable, you can take your hands to the floor on either side, palms facing down. ? ? “Let gravity decompress your spine”
FOLDED LEAF Take the legs wide Pike your straight legs down Arch of the foot connects to hipbone Relax the entire upper body Straight and stacked legs Pull out to the side for a deeper stretch
FLYER ? BASE ? Start by standing just behind the Base’s hips. Bend forward enough that you can connect hands with the Base, with your fingers forward. As the Base bends Start by placing your feet on the Flyer’s shin bones, just below the knee, with the big toe on the inside and the other toes on the outside. The heels will sit on the inside of the shin bone. ? Connect hands with the Flyer with crab hand placement, fingers out to each side. Next, bend your knees into your chest and give a light pull with your arms to help the Flyer up. Keep your arms stacked above your shoulders. Straighten your legs and stack your feet above your hips. ? Keep your hands connected until you feel very balanced and the hands start to feel light. If this happens and the Flyer feels comfortable enough to release, you may let the hands go and place your palms on the floor next to your hips. ? their knees, you will need to keep your body tight and press your shins into the Base’s feet to maintain contact. ? As you begin to rise, it is important to bring your knees into your chest and sit your hips down onto your heels. Be sure to keep your arms stacked so that they are directly over the Base’s shoulders. Once you are up, continue holding hands. ? If you feel very stable and balanced, you may release the hands and wrap your arms around your own knees. Hold either opposite wrists or elbows. If you are feeling really brave, you may even close your eyes. “Less thinking, more feeling - that is true balance”
SHIN MOUNT 1 Round the upper back Hips to the heels Tuck your chin and breathe deep Wrap the arms around the knees Strong and straight legs Rest the shoulders Hips rooted into the floor
FLYER BASE Start by standing just behind the Base’s hips and connect hands with fingers forward. Step one foot onto the Base’s shin just below the knee, with the big toe inside the shin and the other toes on the outside. You will have your heel to one side or the other. ? Press through your palms to help yourself as you slowly step the second foot up. Avoid jumping as it will be much harder to stabilize. Step your second foot onto the Base’s shin in the same position as the first. It’s important that both heels are consistent with each other, either on the inside of the shin or on the outside. ? Keep hand connection until you feel stable enough to very slowly stand up. Make sure not to send the hips back. Stand primarily on the ball of your foot. Once standing, you may lightly squeeze your legs toward the centre. Start by lying on your back with both knees pulled into your chest, arms straight and stacked over your shoulders. Connect crab hands to your Flyer’s hands. ? As the Flyer steps up with one foot, you will need to give a push into the knee that they are stepping onto in order to avoid any tipping. You will also need to keep three strong points of contact to help the Flyer to step up. After you have the strong three points of contact, you may ask the Flyer to step the second foot up. ? Keep your hands connected until you feel a balance between both of your legs and you feel stable enough to release the hands. You may need to place your hands onto your own knees to help stabilize the position first. After the shakes stop, you may place your palms next to your hips on the floor facing down. ? “Let your Base become your foundation”
SHIN MOUNT 2 Chest up, look forward Arms firmly by your side Lean forward slightly Legs straight Heels one line with your knees Knees hip distance apart Keep your hips grounded
FLYER BASE Stand with your toes just over the Base’s shoulders. Grab hold of the Base’s feet with thumbs on the inside arch of the feet. Press the heel of the hand into the Base’s arch and all other fingers off to the baby toe side of the foot. ? Put about fifty percent of your weight into the Base’s feet as you step onto the Base’s hands, one foot at a time. You may continue to hold the feet until you feel safe enough to release hands (low Foot-to-Hand.) ? Make sure to stay still and not create sudden shifts in your body weight, as your Base will have to absorb it all through their body. While it is their job to be prepared for this, it is the job of both parties to make the other's job as easy as possible. As with all of Acro, it takes two fully-present people to tango. Have your elbows bent right next to your ribcage. Legs will be stacked over your hips, doing your best to keep your legs as still as possible. ? Stabilize as the Flyer holds your feet and steps onto your hands one foot at a time. Grip the heel of the hand to the arch of the Flyer’s foot. The peace fingers will run along the heel, the ring and baby finger will wrap along the outside, and the thumb will wrap on the inside of the foot. Keep your elbows planted while the Flyer practices releasing pressure from their hands. As the Flyer is standing, it will be important to squeeze your elbows into your ribcage to create more stability. If you and your Flyer feel steady, you may slowly release your legs down to the floor. ? “Use your bones and not your muscles”
FOOT TO HAND Chest up and look forward Arms firmly to your sides Tight bum, with a natural pelvis Legs straight 45-degree angle with your feet Strong upward pressure with your fingers Reach forward with your toes to keep the legs firm
FLYER BASE Start by standing on either side of the Base with your inside leg slightly in front of the outside leg. Connect your palms together with your Base’s hands, positioning your fingers forward. ? Once the feet are in place, you will lean your body over the top of the Base. Be sure to press your inner thigh firmly into the Base’s foot, keep your core strong, and avoid letting your hips sink toward the floor. The key to this posture is total engagement. Press your armpit down firmly as you seal the arms tight to lock you into place. ? Once lifted, bring your legs together, hook your feet onto each other, and squeeze your legs inward. Once you and your Base feel stable, you may release the hands and enjoy the flight. Place your foot closest to the Flyer on the upper inner thigh of their outside leg and place your other foot into their armpit. Be sure your outside leg is behind the Flyer's inside leg. Connect palms together with the Flyer's fingers positioned in a forward-facing grip. ? Shift both of your feet to be directly over your hips. Then, straighten your legs and pull your feet slightly away from centre. Opening the legs will help to spread the weight of the Flyer. ? Once you have lifted the Flyer and you both feel stable, you may release the hands. Be sure to avoid any forward or backward motion with your legs. Keep your legs stacked right over the hips. ? “Give pressure where you feel it”
SIDE PLANK Seal the arms tight Press your inner thigh firmly into the foot Press your armpit down firmly Open the legs to spread the weight Reach down with your fingers Use your arms to stabilize
FLYER BASE ? Stand over the Base’s shoulders with your toes resting about 6 inches away from them. Connect hands with the Base in the V-grip fashion. Next, place your shoulders onto the Base’s feet, with their toes placed just past your collarbone. ? Round the spine and tuck your chin into your chest. Jump and roll your hips above your shoulders using a downward push through your hands to help assist the momentum of this motion. ? Keep your knees into your chest until you feel more balanced and stable. Once you feel solid enough, straighten and extend your legs wide out to the sides. This is called Straddle position. Make sure to keep the legs fully engaged with toes pointed and reaching outward. Keep your elbows pulling in with a 90- degree bend. Start by lying on your back with your knees bent and arms straight. Connect hands with the Flyer using the V-grip (peace fingers in to the wrist.) ? Now place your toes onto the Flyer’s collarbone. As the Flyer hops up, it will be important to keep your knees bent, with your arms locked tight and straight, to help the Flyer make their way up. ? Once the Flyer is up in position, be sure you have your feet stacked above your hips and your hands stacked over your shoulders. Avoid overly squeezing the Flyer’s hands, as most of the weight should be centred over the legs. ? “Learn how to work less by stacking more”
STAR Toes reaching out Backs of the legs straight 90-degree bend in the elbows Pull the elbows in Use V-grip ? (peace fingers in to the wrist) Lock your arms tightly
FLYER ? BASE ? Stand one foot’s width away from your Base to transition to Side Star. Place the lower part of your hip into the Base’s foot and the palm just above the knee for support. ? Keep in mind that this move is not about speed - the jump actually makes it harder. It’s primarily a tilt and a shift of your body weight. As you feel the Base supporting your weight, start to lift the outside leg up toward the ceiling. ? Pour your weight into the foot. Then, slowly start to transfer the weight into your hand. As everything stays engaged, slowly start to tilt and you will notice that your bottom leg will lift naturally. ? Keeping the integrity of your body is crucial to the success of this posture, because any vibrations that you create, your Base will have to absorb. As you will keep coming back to through the course of your journey with it, AcroYoga is a continuous dance of balancing bodies and returning to centre along every step of the way. The key point here is for you to place your outside arch of the right foot at least four inches below the Flyer’s hipbone. That way, when their body weight is shifted, your foot will slide perfectly into the crease of the leg, where most of the body will be supported. Press your shoulders and back firmly into the ground. ? Keep in mind that you’re holding all of your Flyer’s body weight, so your leg needs to be centralized for maximum support. The more you push up, the more stable you will feel. Complete engagement will get you where you need to go with this posture. Pull the Flyer’s foot down to lengthen their body weight, making it more manageable in this case. ? Attempt twisting only if you have full control over the posture. Otherwise, keep the leg centred and your toes facing back toward your head. If you’re feeling shaky, take the arms out to the sides in a “T”-shape, and use your palms like anchor points to give you extra stability. ? “Feel the extension”
Flex the foot Grab the big toe with your peace fingers SIDE STAR Anchor your hand above the knee Pull the foot down to lengthen the body weight Press your shoulders and back down
FLYER ? BASE ? Slowly transition into Bird. Grabbing both hands, pivot all of your weight into the left hip as you lift your right hip off of the Base’s foot. Slide your right palm onto the Base’s Slowly support your Flyer’s transition into Bird. As they shift their body weight into the right hip, pivot your right foot 45 degrees and slide a bit deeper into the hip crease so that your toes are near their bum, to give maximum support. ? As you absorb your Flyer's weight, bend your knee. Wait until they transfer their weight to finally straighten the leg. Once their weight is stacked and you are both feeling comfortable, you are free to start to transition into Croc. ? Extend your left foot out to the side for your Flyer to hook their elbow and hold your calf. This point is critical, as your Flyer is about to transition all of their body weight onto one leg. Keep the weight stacked, meaning, the leg should be into the centre and pulling towards the midline to give you maximum support. Rotate the legs out ever-so- slightly and press your arm down for more stability. ? calf and guide your right elbow in towards your hip crease, just above the hipbone. ? Keep your left hand connected with your Base until you can bring your legs together. The main focus here is to push your hip into your elbow, which will allow your legs to hinge toward the ceiling. Make sure to keep everything tight and engaged to maintain lightness through the pose. ? Rotate both legs out to engage the glutes, keeping them straight and reaching out at a 45-degree angle. Reach out with the right hand to create stability. Only when you feel stable enough, start to release the left hand. Make sure it’s a slow release so that it does not jar your body. Maintain the pose for 10-15 seconds, and come back to Bird to slowly switch to the other side. “Balance is everything”
Crocodile Legs straight and reaching out at a 45- degree angle Rotate both legs out to engage the glutes Reach out to create stability Place your elbow above the hip bone Pull your hand up to create traction Slight outward rotation of the legs Press your arms down to secure yourself
FLYER ? BASE ? As you’ve noticed, a lot of the positions start with Bird - and this posture is no different. Keeping your core engaged, hinge at the waist and place your shoulders in your Base’s Bring your Flyer into Bird position. As they hinge at the waist and place their shoulders in your hands, make sure to give them lots of support with your toes. As their body weight is tilting forward, they will need extra support. ? Place the heels of your hands right on the meat of their traps, so that your fingers are close toward their scapulas. This will ensure that you keep your wrists safe and avoid compression. Have your arms extending straight with a slight outward rotation. ? Keeping your legs at a 45-degree angle, you will feel some resistance with the Flyer’s hands as they pull back and you push forward. This counter-balancing effect will be a key to your success in this posture. ? Make sure to keep shape and not move the legs forward or backward as it will affect your Flyer’s position. Once your Flyer is upright, give their arms a little bit of resistance to lengthen and stabilize the pose. To come out of the pose, let the Flyer pull your feet toward their hips and re-enter Bird. ? hands. Once you feel solid support, release your hands and place your palms on your Base’s shins, just below the ankles. Four fingers out, thumb in for maximum support. ? The easiest way to get into this pose is to slowly slide your quadriceps, then your knees, then your shins, down the feet, until your ankles are positioned on your Base’s feet. Once you feel the pelvis stacked, you can start to lift your legs slowly toward an upright angle. ? The more intermediate version of this is lifting your legs directly up from Folded Bird, and not moving your legs toward the Base’s feet. This takes a lot of coordination and control, and should be executed slowly and mindfully. ? Extend up through the toes, keep your legs straight, and your glutes squeezing as you pull the Base’s feet back with your hands while they reach toward the ground with their legs. Become the Candlestick. “Let the flame go higher”
Extend up through the toes CANDLE STICK Keep your legs straight Squeeze your glutes Pull back with your hands, reach forward with your legs Push up through the heel of the hands Legs at 45 degrees Arms straight, with a slight outward rotation
FLYER ? BASE ? From Folded Leaf, zip your legs together, point your toes, and very slowly place your palms just below your ankles. Keep your arms very strong, as they are going to be your anchor points, where most of the weight of your body will be supported. ? Try not to arch or round too much. This posture will work seamlessly if you keep the angles in the proper positions. Once you feel the Base shifting their palms into your biceps, press and meet their pressure to keep you stable. ? Look at your big toes and keep breathing. Try not to hold your breath, knowing that you can contract your muscles without tensing your nervous system. This is a key skill to develop in order to be successful across many postures and disciplines. Learn it and wear it well. ? To come out, you’ll feel your Base tilting you over their head. Keep your arms strong, and lightly place your toes a few inches above their head. Absorb through the feet. Evenly press through the hands as you stand and exit. Once you've supported your Flyer into Folded Leaf position, wait until they zip their legs together to internally rotate your feet, which will allow you to keep your Flyer balanced without dropping them. ? Wait until their hands are on their shins to reach toward their biceps. Now this is the important part. Keep your index fingers as the primary balance point, placing them just a bit above the elbow, with the other forefingers wrapping around for extra stability. ? If your Flyer starts to fall forward, you can always help them regain balance by simply pushing through the index finger to catch them. ? Once their complete body weight is over and fully released out of your feet, keep your legs close to their back for a few seconds, just in case they fall back and you need to catch them. If they are solid and stable enough, then you can take the full pose variation and extend your legs on the floor. ? “Within symmetry there is beauty”
PASCHIMO Let the energy transfer from the pelvis to the shoulders Legs straight Shoulders in line with the arms Feet press down firmly Fingers in, thumbs out Hands press up for stability Reach out of your toes Plug the shoulders down into the floor
FLYER ? BASE ? This posture begins by entering into Folded Leaf. Keeping your legs heavy to give your Base plenty of support, slowly start to take your hands through your Base’s legs. Bend the Keeping your legs out at 45 degrees, waiting until your Flyer has folded themselves completely over your legs. Once they start to reach their arms through your knees, make sure to give them plenty of room by bending. ? Placing your palms on their upper back, guide them toward spinal flection, a.k.a. a rounded spine. Once you feel that they have grabbed their ankles, turn your fingers out and press the heels of your hands into their mid-back, giving them a bit of pressure and then easing off for the therapeutic treatment. ? If you are getting ready to transition, place one hand closer to their neck with your fingers pointing toward their head and the other hand up above their lower back with fingers pointing outwards. Now, the next detail is very small, but it is the most important. The hand that's on their lower back needs to turn inwards, for you to prepare for the transition that’s coming up. This transition will be determined by the goal of this particular flow - the possibilities are endless. ? knees as your bring the soles of your feet together and take your palms to your ankles. ? All of this needs to happen while you keep a pike position through your legs. If they start to lift, your Base’s feet will start to slip and you will fall. ? Once you have contact through your palms on top of your ankles, hold lightly and try to relax the head, shoulders, and back. ? You will feel a gentle rock from your Base as they release your spine. Or, you could be a bit more active and tuck your chin, preparing yourself for the transition, whatever it may be. This will open you to a world of possibilities, depending on the unique convergence of you and your particular partner. “Find your inner bat”
RESTING BAT Hold the ankles Bend your legs deeply Keep the knees into your chest Round the upper back Move the Flyer forward Push the arms through the legs Lean your legs toward you
FLYER ? BASE ? Starting where we left off with our Resting Bat position, you are going to tuck your chin and wait until the weight is transferred into your Base’s hands. ? Think of yourself like a giant sticker, not a square box. You want to push into the structure that’s supporting you every millimetre of the way. So as the hands start to give you weight, make sure to pour all of that weight back to not only stabilize yourself, but to give your Base a sense of control. ? Once the rotation starts to happen, keep your chin tucked and knees wide. It's important that you don’t release your head, as, being the start of your spine, it holds a very important balancing point. Keep it round and engaged. ? Keep your breath steady and even. Try your best not to react to the small shifts within the pose. Let the Base do the stabilizing. Like all AcroYoga, this posture depends on the synergistic coordination of the Base and Flyer in order to keep it clean and complete. Once you have the hand position from Resting Bat, you will notice that the bottom hand closest to the neck is bent, and the top arm is straight. This will need to change. As you bend your legs, you will start to bend the straight arm and straighten the bent arm, until they are evenly bent and absorbing the majority of the weight equally. ? Once you are ready, you will start to twist your Flyer. The good thing is, if you’ve placed your hands properly, there is only one way you can spin. This way there is no confusion, because the other direction would only wind your arms. ? Rotate until your arms are completely stacked over your shoulders. Your fingers will be the stabilizers in this pose. The small shifts you feel your Flyer make you will absorb with finger strength and pressure through palms upward. ? This posture in particular puts a strong emphasis on the Base as the centre of strength while the Flyer moves through to the final expression. ? “Tuck it tight like a bat”
BAT Grab your ankles Bend your knees Press your back into the Base’s hands Round your back Spread your fingers out wide Keep reaching out for more straightening Legs straight for maximum strength?
FLYER ? BASE ? Progressing from Bat, maintain the pose, especially for this transition. Release the hands onto your chest. Extend both legs at the same time. It’s important that you don't do this one at a time, because the smallest shift in weight will throw you off of this pose and down onto your Base or the floor. Think like you’re moving through water, or doing Tai Chi. ? At the same time, bring the knees into your chest and extend the legs straight, keeping the ankles above the hips. Only when you feel stable, you can start to move your hands up so that you create an uneven box shape with your limbs. ? Pull your shoulders up while at the same time trying to push the point on your back where the hands are supporting you down. This means you will extend the muscles and fully engage. Make sure not to react to any vibrations. As with Bat posture, let your Base do most of the stabilization. The name of the game is slow and controlled. Your position doesn’t really change. But, adding extra movement will definitely test your stability and balance. ? Keeping your fingers wide and spread will give you the maximum amount of support. You can think of it as having extra real estate. And we all know real estate is expensive, especially here in Vancouver… So grab as much as you can. ? Lift your shoulders off of the floor while imprinting your back into the ground. If you want the advanced variation, slowly replace your hands with your feet. Placing one foot, transfer the weight. ? Keep the pressure even through the hand and the leg until both legs are on your Flyer’s back. Using your toes for stability, slowly straighten the legs fully. Make sure everything is stacked for maximum stability. ? “Engage and find ease”
BAT BOX Extend upward and point the toes Reach through fingertips Knees straight, legs stacked Legs extended directly over hips Reach shoulders up Wrists stacked over shoulders, extending through arms Lift the shoulders to engage the pecs
FLYER ? BASE ? Begin the transition with Throne. Slowly lean forward to give your Base a hand and a foot. Pick which side you’re going to and make sure to communicate with your Base. ? When you start the transition, your right hand will be with the right hand of the Base, and your left foot will be with their left hand. An easier way to think of it is “same side limbs.” ? As the Base releases their feet, you will have to transfer equal weight through the two points of contact that you still have. The key factor here is for you not to drop your centre of gravity, a.k.a. your pelvis. Try to keep your hips above your knees and continuously pour pressure into your foot to allow you to centralize the weight. ? Once you feel your Base’s foot wrap around behind your knee, hook your shin and foot around their calf, like you would in normal Throne. Once one side is complete, make sure to finish the other to come back to the original position. Try both sides to keep you balanced as a Flyer. Starting in Throne position, wait until your Flyer leans forward and presents you with their contact points. One hand will connect with theirs, same side; the other hand will connect with their foot (same side.) The beginning is very tricky, as your wrists are not stacked above your shoulders. They are instead in one line with your spine. So, be sure to prepare yourself to bear your Flyer’s weight and give lots of upward force to stabilize the wrists. ? Once the Flyer starts to shift most of their body weight into your hands, start to release your feet from Throne position. Rotate them until your wrists are over your shoulders. This is when you’ve reached halfway. Keep rotating in the same direction so that your wrists are stacked in the opposite way. ? Once you see an opening, place your foot behind their knee. Wait until the Flyer wraps their foot around your calf and use that leverage to rotate them back to centre. Let them hook the second foot around your second calf to complete the rotation. ? “Fasten your seat belts, we’re going for a ride”
AROUND THE WORLD Hips up in one line with the shoulder Reach away to keep your shoulder active Lift your knees into your chest Centre your weight evenly into the hand and foot Press upward through the bridge of the hands Straight arms Externally rotate the legs to fully engage the glutes Push up to lift the Flyer evenly Point your toes
KEEPIN’ IT SAFE ? ? It is very easy to jump into this practice and get overly ambitious with certain moves and transitions, especially when we see the end result being achieved with just two people. But what happens behind the scenes is rarely glorified or advertised. And that is the importance of a third person - the Spotter. Working with a Spotter is the vital stage that every AcroYogi needs to go through. To have a safety net that will be there for you and give you the opportunity to try new things while feeling reassurance. A Spotter’s job is just as important as that of the Flyer or Base. This job has its own titles, certain things that you have to be able to do to achieve success. ? As funny as this is going to sound, always expect your Flyer to fall. This keeps you alert and present with what’s going on, and will give the Flyer confidence to be able to commit to moves that they have never tried. When first spotting a new transition or movement, have a hands-on approach. Give strong and sturdy pressure through the entire sequence. When you start to feel safe as a trio, start to give less and less pressure, until you are hovering - what we call “Jedi Spotting.” Ever-so-present and attentive, you are there just as a precaution. ? There are wrong ways to spot, and this is where you neglect the points made up above. Examples of this include being easily distracted, non-communicative, &/or uncomfortable with holding people’s body weight. Know that just like any other, spotting is a skill acquired through time. Practice often and you will become a great Spotter that will be highly sought-after. ??
SPOTTING ?
THE RIGHT WAY THE RIGHT WAY ?
SHAPE-SHIFTING ? ? Now we take our practice outside of just L-basing and start to put a twist on two bodies and how they can move together. In this section of the manual, we will be exploring different shapes that utilize flexibility, strength, coordination, and power. These can be tied into a flow, a sequence, and/or performance, or simply just taught as separate components in a class or workshop. ? These shapes are designed to give you a different look into the practice of AcroYoga. Primarily, they serve to break us out of the traditional mold of “Base” and “Flyer.” We have included six shapes for you to play around with and explore. Keep in mind that the angles might be slightly different depending on your flexibility and strength, but the general feel of the shapes should stay the same to give you a good understanding of the balance points. ? Think outside the box. After you’ve completed these shapes, try to come up with your own and see how they integrate into your practice. They are meant to forge new neural pathways and give you a taste of creativity.
POSITION 1 ? POSITION 2 ? The person who’s taking the backbend should first set up into a Bridge where their shoulders and neck are on the floor, knees are bent, feet flat, and hips lifted. Once you feel a sturdy base, place your hands close to the ears like you’re going into Wheel. Press into the floor to lift your chin and firmly press the middle of your skull into the ground. ? Make sure to do this only if you have a strong headstand practice. Another option is to place your forearms to the floor like you’re doing a supported headstand so there is less pressure on your neck. Once your partner grabs your calves, lift your hips and counterbalance their weight by reaching backward with your chest, and, if you feel sturdy, with your hands while keeping the palms together. ? Once you’ve taken the shape, try to push your toes into the floor like you’re going to lift your heels - but keep them on the ground for maximum stability. Another tip to make this more steady: press through the big toes and engage your inner thighs, which will lessen the shakes inside of your body. Lay down flat on the floor with your back on the ground and your chest to the sky. Once your partner has assumed their full position, grab their calves from the outside with your fingers spread wide. Pull your palms toward your chest and then press them down to give you traction and energy that you will transfer for the necessary lift. ? Bring the knees into the chest. Elevate your pelvis as you raise your entire spine up at a 45-degree angle coming into your shoulders. Make sure to give constant pressure with your hands, as they are your anchor in this pose. ? If you feel comfortable and steady and your partner is not shaking, extend one leg at a 45-degree angle. If that is easy, extend both legs to achieve the final pose. ? To come out, bring the knees into your chest. Keep resistance with your hands. Lower your pelvis to the floor. Slowly release the hands and return to your original position. ? “Find balance in each other’s weight”