Download
1 / 13
130 likes | 486 Vues
SDSM Sample Distribution Shadow Maps. The Evolution Of PSSM. Quickie Overview of PSSM. http:// alextardif.com/ShadowMapping.html Goal is to hide artifacts resulting from wasted texture space Stable CSM Scene-dependent cascade divisions (smoother transitions from one cascade to another)

E N D
SDSMSample Distribution Shadow Maps The Evolution Of PSSM
Quickie Overview of PSSM • http://alextardif.com/ShadowMapping.html • Goal is to hide artifacts resulting from wasted texture space • Stable CSM • Scene-dependent cascade divisions (smoother transitions from one cascade to another) • Increase Texture Resolution • Blur the shit out of it
Goal of SDSM • Instead of hiding artifacts, lets make them borderline non-existent. • How? • By making sure we get the most out of our texture resolution. Focus on reducing the waste, and you’ll no longer have to worry about hiding artifacts, because in most cases you’ll get sub-pixel shadow resolution.
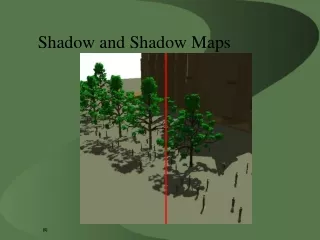
What Does it look like? Well damn, Alex, that looks amazing! Yes, yes it does.
So how do we make it go? SDSM operates similarly to PSSM, but with a few key differences… • As always, either start with a depth prepass for forward renderers, or your depth/stencil from your gbuffer pass
Next, we apply a min/max reduction of our depth buffer using a compute shaderby finding our samples and clamping our z-min and z-max to them. • Why? • We’re going to partition that space logarithmically • It’s been proven by several wicked-smart CS researchers that logarithmic distribution of shadow partitions produces the least chance of scene-independent error (and smoother transitions), but only if the entire space is covered. • By doing this z-reduction, we’re ensuring that our bounds are clamped to covered space. • It reduces the wasted space where we aren’t drawing anything.
As mentioned, the next step is to get the logarithmic split bounds based on the reduced z-depth. • Can be done CPU or GPU-side. In my case I’m doing it GPU-side. • Once we have our splits, we do a reduction on the bounds of each to confine them to our sample space, kind of like we did with the depth buffer. • This is where we save the most quality, as you can see below
Then, we create light view-projection matrices to wrap around these bounds just like we do in PSSM, and render shadow maps with them too. • From there you just apply those shadow maps like you normally would. • You can optionally convert them to EVSM (exponential variance shadow maps), or do some PCF, etc. • You can also add a blur pass • Most remaining artifacts seem to come from hard edges meeting curved edges • In my experience, a little blur cleans up 98% of these • You can apply a stable CSM algorithm like I mentioned before, but you shouldn’t need it because crawling should be almost non-existent. You’d probably just end up wasting texture space which would reduce your quality anyway.
Benefits • Shadows that look amazing • Smoother cascade transitions • Roughly the same or better performance when compared to PSSM • Tighter bound frusta allow for more aggressive culling • Better quality for your texture space allows you to use smaller shadow maps • Worst-case scenario is PSSM quality if the entire camera space is covered in shadow • Never happens, so…. yeah. You’re guaranteed to get better quality. • Scene-independent
Downsides • Because your light-space partition calculations are done on the GPU, you need to be a little conservative with your CPU-side frustum culling to ensure you see everything in your scene. • Can be solved by stalling the CPU until the GPU is done and read back the partition information to do culling. • Not as expensive as it sounds, but it’s still perf that you might not want to lose. • Use predictive culling based on the previous frame’s results • Can lead to issues for moving objects or a moving camera (obviously not a good solution for games) • SDSM has a somewhat tricky implementation when compared to other techniques.
Conclusion • This is the new standard that either not many people know about, or not many people use (at the time of writing this). Some games that use SDSM include: • Destiny • The Order: 1886 • Everyone should use this from now on. • The end!
Resource and Code IMplementation • http://visual-computing.intel-research.net/art/publications/sdsm/ • ^ This guy, Andrew Lauritzen, is the man when it comes to shadows. Credit for this presentation’s resources is entirely his, so be sure to check out his research for more details. • Source code for this will depend heavily on your renderer implementation, so I have not added my own code samples. However, his source is included in the link above so you can adapt it to your engine as well.