Download
1 / 25
250 likes | 406 Vues
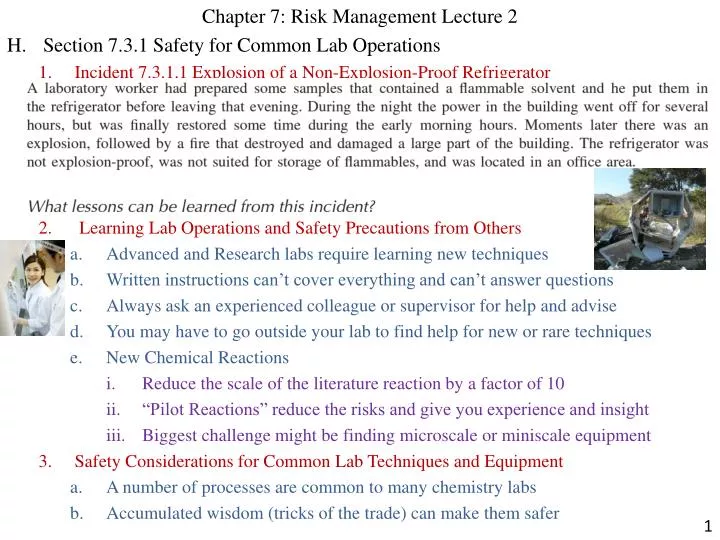
Chapter 7: Risk Management Lecture 2 H. Section 7.3.1 Safety for Common Lab Operations Incident 7.3.1.1 Explosion of a Non-Explosion-Proof Refrigerator Learning Lab Operations and Safety Precautions from Others Advanced and Research labs require learning new techniques

E N D
Chapter 7: Risk Management Lecture 2 H. Section 7.3.1 Safety for Common Lab Operations Incident 7.3.1.1 Explosion of a Non-Explosion-Proof Refrigerator Learning Lab Operations and Safety Precautions from Others Advanced and Research labs require learning new techniques Written instructions can’t cover everything and can’t answer questions Always ask an experienced colleague or supervisor for help and advise You may have to go outside your lab to find help for new or rare techniques New Chemical Reactions Reduce the scale of the literature reaction by a factor of 10 “Pilot Reactions” reduce the risks and give you experience and insight Biggest challenge might be finding microscale or miniscale equipment Safety Considerations for Common Lab Techniques and Equipment A number of processes are common to many chemistry labs Accumulated wisdom (tricks of the trade) can make them safer
Working Alone Working alone is not advised; instead use the “buddy system” Particularly if you are working with hazardous chemicals, someone in the lab should know what you are using and what the hazards are Help during an incident (fire, explosion, exposure to a chemical) can be vital to preventing a larger incident If you must work alone, consider postponing riskier experiments Sharps: glassware, needles, scalpels, etc…. Cuts and punctures are probably the most frequent lab incident Slow down. Use safety equipment if available. Consider alternatives Inserting a glass tube through a stopper is a common hazard Use an insertion tool, wear gloves, and lubricate the tubing to lessen risk Dispose of sharps appropriately—broken glass in trash will cut custodians Sharps used in biology may be contaminated, in addition to being sharp Weighing Balances and the area around balances are often contaminated during transfer Toxic chemicals should be weighed/measured out in a hood—move the balance Clean up after yourself and dispose of any spilled chemicals appropriately Wear the appropriate gloves Antistatic guns may be needed to reduce static charges which scatter powders Especially problematic in the dry conditions of a glove box
Mercury Thermometers Avoid their use if you can, but sometimes that is all you have Spilled mercury needs cleaned up quickly and properly by a trained person Mercury spill kits and mercury staining dyes can help ensure proper cleanup Heating Use spark-proof hot plates when heating flammables Many older hot plates are not spark-proof Organic vapors are often heavier-than-air and will “pool” and then ignite Working in a hood should help disperse flammable vapors Heating mantles are safe ways to heat Resister (wire) covered by nonflammable material Variable transformer controls current and thus temperature Oil Baths are not-so-safe Need an oil that won’t smoke or catch fire at your temp needed Silicone oil is often good up to 300 oC (check the label) Mineral oil is a bad idea above 200 oC—will catch fire Heat Gun = turbo-charged hair drier Use glowing hot coil to heat air: big-time ignition source Never use near flammables Run on “cool” (no heat, air cools coil) setting before turning off
Ovens Often used to dry glassware and/or drying agents Make sure all flammable solvents (acetone) have evaporated first (flush w/air) Most don’t have any exhaust so fire hazard as well as chemical hazard Don‘t use a mercury thermometer: heated mercury creates vapor if spilled Microwave Ovens Some labs use off-the-shelf microwaves for some heating • Not spark-proof: can’t use flammables • Flammables may catch on fire from heat without a spark anyway Don’t heat sealed containers: they can explode when heated Superheated solvents (water) can “explode” when disturbed Microwave Synthesizers are becoming popular • Designed to work with chemicals and to heat organic solvents • Follow all safety recommendations and study specific solvent behavior Sonicators 16-100Hz (high frequency) sound generated into a bath Used to clean small parts or to help solids dissolve Irritating sound can cause health problems: may want to insulate for sound Tissue in contact with the sonicating bath solution can be damaged
Chromatography = separation based on polarity Often use silica or alumina small particles as the stationary phase Small particles can cause lung damage upon repeated exposure Solvents used are often toxic and/or flammable Do the chromatography in the hood “Flash Chromatography” pushes solvent with compressed air • Have the right glassware and connections and use appropriate pressure • Glassware under pressure can break Distillation and Refluxing Reflux = heating a reaction at the boiling point of the solvent Distillation = purification of a liquid by boiling it away from contaminants Water cooled condenser often used to return vapor to liquid state Secure water hoses with wire or clips to avoid flooding (especially overnight) If water cooling is lost, reaction my dry out, overheat, boil off solvent Devices exist to turn off heating if water pressure is lost Distillation pot should always be placed on a lab jack • Overheating: lower lab jack to lower heat source • Without a lab jack, you have to grab hot, spewing glassware to remove
Recrystallization = precipitation of pure solid from a (hot) solution Often involves flammable solvents Remove all ignition sources Do in the hood to remove solvent vapors (toxic, flammable) Don’t add a solid to a boiling solvent: causes it to boil over Add solid to cool solvent, then heat to boiling, then add more solvent Extraction = transferring solute from one solvent to a more soluble solvent Separatory funnel used to get the layers apart Shaking the funnel mixes the two solvent and allows movement of solute Vapors generated and pressure builds up: vent to release pressure • Usually, the first extraction is the worst at building pressure: vent soon • Turn Separatory Funnel upside down and vent with valve at bottom Grease will seal stopper, but organic solvent dissolve grease Leaks are common—be vigilant, wear gloves, do in the hood Stirring Stirring reactions ensures effective mixing, distributes heat, prevents bumping Bumping = solution boils violently all at once, often splashes out Teflon stir bars on a stirring hot plate Motor driven stirrers with shaft into solution from top—viscous Spark-proof motors, stir reactions in hood to avoid vapors/aerosols
Centrifuging: separating based on density Bench-top models (500rpm) to large floor models are used (30,000 rpm) Get help from an experienced user of each specific centrifuge Minimize breakage by balancing tubes on opposite sides (use plastic tubes) If tubes break (tell by the noise), leave lid closed 1 hr for aerosols to settle Toxic or infectious? Use capped chambers for the tubes in case of breakage Vacuum Pumps Make sure guards cover any belts or other moving parts Exhaust into a hood if possible; oil collecting outflow traps are available Use cryogenic trap to prevent vapors from making it into the pump (and out) Refrigerators and Freezers Only store chemicals in explosion proof refrigerators • Internal light and thermostat switches eliminated or moved outside • Ordinary fridges will spark inside (and explode flammable vapors) ii. Never store food or drinks in the lab fridge
I. Radiation Safety Incident 7.3.2.1 Exposure to Airborne Plutonium The Radiation Safety Program The Nuclear Regulatory Commission requires a license to use Ionizing Radiation Radiation Safety Program (RSP) managed by Radiation Safety Officer (RSO) If you don’t comply: may be contaminated and may lose privileges to use Detecting Radiation Radiation can’t be detected by our senses, but can harm tissues Passive Detector: badges that react with radiation over time to estimate exposure Active Detector: direct detection by reaction to ionizing radiation particles/ray ALHLT 1021 RADIATION SAFETY AND PROTECTION A comprehensive course designed to provide the student with principles of radiation protection. Radiation-protection responsibility by the radiographer to patients, personnel, and the public is presented, as well as self-protection methods for personnel working around ionizing radiation. Dose limit and regulatory involvement are discussed, as well as radiation monitoring and measurement. F
i. Geiger Counter: ionizing chamber gas reacts with radiation (click or count) • Portable, can be used to pinpoint radiation source • May not detect particles (a, b) that have to pass through surface ii. Scintillation Detector: detecting material emits light when irradiated • Usually not portable, but more sensitive • Require collection of a sample to analyze ALARA = As Low as Reasonably Achievable Since radiation causes biological damage, goal is to minimize exposure NRC has strictly enforced maximum dose limits (5 rem/year) Instrument Radiation Sources X-Ray diffraction instruments (and others) generate ionizing radiation to function Special training and education required to operate Methods to minimize exposure Limit the time you are exposed Increase distance between you and the source (dose inverse square of distance) Use shielding between you and the source: • Lead is particularly effective • Charged particles (a, b) are more easily shielded because they interact
Open Source Radiation: solids or solutions containing radiation Monitor work area frequently for contamination Decontaminate and re-monitor if contamination is found Work in a specialized chemical hood if any chance of aerosols Use portable shielding when you openly handle radioisotopes a-particles don’t penetrate skin, shielding usually not used b-emitters: see-through acrylic shielding it effective (found in many labs) Lead aprons and/or lead bricks used with g-rays or X-rays Good safety practices and housekeeping: goggles, gloves, no eating, etc… Lock radioisotopes in secured container inside secured cabinet inside locked lab Laser Safety 1. Incidents 7.3.3.1 Eye damage from a pulsed laser
2. Incident 7.3.3.2 Shock from a laser power supply Laboratory Lasers LASER = Light Amplification by the Stimulated Emission of Radiation Single wavelength of light (red pointer = 650 nm; green laser = 532 nm) Very bright source of light Principle Hazard is Eye Damage High Voltage power supplies are often used with lab lasers MPE = Maximum Permissible Exposure (watts/cm2, or joules/cm2) Energy, wavelength, length of exposure, spatial coherence of laser determine MPE Old Laser Classes are still used (phased out starting 2002)
New Laser Classes phased in since 2007 Eye Protection from Lasers Never stare directly into the beam of any laser Work with Class 3B or Class 4 lasers requires eye protection No universal laser goggle (except a blindfold) Specific wavelength must be in mind when choosing eye protection Damage to retina most likely for 400-1400 nm, cornea damage 1400nm—1mm Lenses in protective goggles may be colored and reduce ability to see: keep in mind Laser goggles are not chemical splash goggles; may need different sets
Safety Measures for Handling Lasers Educate yourself and get advise from experience users if you will use laser Key switches and safety locks required for Class 3B and Class 4 Lasers Never shine a laser at a reflective surface (mirror) Get training in using the high voltage power supply often needed Only use laser pointers in Class 2 or 3R with power < 5 mW Biological Safety Cabinets Incident 7.3.4.1 Meningitis in the Lab Containment of Infectious Agents = Biosafety Exposure to a few molecules of a toxic chemical will probably not harm you. Exposure to just a few microbes may infect you. Emphasis: prevent exposure Aerosols produced in the biological lab can carry microbes and be inhaled/ingested
Fomite = inanimate object/surface acting as a point of exposure Ex: Glove to sink handle to bare hand to nose Hand-washing is particularly important in Biosafety Routine surface decontamination: remove organisms that can survive in air Dilute Bleach = 1:100 household bleach to water or Alcohol (EtOH, i-PrOH) 3. HEPA (High Efficiency Particulate Air) Filters Developed by the military to remove 99.97% of 0.3 mm particles from air Made from borosilicate glass fibers woven into a sheet; binder makes waterproof Folded into pleats to increase surface area Handle carefully: dropping may make ineffective Must be tested once they are in place Minimize dust/aerosols in the lab so not to damage Special procedures for “bagging” exposed filter BSC Classes P = Personal E = Environment Pr = Product NV= non-volatile V = volatile
Design Air drawn into the front of the hood goes downward through a HEPA filter Some is recirculated down the front of the hood: “curtain of air” protects “product” Some is exhausted through another HEPA filter back into the lab Goals Prevent “product” from being contaminated Protection of the “personnel” from product Protection of the environment from product Face velocity ~75-100 ft/min in fixed opening NOT Designed for chemicals Safe for chemicals only if vented outside Only use small amounts of volatile chemicals; otherwise, use chemical fume hood Canopy can vent chemical vapors and provide normal lab airflow Using BSC’s Get training by an experienced user in that lab Most have a gauge measuring pressure drop across HEPA Large pressure gain might mean clogged HEPA filter Large pressure drop might mean hole in HEPA filter Either one means the filter is not protecting you any more “Laminar Flow” = smooth air flow is required; impediments to flow are unsafe
Don’t go in and out often (disrupts flow); have what you need before starting Small arm movements, strait in and out are better than large or side-to-side BSL (Biosafety Level) determines what BSC you can use Work as far inside the BSC as you can Regularly decontaminate surfaces (bleach, alcohol); especially when turning on Let BSC run for a few minutes prior to use (get air flow stabilized) Use absorbent paper to contain any small spills or splashes; keep away from grill Biohazard bag for discarded items should be inside the hood Autoclave glassware and contaminated material to decontaminate them Certification and Testing BSC must be certified upon installation and tested yearly Should be a sticker with the last test date on it Maintenance requires sterilization first, to protect maintenance workers Formaldehyde, HOOH, or ClO2 vapors are used Selection of the decontamination agent depends on the organisms used
Protective Clothing and Respirators Incident 7.3.5.1 t-Butyllithium Fire and Fatality Incident 7.3.5.2 Misuse of a Respirator
Protective Clothing for the Lab Lab Coats or Lab Aprons Protects you from contaminants, splashes, exposures Always wear if handling hazardous material Easy to remove quickly if splashed on, with 2nd layer of clothes protecting you Never wear in public places—risk exposing others to hazards Wash at work (if possible) or separately at home Fire-resistant lab coats available if working with flammables • Nomex, Indura, or Excel have fire retardant in them • Consider fire resistance of your own clothes as well: cotton > synthetics Chemical resistant materials can be used for lab coats • Tyvek, Proshield, NexGen, etc… • Won’t keep all chemicals out (just like gloves) Respirators—The Last Resort Used where contaminated atmospheres are present to avoid breathing contaminants Chemical Fume Hoods should provide the necessary protection Labs should not require their use, unless something has gone wrong: spill cleanup Before you wear a respirator Using the correct one and trained in its use Medically Fit for respirator use and Respirator is Properly Fitted to you
Categories of Respirators Simple Masks Often Disposable (use once or for period of time and dispose of) N = not resistant to oil; P = resistant to oil Number indicating percent efficiency: Ex: N95 or P100 Used by healthcare personnel in emergency environments Particulate filters only, don’t protect against gases Not suitable for the chemical lab Don’t provide a tight fit around mouth and nose Cartridge Respirators Must provide a tight seal around the mouth and nose Forces all inhaled air through a cartridge filter “Half-face” cover mouth and nose; “Full-face” cover entire face OSHA has a color code for the cartridges and what they can be used for OSHA requires a “Respiratory Protection Plan” for industry including “fit testing” to ensure a proper seal around the face Only trained, authorized personnel should use respirators Generally applicable for industry; Lab conditions should not require them
Self Contained Breathing Apparatus (SCBA) Used by firefighters or HAZWOPER trained responders Clean air supply carried in a tank on the responder’s back Specialized training is required Few Scientists would ever use SCBA during their careers Before Using a Respirator Fitness, training, fit-testing: ignoring these can cause worse problem Not normal safety devices; generally used by experts as a last resort
Safety in the Research Lab Incident 7.3.6.1 Runaway Research Reaction Undergraduate Research Research is doing something that has not been done before Exciting, rewarding, frustrating, even dangerous Many new hazards might be encountered Supervision may not be as direct as in Laboratory Courses Direct experience with “doing science” rather than learning about science
Considerations When Performing Research Consult an experienced researcher when faced with a new reaction or technique Formal and Informal safety information is transmitted this way Attitude: When in doubt, ask. Safety culture in the research lab may not be ideal Routine hazardous experiments dull respect for safety By-passing safety measures in favor of “getting something done” If the lab doesn’t value your safety, you don’t want to work in that lab. You have to take responsibility for your own safety: insist on minimizing risk Synthesizing new compounds: NO ONE KNOWS HOW TOXIC IT IS Think about worst-case scenario, and then act to avoid it Even when “experienced”, go over your procedure for new procedures with others Safety Steps in Research Consider safety questions BEFORE you do the experiment Know where the safety equipment, exits, etc… are Understand how waste generated will be disposed of (not down the sink) Unattended reactions Post a sign nearby detailing reaction, start/stop times, contact number, etc… Make sure sufficient gas, cooling water wired up, secondary containment, etc.. Supervisor might allow working alone in lab, if what you are doing is “safe”
Process Safety for Chemical Operations Incident 7.3.7.1 Explosion from Scale-up of Reaction What is Process Safety? Process Safety = developing and understanding hazards of a chemical process and developing methods to safely manage and minimize the risks Chemical Industry uses this for new processes for industrial production It really begins in the lab Bhopal Tragedy an example of process safety gone wrong Basic Concepts: Process Hazard Analysis (PHA) Team of chemists, engineers, managers go over every step identifying hazards What can go wrong? is the approach they take Can’t manage the risk to a hazard you didn’t anticipate Runaway reactions are particularly looked for and attempts made to eliminate them
The Chemist’s Role in Process Safety Minimize hazardous chemicals Substitute or replace hazardous materials Moderate the conditions: lower temperature and pressure Simplify the process: fewer steps Ideal Industrial Process Chemical Steps High yield with little or no by-products Fast reaction kinetics Single phase (solution, gas, etc…) Ambient temperature and pressure Not strongly exothermic Insensitive to small changes in conditions Process Safety Management (PSM) OSHA established performance standards for industry following incidents in 80-90’s Performance standard to make sure PHA is followed Example: Failure to use PSM Synthron Explosion in Morgantown, North Carolina in 2006 Shows how PSM could have been more effectively used