Download
1 / 39
390 likes | 1.25k Vues
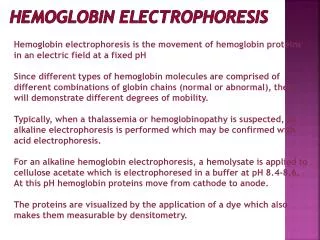
2-D Electrophoresis. 유미애. Introduction. “ Proteom ” = protein ( 단백질 ) + osm ( 전체 ) 의 합성어 Proteomics ( 단백질체학 ) 세포내 전체단백질을 연구하는 대형 스케일의 다단계 고속분석기술

E N D
Introduction “Proteom” = protein(단백질) + osm(전체)의 합성어 Proteomics(단백질체학) • 세포내 전체단백질을 연구하는 대형 스케일의 다단계 고속분석기술 • 단백체의 발현(expression), 기능(function), 구조(structure) 및 생합성 후 구조변형(post-translational modification: 이하 PTM), 관련 단백질간의 결합성 (protein-protein interaction)에 초점을 두고 질병의 진행과정과 연계시켜 총괄적으로 분석하는 기술 • 여러 steps에 의해 control 되지만 2-D electrophoresis는 가장 중요한 기술 중 하나임.
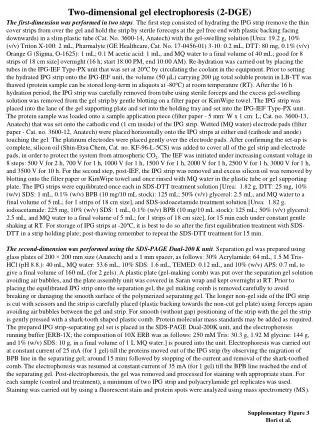
2. Expression proteomics Step 1. sample preparation Step 2. isoelectric focusing Step 3. SDS polyacrylamide gelelectrophoresis Step 4. staining of the gels Step 5. image analysis Step 6. mass spectrometry
Step 1. Sample preparation • Sample treatment는 2-D 결과에 중요한 영향을 준다. • Cell lysate 또는 tissue의 protein 조성은 2-D electrophoresis gel의 pattern에 반영될 수 있다. • Protein의 co-analytical modifications(CAM)은 피해야 한다. -> 다양한 protein과 protein의 interaction: complex mixture 발생가능 sample의 pre-purification: some protein의 uncontrolled loss 가능 • Protein의 loss와 modification을 피하기 위해 sample은 최소한으로, cold 상태로, 빠른 시간 내에 처리해야 한다. • 너무 많은 salt는 isoelectric focusing을 방해하고, gel상에 줄무늬가 생기는 pattern을 가져온다.
Protein 추출에는 lysis buffer를 이용한다. 1. convert all proteins into single conformation. 2. cancel different oxidations steps. 3. prevent protein aggregates. 4. prevent protein modifications. 5. get hydrophobic proteins into solution and keep them in solution 6. deactivate proteases. 7. cleave disulfide and hydrogen bonds: uncoil the polypeptides to expose all buffering groups to the medium. -> composition of the standard lysis buffer 9 mol/L urea, 4% CHAPS, 1% DTT, 0.8% carrier ampholytes, 0.002% bromophenol blue
Lysis buffer 조성 성분 역할 1. urea - neutral chaotrope로써 detergent - 대부분의 단백질 용해, 이온화 가능 group이 용액에 노출되게 한다. - 최소 8M (9.8M까지 가능) 2. thiourea -urea와 함께 쓰여 단백질의 용해를 향상시킴. - 5-8M urea에서는 2M thiourea가 적당 3. CHAPS - zwitterionic detergent, 2~4%(w/v)사용 - 단백질의 용해에 관여 - hydrophobic interaction으로부터 aggregation을 막는다. 4. DTT - reducing agent, 20-100mM 사용 - disulfide bond를 끊고 모든 단백질이 환원된 상태를 유지하도록 한다. 5. carrier ampholytes/ IPG buffer - charge-charge interaction으로 인한 단백질의 aggregation 최소화, 용해도 증가, 2%(v/v)까지 사용 6. Protease inhibitor cocktail (PIC) : proteolysis를 방지함.
Contaminants제거 • crude extract는 salt ions, phospholipids, nucleic acid에 의해 오염가능 -> disturbances 또는 background streaking 될 수 있음 • Nucleic acid: silver staning, gel의 acidic part에서 horizontal streaking but, IEF gel의 basic part에서 protein과 함께 침전되어 이후 DNAse와 RNAse 처리로 제거가능 nucleic acid를 brake하는 가장 쉬운 방법- sonication • lipid: 2% 이상의 detergent 사용 또는 침전법으로 제거 • salt: microdialysis 또는 electrophoretic desalting methods로 처리 - microdialysis kit: sample tube with cap, dialysis membrane로 구성 일반적으로 membrane cut off 8,000 Da 사용됨 - electrophoretic desalting: dialysis를 할 수 없는 경우에 이용 ex) protein in halobacteria lysate- salt가 제거되면 insoluble bovine vitreous protein 함유된 추출용액-desalting시 gel이 됨 IPG strip에서 IEF 하는 동안 desalting 가능 voltage: 5h, 100V로 제한
Pricipitation methods 1. ammonium sulfate precipitation • 시료의 양이 많은 경우 엄청난 양이 필요, 3시간 이상 소요. • 높은 농도의 salt 존재 시 protein이 solution에서 aggregate, precipitate 되기 때문에 투석 필요 • 대부분의 단백질 활성 유지 2. TCA precipitation 3. Acetone 또는 ethanol precipitation • 물 분자 제거, 수소결합 방해 • -20℃ 보관한 acetone을 시료의 4-10배 정도 넣고 원심분리 • 침전물의 acetone은 질소가스로 제거. 효소활성 유지 불가능 4. Precipitation with TCA in acetone
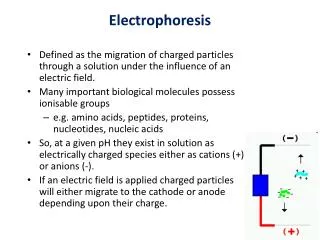
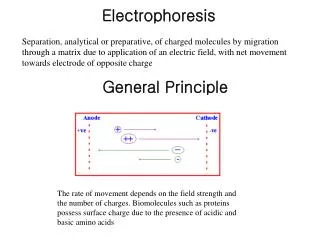
Step 2. isoelectric focusing(IEF) • protein의 isoelectric point (pI)에 따라 분리하는 방법 • Protein: amphoteric moleclues 이들 주변의 pH에 의존하는 positive, negative, 또는 zero net charge를 가지고 있음. • Net charge: protein의 amino acid side chains과 amino- , carboxyl-terminal의 모든 negative, positive charge의 합 • Isoelectric point (pI): protein이 zero인 net charge를 가진 특정 pH
Sample application = A = B 3 5 7 8 9 10 + pH gradient - Ex) A protein pI : pH 9 B protein pI : pH 5
pH gradients • 2-D gel을 이용한 protein 분리과정에는 1차적으로 IEF를 통한 pI별 구분이 이루어져야 함. • 이때 pI 구분이 이루어지기 위해서는 pH gradient가 성립되어야 함. • 전통적으로 Carrier ampholytes를 이용한 glass column외에 최근 immobilines을 이용한 IPG strip이 많이 사용되고 있음.
Carrier ampholytes • The synthesis of a heterogeneous mixture of isomers of aliphatic oligoamino-oligocarboxylic acids • 산과 염기성 모두 가지는 양쪽성 전해질 • 용질의 pI (Isoelectric point)보다 산성인 용매에 있으면 양전하를 띠게 되어 음극(cathode)쪽으로 이동하고, 반대조건에 있으면 양극(anode)쪽으로 이동 • Properties: High buffering capacity and solubility at the pI Good and reglular electric conductivity at the pI low molecular weight
IPG (immobilized pH gradient gel) • IEF의 한계 gel에 loading 할 수 있는 protein 양이 너무 적음(10 ug 단위) -> spot을 찾더라도 분석 불가능, 재현성 낮다 • 대안책: IPG (immobilized p gradient gel) • IPG pH gradient를 만드는 물질을 immobiline이라는 zwitterion 사용 IPG strip: immobiline을 함유한 polyacrylamide gel Immobilines : buffering group을 함유한 acrylamide 유도체 R기에 붙은 carboxylic-, amino group에 따라 acid 또는 base로 나뉨 CH2=CHOCOOH(acidic) + CH2=CHONH2(basic) Supporting film 사이에 acidic을 첨가하면서 점점 basic 첨가량을 증대시키면, 바닥에는 acidic pH가 성립되고, 위로 올라갈수록 basic 가 성립된 얇은 필름상 p gradient IPG strip을 만들 수 있다.
IPG 장점 • protein loading양 약 100배 증가(mg 단위) • Ampholyte에 의한 pH gradient보다 재현성 증가 -> IPG strip 상업적 생산으로 실험자 조작에 의한 편차감소 film-supported gel strip은 다루기 용이함 고정된 gradient는 sample 조성에 의해 영향 받지 않음 • Dry strip은 sample solution이용 rehydration 가능
IPG strip 선택 • Sizes: 상업용 strip-폭 3 mm, 두께 0.5 mm • 얇고 폭이 넓은 strip은 protein loading capacity가 크지만, SDS-PAGE에 의한 2차적 분리에서 protein overloading effect를 보일 수 있음. • 길이: 7 cm ~ 24 cm까지 다양 proteomic analysis에서는 가능한 높은 분해능 요구 -> 18~24 cm 사용 sample preparation method 최적화 -> 7 cm strip 사용 • Gradient type: pH 3 ~ pH 10까지 linear- , nonlinear gradient 분석하고자 하는 sample 특성에 따라 선택 ex) acidic protein 多 : pH 3~pH 7, pH 4~pH 7 basic protein 多 : pH 6~pH 9, pH 6~pH 12 간격이 넓은 strip 이용
IPG strip의 rehydration • Glycerol: electroendosmotic effects 감소 gel의 건조, urea crystallization 방지 • 첨가물들의 농도는 lysis buffer에 첨가되는 것보다 낮게 조절 1. urea crystallization 2. carrier ampholytes overloading-> buffering group의 충돌 pattern 불안정화 3. second dimension에서 여러 종류의 detergents 사이에 micelles 형성 -> staining 후, gel의 background가 dark, dirty해지는 원인 제공 Composition of the standard “rehydration solution” 8 mol/L urea, 0.5% CHAPS, 0.2% DTT, 0.5% carrier ampholyte, 10% glycerol, 0.002% bromophenol blue
1. Apply rehydration solution 3. Apply protein sample 2. Lay IPG strip 6. Place assembled strip holder on IPGphor platform and run 4. Apply oil 5. Place cover
Rehydration cassette: rehydration solution 다량 필요 다른 sample의 rehydration loading 불가능 • Reswelling tray: cassette technique에 의한 단점 보안 12개 strip까지 가능 정확한 rehydration solution volume 조절가능 •상업용 strip의 이론적 liquid volume : 7 cm – 125 uL 18 cm – 340 uL 24 cm – 450 uL •실온에서 실시 - 저온에서 urea crystallization • Cover fluid: paraffin oil 사용 strip 표면의 건조, urea crystallization 방지 O2, CO2흡수 방지
IEF conditions • 온도: running최적온도 20 최적온도 이하 – urea crystallization 최적온도 이상 – protein carbamylation • Electric conditions • IPG 는 매우 낮은 conductivity를 가짐 • strip당 current는 50-70u로 제한(높은 current에서는 strip 탈수 있음) • electric conditions은 voltage setting으로 조절 •처음에는 sample aggregation, cuploading에서 protein precipitation, 일부 strip에서의 overheating을 피하기 위해 low voltage로 진행하다 천천히 높인다.
8000 6000 4000 2000 1000 500 V 1 2 3 4 5 6 7 8 9 Time Step and hold Gradient + step and hold
Volthours (Vh) complete voltage load는 volthour로 정의 Ex) 5000 Vh = 5000V x 1시간 or 1000V x 5시간 충분한 Vh 가해지지 않으면 spot이 원형 X, Horizontal streaks 발생 고분자, hydrophobic protein 함유된 sample 경우 충분히 높은 Vh 필요 • Over focusing protein이 너무 오랜 시간 focused 되면, negative effect 발생되기도 함 - cystein oxidation으로 protein pI 변화 • Instruments 1. multiphor: 2 steps, hydration in reswelling tray -> IEF strip 12개까지 가능, 최대 voltage- 3500V 2. IPGphor: 1 step으로 처리가능, 최대 voltage- 8000V 14개의 각각의 strip holder로 다른 sample을 한번에 분석가능
Step 3. SDS(sodium dodecyl sulphate) electrophoresis • 분자량에 따라 polypeptide를 분리하기 위한 electrophoretic method SDS를 포함한 polyacrylamide gel에서 수행 • SDS: anionic detergent •약 1.4g SDS/protein g 비율로 polypeptide backbone 주변을 둘러싸 protein 변성시킴 -> negative charge •hydrogen bonds 파괴, hydrophobic interaction 방해, protein unfolding • DTT 사용: cystein residue 사이에 형성된 disulfide bond를 끊어 전체적으로 unfolding • 따라서 protein은 anode(+) 쪽으로 이동 • SDS와 DTT로 처리된 protein의 electrophoretic mobility는 protein의 분자 량에 크게 의존, gel상의 이동거리와 분자량은 반비례관계 • Sample의 분자량은 분자량을 알고 있는 표준물질로 확인
Polyacrylamide gel • Acrylamide 측쇄 기능기가 N,N’-methylenbisacrylamide 같은 2개의 기능기를 가지는 화합물에 의해 cross-linked되어 형성된 polymer • SDS-PAGE의 효과적인 분리범위는 polyacrylamide 농도와 cross-linking 정도에 의해 결정됨 • Bisacrylamide에 의해 생긴 gel은 gel 자체의 강도와 탄성을 유지하고 SDS-polypeptide가 통과할 작은 구멍을 형성 • 투명, 화학적 작용이 없으며 전기적으로 중성이므로 electroendosmosis 발생하지 않음
Pore size는 total acrylamide concentration T와 cross-linkig정도 C 의 비율로 control 가능 T = (a + b) x 100 / V (%) C = b x 100 / a + b a: acrylamide 양 (g) b: bisacrylamide 양 (g) V: volume (mL) : C 변화 X, T 증가 -> pore size 감소 C 증가, T 변화 X -> pore size 증가 즉, bisacrylamide : acrylamide 비율이 증가할수록 pore size 감소
Running Buffer • Buffer 조성: running buffer와 gel은 0.1% SDS 함유 25 mmol Tris base, 192 mmol glycine, o.1% SDS electrophoresis 동안, 음전하된 SDS, glycine은 anode(+)쪽으로, 양전하된 Tris-ions은 cathode(-)쪽으로 이동
Instrument; Chamber for SDS-PAGE • Flatbed system: 하나의 gel만 작동가능 IEF시에도 사용가능 Cooling이 한쪽 면만 가능-gel 두께 제한적 gel size 다양 • Vertical system: 여러 개의 gel을 동시 실시가능 SDS-electrophoresis만을 위해 고안된 장치 Cooling 양면가능-두꺼운 gel 가능 다량의 protein loading 가능 gel size는 glass plate size에 의존
Equilibration • IPG strip은 second dimension하기 전, SDS buffer를이용하여 완전히 unfolded, negative charge를 띠고 있는 SDS-protein complexes 상태에서 focused protein으로 전환시키기 위해 equilibration 실시 • Stock solution 2% SDS, 50 mmol/Tris HCl pH 8.8, 0.01% bromophenol blue, 6 mol/L urea, 30% glycerol 1차: stock solution + 1% DTT , 15 min 2차: stock solution + 2.5% iodoacetamide , 15 min * iodoacetamide: cystein의 free sulfer와 반응하여 acetamide를 붙임 protein의 disulfide bone 방치-> 거대분자 형성하므로, alkylation과 같이 SH기를 다른 분자로 치환
Running conditions for vertical gels • Electric conditions • electroendosmosis effect를 감소시키기 위해 처음 40 min은 낮은 voltage로 실시 • 불연속적인 buffer system 인 경우, 이동성이 높은 chloride ion이 gel에 함유되어 있기 때문에 초기 conductivity가 높다. • 온도: 25℃에서 가장 빨리 이동 • Quick run의 장점: resolution 및 detection sensitivity 증가
Step 4. Detection of protein spots • Staining- 2차원 공간에 protein들을 눈으로 식별하기 위해 염색하는 과정으로, proteomic에서 실험결과 해석에 중요 • 따라서 Protein 감지도 높아야 하고, spot 크기에 따라 protein 양이 비례되어야 하며, mass 분석 용이해야 함 • Coomassie blue staining • Zinc imidazol negative staining • Silver staining
Coomassie Blue dye (R and G types) • Coomassie blue는 ionic & hydrophobic interaction을 통해 protein과 결합 (coomassie blue의 sulphonic acid group과 protein의 basic residues 간에 ionic interaction 발생) • Detection limit: 30~100ng • 10-30배 범위의 단백질 양에 대해서만 linear response제공 • 저렴한 가격, 편리한 사용 방법, mass spectrometry와의 좋은 호환성 ->가장 널리 사용 Silver staining • 젤을 은 이온과 함께 포화시켜 결합이 약한 이온을 씻어낸 후 단백질과 결합된 금속 이온 환원-> 금속 은을 형성 • ng 단위보다 더 적은 양의 단백질도 검출가능 • 10배 범위의 낮은 linear range를 가지고 있고 단백질 검출 intensity면에서 20%의 편차가 있음
Reverse stain methods • Zinc chloride-imidazole를 이용한 염색 방법이 가장 민감 • 단백질에 Imidazole을 첨가하면 결합되지 않았거나 결합이 약한 zinc 이온은 zinc-imidazole 형태로 바로 침전되지만 단백질과 강하게 결합된 이온은 침전X -> gel상에서 명확한 단백질의 위치 구분가능 • 검출 한계는 방법에 따라 10-500ng, linear dynamic range는 10-100ng 방사능 동위 원소 표지 방법 (Radioactive labeling methods) • 방사능 표지는 3H, 14C, 35S, 32P, 33P, 125I를 단백질에 결합, 전기 영동을 한 후 필름을 이용하여 신호를 검출할 수 있는 방법 • 민감성 높지만 세포대사과정 중 세포사멸 유도가능, 인체유해 비경제적 -> 사용 감소추세
Step 5. Image analysis • 복잡한 2-D pattern을 육안으로 평가, 비교하는 일은 불가능 • Gel image를 scanner이용, gel spot을 digital data로 전환 -> analysis software 이용한 computer 분석 • Gel 상에 나타난 pI 및 standard molecular marker line 설정, computer 분석을 통해 sample protein의 pI, 분자량 파악가능 • Gel image를 기존의 database에 있는 image들과 비교 분석하여 protein expression pattern과 실험조건과의 상관관계 파악가능 • Reference gel을 설정하여 gel spot의 위치를 비교 분석하여 sample protein 확인가능
Step 6. mass spectrometry • 진공상태에서 하전된 ion에 힘을 주기 위해 자석, 전기장을 이용하여 질량을 분석하는 장치 • 따라서 분석하고자 하는 시료는 하전되거나 이온화되어야 함 • Mass analysis system은 시료도입계, 이온원, 질량 분석관, 검출계, 데이터 분석을 위한 컴퓨터로 구성
1. Sample introduction of inlet (시료도입부) 2. Ion source(이온화 하는 곳): 분자구조를 유지시키며 H+를 붙이거나 떼는 방법으로 이온화시킨다. 3. mass analyzer(m/z): 이온화된 분자를 질량대 전하비에 따라 분리 4. Ion detector: 이온화된 분자가 검출기에서는 전기적인 신호로 바뀌어 증폭 5. data system: 기기를 조절하고 분석 데이터를 처리하는 컴퓨터와 소프트웨어 부분으로 구분
MALDI-TOF(Matrix associated laser desorption/ ionization - time of flight)
Tandem Mass (MS/MS) Spectrometry : peptide를 fragmentation하여 sequencing하는 방법