Download
1 / 26
300 likes | 2.59k Vues
Good Dimensioning Practices. Goals Review the principles of good dimensioning Introduce additional dimensioning techniques Reference Technical Graphics Chapter 6. Dimensioning. Orthographic and Isometric Views define the shape and general features of the object

E N D
Good Dimensioning Practices Goals • Review the principles of good dimensioning • Introduce additional dimensioning techniques Reference • Technical Graphics Chapter 6
Dimensioning • Orthographic and Isometric Views define the shape and general features of the object • Dimensioning adds information that specifies • Size of the object • Location of features (e.g. holes) • Characteristics of features (e.g. depth and diameter of hole) • Dimensions also communicate the tolerance (or accuracy) required P. 2
Some General Guidelines • Start by dimensioning basic outside dimensions of the object. • Add dimension for location and size of removed features • Add general and specific notes – such as tolerances P. 3
Dimensioning Basic Shapes -Assumptions • Perpendicularity • Symmetry P. 4
Dimensioning Shows: A) Size B) Location and Orientation • ALWAYS give DIAMETER “ “ for full circles (360 degrees) and RADIUS “R” for arcs (less than 360 degrees) P. 5
Principles of Good Dimensioning • The overriding principle of dimensioning is CLARITY • Principles – not an infallible rule set, need to apply good judgment. P. 7
Each feature dimensioned once and only once Dimensions should suit the function of the object Principles of Good Dimensioning P. 8
Principles of Good Dimensioning • Attach dimensions to most descriptive view P. 9
Principles of Good Dimensioning • Angles as Right Angles Assumed 90o unless otherwise noted • Dimensions outside of object whenever possible P. 10
Principles of Good Dimensioning • Dimension lines aligned and grouped to promote uniform appearance P. 11
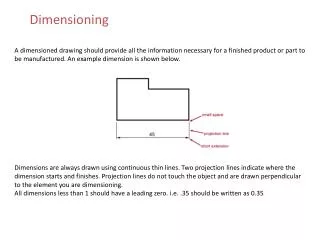
Principles of Good Dimensioning Correct Incorrect • Dimension and Extension Lines Outside the Body • Do not have Extension Lines cross Dimension lines. P. 12
Principles of Good Dimensioning • Dimension lines should be unbroken except for the number between the arrowheads • Space (at least) • 3/8 in. from object to 1st line • 1/4 in. from line to next line P. 13
Gap – object to extension line = 1/16 in. Extension lines 1/8 in. beyond dimension line Extension lines broken for crossing Principles of Good Dimensioning P. 14
f1.50 f1.50 Incorrect Correct Principles of Good Dimensioning • Leader lines used to dimension circles and arcs should be radial P. 15
Principles of Good Dimensioning • Positive Cylinder in longitudinal view, Holes in Circular View, n symbol before value P. 16
Principles of Good Dimensioning • Internal and external radii should be dimensioned with numerical value preceded by the symbol R (Note small cross for center.) P. 17
Principles of Good Dimensioning • Do a final check! • Every feature has been dimensioned once and only once • Make sure the numerical values are correct P. 18
Dimensioning Basic Shapes • Cylinders Positive (solid) Negative (hole) • Avoid dimensioning to a hidden line P. 20
1.00 2.00 .500 .500 1.25 .325 .250 Dimensioning Example Step 1. Dimension basic outside dimensions Step 2. Location and Size of Removed Features (Notch) LOCATION OF THE NOTCH SIZE OF THE NOTCH P. 21
General considerations in dimensioning • Fillets and rounds can be dimensioned in a “NOTE” e.g. “ALL FILLETS AND ROUNDS R1.000 UNLESS OTHERWISE NOTED” • When there are multiple identical rounds or holes, dimension one and include the number of holes e.g. 4 X R1.000 or 2 X Ф1.000 and so on. NOTE: You may see older drawings with letters TYP after the dimension. This indicates that all similar un-dimensioned features have the same dimension P. 22
Dimensioning Circular Center Lines • Circular Pattern Centerlines (Bolt Circles) P. 24
Special Surface Features Countersink Counterbore Spotface Boss P. 25