Download
1 / 27
270 likes | 806 Vues
Unable to Connect When your local system is Unable to Connect to the Accent Server, whether from a district-wide or local system failure, you will get a message asking if you would like to continue in stand-alone circulation mode?

E N D
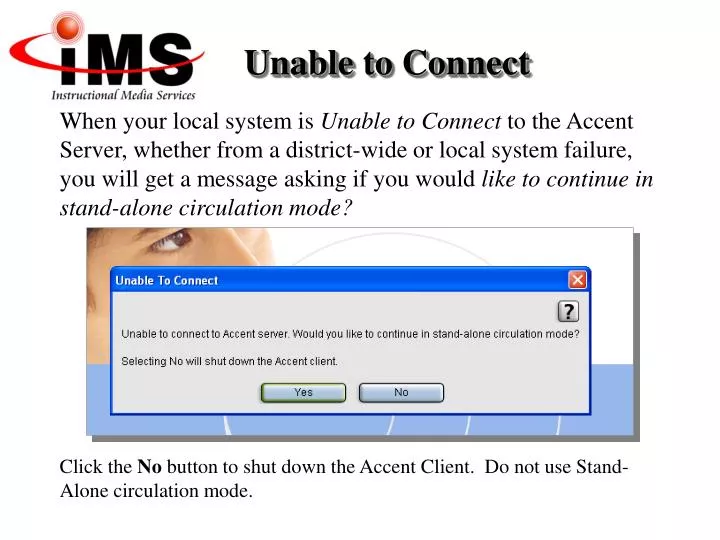
Unable to Connect When your local system is Unable to Connect to the Accent Server, whether from a district-wide or local system failure, you will get a message asking if you would like to continue in stand-alone circulation mode? Click the No button to shut down the Accent Client. Do not use Stand-Alone circulation mode.
Stand-Alone Circulation Options There are 2 suggested options for emergency circulation: • Manually, using cards and pockets or a list, or • Electronically, using an Excel spreadsheet, a Word document, or Notepad.
Using an Excel Spreadsheet Step 1: Download the Barcode Font: Use one the following URLs to download the IDAutomationHC39M barcode font. • For Windows OS: http://www.idautomation.com/fonts/free/IDAutomationCode39.zip • For MAC OSX: http://www.idautomation.com/fonts/free/IDAutomationFreeCode39FontforMAC.zip
Using an Excel Spreadsheet Step 2: Create an Excel spreadsheet or download the template from http://www.freewebs.com/shirleya/circulatingusingexcel.htm. With this template, you can use your barcode scanner to scan both the patron ID and the copy ID barcodes. If you manually type in the patron ID or copy ID barcode, begin and end the barcode numbers with an asterisk (e.g., *31112000155122*).
Using an Excel Spreadsheet The downloaded template includes 3 sheets within the Excel file. Each sheet is named for the corresponding circulation process, CHECKOUTS, CHECKINS, and RENEWALS, and has appropriately named columns.
Using an Excel Spreadsheet In the Checkouts column, on the CHECKOUTS sheet, skip a cell/row when checking out an item to a new patron. Accent should automatically discriminate the patron ID from the copy ID, but this will let you know that you are starting checkouts for a new patron. Skip a cell/row when checking out or renewing for a new patron.
Using an Excel Spreadsheet Use the RENEWALS sheet the same way as the CHECKOUTS sheet. If the patron does not have the item they want to renew with them, put the title of the item on the RENEWALS sheet instead of the copy ID. You should be able to identify which item to renew in the Patron Status screen with the title information.
Using an Excel Spreadsheet During checkout and/or renewal, it is best to use the patron’s ID. However you can input the name on the spreadsheet if you choose. In order for the scanner to scan the barcode (name) into Accent, use no spaces when entering the name into the cell. Make sure you have the complete name and/or know the patron to ensure that when you input this information into Accent, you will be checking out/renewing the library material to the correct patron.
Using an Excel Spreadsheet Change font in the cell’s Checkouts column to IDAutomationHC39M. In the column (e.g., Checkouts) that receives the scanned barcodes, change the barcode font to IDAutomationHC39M. This is the font you downloaded.
Using an Excel Spreadsheet To save the file at the end of the each day, click on File in the menu bar, then choose Save As… Name the file using the date of the transactions (e.g., 3-28-08Circ.xls). Print the sheets to use for inputting the circulation transactions when Accent is able to connect to the server.
Step 3: Input Circulation Transactions into Accent It is important to process the circulation transactions’ sheets (Excel spreadsheets) in date order, processing the file for the earliest date first. For example, process: • the 3-28-08Circ.xls file, then • the 3-29-08Circ.xls file, then • the 3-30-08Circ.xls file. Within each file, process: • Checkouts, and then • Check Ins, and finally • Renewals.
Process Checkouts • On Accent’s Check Out screen, scan the patron’s barcode from the Excel spreadsheet in the Enter a Patron ID or Name field. • Click the Find Patron button.
Process Checkouts On the patron’s Check Out screen, you can change the due date for the items you are checking out using the date of the file to calculate when the items would be due. Click on the Due Date button.
Process Checkouts On the Special Due Date pop-up window, click on the desired due date. For example, for the file named 3-17-08Circ.xls the due date would be 3/31/08. If the option All patron checkouts/renewals until special due date cancelled is chosen, the date will remain in effect until you change it. Click the OK button.
Process Checkouts On the patron’s Check Out screen, scan the copy barcodes from your sheet into the Enter a Copy ID field.
Process Checkouts When you come to a blank cell/row on your CHECKOUTS sheet,
Process Checkouts Click the Next Patron button on the Accent Check Out screen. Repeat the process to check out the remaining library material to the corresponding patrons, changing the due date as you proceed through the dated files.
Process Check Ins When checking in the items from your CHECKINS sheet, you can use either regular Check In or Fast Check In. For either method, you can change the check in date to prevent Accent from assessing fines. To change the Check In date: Click the Change Date button on the Check In screen.
Process Check Ins Choose the date that corresponds to the first date of the outage or the actual date you checked in the items on your Excel sheet. On the Change Check In Date pop-up window, click on the chosen check in date. The date will remain in effect until you leave the Check In screen. Click the OK button.
Process Check Ins: Regular Check In On Accent’s Check In screen, scan the barcodes from the CHECKINS sheet into the Enter a Copy ID field.
Process Check Ins: Regular Check In On Accent’s Check In screen, scan the barcodes from the CHECKINS sheet into the Enter a Copy ID field. When using regular check in, you will have to deal one-at-a-time with windows that pop-up for items that need special handing, e.g., fines, holds, items from another library, etc.
Process Check Ins: Fast Check In The advantage of using Fast Check In is that it is (1) quicker (no pop-up windows) and (2) you will have a print out of the items that need special handling, e.g., holds, fines assessed, etc. To use Fast Check In: On Accent’s Check In screen, check the box next to the Fast Check In option. Scan the barcodes from the CHECKINS sheet into the Enter a Copy ID field. When all items are checked in, click the Print Exceptions button.
Process Check Ins: Fast Check In Handle each exception as appropriate from the print out of the Check In Exception List.
Process Renewals Click on the Patron Status button. Scan the patron’s barcode (name or patron ID number) into the Enter a Patron ID or Name field.
Process Renewals Highlight the item that matches the copy ID or title on your RENEWALS sheet. Click the Renew button.
Process Renewals RENEWALS Renewals 5. When you come to a blank cell/row on your RENEWALS sheet,
Process Renewals Click the Next Patron button on the Patron Status screen. 6. Repeat the process to renew the remaining library material, changing the renewal date as you proceed through the dated files.


![[ Unable to print this part. ]](https://cdn1.slideserve.com/3541576/slide1-dt.jpg)