Download
1 / 38
380 likes | 738 Vues
You may have a simple aim and shoot camera so can you take good pictures ? ... With a digital camera, knowledge of image editing software is ...

E N D
1. Railfan and the digital camera. The easy way to take good railway pictures.
2. Enjoy ! Railfanning and the associated photography is meant to be fun.
Taking pictures is one of the most potent forms of expression that the railfans have.
We capture a slice of time � an event that may never occur again.
Instead of enjoying the process, are we getting caught up with the Aperture, F stops, ASA setting, Focus and other technical bits ?
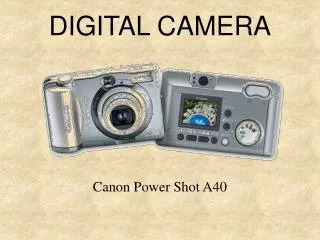
3. Do you Aim and Shoot ?
While all the terms mentioned before are important, but do you have to know all before taking a single good picture ?
You may have a simple aim and shoot camera � so can you take good pictures ?
Having a good camera is only a part of the story !
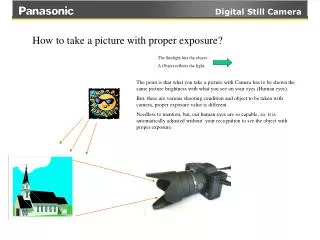
4. The bad news first, As a railfan photographer you have very few controls on your subject.
Light may be wrong,
Time may be wrong,
The trains that take you to and back to that special place may be at the wrong time,
Vantage point may not be available,
RPF and other unsympathetic people may be around you.
5. More bad news�. Your camera may be slow.
Slow from off to on,
Slow from wide to telephoto and vice-versa.
Slow from shot to shot,
Slow for the flash to charge,
In any case, flash cannot always be used as it may attract the attention.
6. Taking good pictures - As our parents wanted us to � STUDY !
It is all about good composition.
It is about relationship of shapes, lines, colours and shades.
Study the composition with a �lazy eye�.
Let this lazy eye snap the objects that you want to show and not the unwanted bits.
Be aware of what you like about a picture.
Be aware of what you want to see in a picture.
7. Study ! Look at as many pictures as possible.
Look at trains pics an say sites such as www.railpictures.net etc.
All the pictures on these sites have been filtered by a strict process, so they meet a technical standard.
Again � analyze what you like about a certain picture.
I like Shanky�s pic of the WDG 3A at Hitec City >
9. Be prepared - Equipment Know your camera, the controls and the response time.
Be prepared � adequate batteries, spare batteries.
Large memory card � the largest you can afford. Make sure that the card is empty before you come for a railfanning session.
A good camera bag � that allows you to flick the camera out from storage without fumbling.
10. Be prepared � Yourself Adequate rest. One tends to lose enthusiasm when tired.
Good shoes, clothes, sun protection.
Food and water.
A knowledge of the area � you may have to ask around � as Ashish says � He who has a mouth would find Rome !
A knowledge of the timetables.
Be prepared to take the EFFORTS more than the RISKS.
11. Be prepared � in your mind Continuously visualize the scene against the changing background.
Even if you are not with a camera, keep an open eye (and mind) about interesting locations to shoot railways against � train your mind to be framing images all the time.
Be aware of the background in a picture � it may be good or it may be bad !
12. Know your camera�s response against the train�s speed � anticipate how many pictures would be possible before the train leaves the frame.
Choose an interesting place off the track � be ready for that special angle when the train goes past � there would be just one of these opportunities!
Ensure that the date stamp in the camera is OFF.
Take as many pictures as possible and shoot continuously!
Shoot in the maximum possible size. This is very important.
Do not shoot in the B&W or Sepia mode � those effects can be added later. You may need the colour image. Be prepared � Camera tips
13. The best pictures of trains are from the ground � not door or window shots. Be prepared to go out there !
Try to capture the train against an interesting background � a wall, flowers, trees, cutting, mountain, water.
Do not shoot only the zoom, use wide also. Keep in mind the time taken for a camera to shift from zoom to wide.
Pay attention to the catenary and signal posts !
Avoid shooting one�s own shadow.
Be prepared � Camera Tips
14. Keep the camera steady while clicking.
Keep the camera steady till the shutter has re-closed.
Use the flash if required to get rid of shadows in the picture � this may be needed in the bright sun also.
Practice taking night shots without flash by keeping the camera on a surface.
Use a small timer to fire the shutter in the night shots. This timer (~2 seconds) overcomes the shake caused by the operation of the shutter button.
You may not be able to use the flash for the macro shots � the excess light would washout finer details.
Treating the camera
15. Anticipate the events - at what point will the driver notch up, or switch on the headlamp or when will the four flags, Crew, Under guard, Guard and SM, show ?
Build a series of pictures � write a story linking these pictures in your mind.
You could take notes using the camera.
Participate in the passage of the train � wave at the crew to thank them for that special pose. Wave at the children in the train too ! Anticipate/Participate
16. Light source Early morning and late evening light is the best for shooting pictures.
Be aware of where the light is coming from � maybe take advantage of the light and shadow by shooting the train as it comes into light.
Example of an against sun, morning shot, with train coming into a light patch. ->
18. As mentioned before � shoot as many images as possible in the largest size.
The large image then can be �cropped� to make more sense of the composition.
The large image size would allow deletion of the irrelevant bits in the picture, thus improving the focus on the primary objects.
Cropping would also improve the composition of the picture � the next image is the uncropped version of a picture followed by the cropped version. Cropping
21. After Cropping � �Resample� the image to a smaller size � keeping the Horizontal dimension to 1024 pixels or the Vertical dimension to 768 pixels.
This would reduce the size of the file.
Resample
22. Unsharpen This technique is used to actually sharpen the picture.
The JPG image tends to blur after every manipulation � �unsharpening� brings out the edges, giving that special finish to the picture.
The next picture is the original image followed by the �unsharpened� image; notice the increase in detail in the second pic.
25. Another example of Cropping The next picture is the uncropped image opened in Paint Shop Pro.
Next is a screenshot showing the process of cropping.
Next is the cropped image itself.
Last is the cropped + unsharpened image.
30. Post shooting See all the pictures in a slide show on a large monitor.
Expect only 10 % or your pictures to be good.
Identify the pictures that should be displayed � Every good picture does not have to be uploaded.
Be very disciplined in the amount of pictures to be uploaded.
Process the pictures � crop, resample, unsharpen.
Write the description with the fullest details.
31. Software to be used With a digital camera, knowledge of image editing software is mandatory.
Learn Photoshop. If that is not possible use a lighter freeware like PaintShop Pro 4 or Ifran View etc.
Aim to learn advanced techniques for removal of unwanted objects and for correcting the levels.
32. Removal of unwanted objects The following two images are examples of an unwanted objects.
The second image is kindly provided by Prakash Tendulkar.
35. Correcting levels