Download
1 / 21
210 likes | 349 Vues
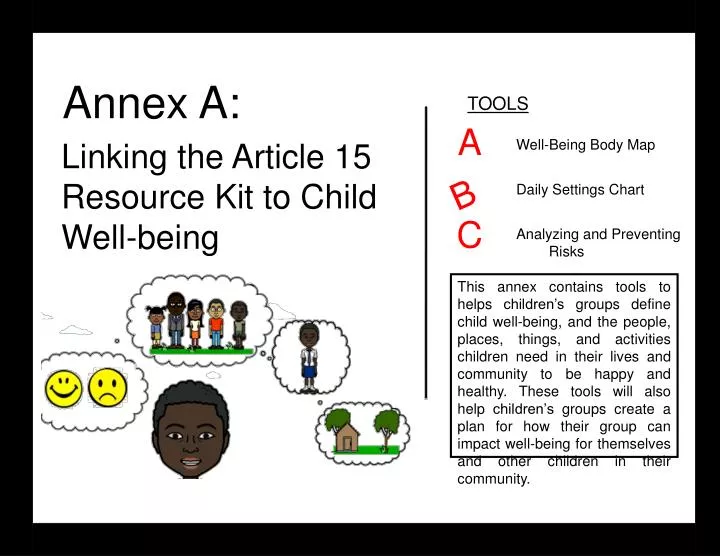
Annex A:. TOOLS. A. Linking the Article 15 Resource Kit to Child Well-being. Well-Being Body Map Daily Settings Chart Analyzing and Preventing Risks. B. C.

E N D
Annex A: TOOLS A Linking the Article 15 Resource Kit to Child Well-being Well-Being Body Map Daily Settings Chart Analyzing and Preventing Risks B C This annex contains tools to helps children’s groups define child well-being, and the people, places, things, and activities children need in their lives and community to be happy and healthy. These tools will also help children’s groups create a plan for how their group can impact well-being for themselves and other children in their community.
A few things to know about Linking theArticle 15 Resource Kit to Child Well-being… What do we mean when we say Child Well-Being? Child well-being is a term used to represent the people, places, and activities that make you a happy and healthy child. Facilitators should keep in mind… 1 2 All of the tools in this module ask the children’s group to separate into smaller working groups. It may be best to keep these groups around 6-8 children, with one adult facilitator per group to allow each group to go at their own pace. Afterward, small groups may come together to discuss their own work. Remember, the role of adult facilitators is not to give children ideas or answer for them. Rather, adults should have patience and understanding to help children develop their own ideas and find answers for themselves. 3 Also, children may bring up sensitive issues. Adult facilitators should help the group create a safe space for discussion and connect children with the right support when needed.
How much time is needed to complete all the tools in this annex? Each of the tools in this annex may be used on their own, but are best used together after exploring the other tools in the Article 15 Resource Kit.It is important for children’s groups to think deeply about how they organize before looking at how the group supports member’s well-being. Below is a suggested plan for children’s groups to follow and adapt depending on the needs of the group, how often a group meets and how much time is available for each meeting. Please look at Module 1 – Introduction to the Resource Kit – for more suggestions on planning meetings around the use of these tools. • Day Three • Total Time: 3-4 Hours • Tool CAnalyzing and Preventing Risks • Tool 5 Re-Scripting Drama • And/Or • Tool 6 Vision Tree Day One Total Time: 5 hours Tool 3Good Group/Bad Group Drama Tool 4 ‘H’ Assessment Tool 10Organizational Diagram Tool 11Decision-Making Chart Day Two Total Time: 4 Hours Tool AWell-being Body Map Tool BDaily Settings Chart
? A Well Being Body Map ? Key Question: ? • What do children need to be happy and healthy? Steps SET UP:Prepare small group working stations by taping large sheets of paper together on the floor. If space allows, spread out the stations for working groups to talk and interact without distracting other groups. OBJECTIVE 1 3 To identify the characteristics of a happy and healthy child as defined by the children’s group members. 2 If possible, use a large room for this activity. Allowing each group to have ample space will help members focus on their own working group, rather than be distracted or peeking at other groups’ body maps. MATERIALS Large roll/sheets of paper and colored writing utensils DIVIDE: Split in to small groups of 6-8 children and gather around the prepared work stations. TIME 2 hours PREPARE: Each small group should draw a figure of a child on their piece of paper. They can do so by having one group member volunteer to lay on the pieces of paper and all other members draw an outline of his/her body. 22, 23
DISCUSS:As a small group, discuss what is needed for a child to be happy and healthy. Start the discussion by focusing on individual parts of the body, such as: Eyes: What does a happy and healthy child need to see with their eyes? What do they not see? Head: What does a happy and healthy child think about? What do they need to know? DISCUSS:Next, discuss what a child needs to be surrounded by in his/her environment in order to be a happy and healthy child. For example: Good Toilets Trees and Flowers It could be helpful to insert different group member’s names in to the questions when having the above discussion in order to make the concepts more personal. For example, “What does Augustine need to be a happy and healthy child? What does Rose need in her environment in order to be happy and healthy?”
DRAW:Write and or draw your responses to the discussion on your group’s figure. Know about our rights and responsibilities Not see violence Say things that are important without insult Hear good things about ourselves Good peer relationships Good Food Good Toilet Safe environment Play Fruit Trees If members of your children’s group cannot read, encourage them to draw! Or, if they are uncomfortable drawing, make sure to have someone in the group writing down their ideas.
PRESENT AND DISCUSS:Each small group should choose a representative to share their small group’s body map with the larger group. Once each group has presented, discuss the following questions: • What aspects of well-being were similar among all groups? • What ideas stand out as different? • Are their any additional ideas for what makes a happy and healthy child you want to add? When choosing someone to present, think about picking a member who normally does not get a chance to speak during meetings. Everyone deserves a chance to have his or her voice heard! NEXT SECTION STEPS FOR CONNECTING THIS TOOL TO THE DAILY SETTING CHART COMBINE:Combine the ideas from each small group’s Well-being Body Map in to one comprehensive map for the group to have and use in later exercises. Use one map as a ‘base map’ and then add any additional ideas about well-being from other groups to that map. You can also use the base map to add new ideas brought about during the discussion. Ask the group if they are in agreement with this new, combined map.
EXPLAIN:All the ideas presented on each body map are important; however, depending on how much time the group has to complete the Daily Settings Chart activity, not all ideas can be discussed. Therefore, the following steps will help the child group vote on the ideas members want to talk about in more detailduring the Daily Settings Chart activity. DECIDE: Look at your group’s body map and think about the 5 ideas you want to talk about the most. Decide on your choices in your mind. Your group can decide how many ideas you have time to discuss. We are using 5 just as an example. VOTE: Each group member should be given 5 colored stickers. Ask members to place one sticker on each idea on the body they would like to discuss in the next activity. TALLY VOTES:Look at all of the stickers and count which ideas have the most votes. The top 5 - 10 choices will be those discussed in greater depth during the Daily Settings Chart. More than 10 topics may be difficult to discussed in one session. A NOTE ABOUT VOTING. Different colored stickers may be used to show differences between members’ opinions. For example, one color sticker can represent boys’ votes and a different color for girls’ votes. This helps show what topics are more important for boys versus girls. Alternatively, different color stickers may represent general members and executive members. In general, this is a great way to understand the opinions of all group members and may be used as a voting method for any activity that requires narrowing down the number of ideas or topics discussed.
This is an example Body Map from the Bumpe Kids Club in Sierra Leone. Here they combined their small group body maps on to one and voted on their collective ideas. This example also shows how colored stickers were used for voting, but you can use anything! You could use colored markers, or natural resources such as stones and leaves. For example, instead of girls getting green stickers and boys getting blue stickers, girls could use stones and boys could use leaves.
? Daily Settings Chart ? B Key Questions: ? • What are the different settings that impact well-being in children’s lives? • How is our children’s group unique to the other settings in supporting child well-being? OBJECTIVE Steps 1 3 Identify how daily settings in children’s lives impact their well being. 2 EXPLAIN:This activity will help the children’s group better understand how the different settings in their lives help or hinder them from being happy and healthy. For example, the opportunities to build relationships with other children and with adults may be different in your children’s group than it is at home with your friends and family, at school with your classmates and teachers, or in other settings. The Daily Settings Chart will help everyone learn which settings are best for different aspects of their well-being MATERIALS Large flip chart paper, markers, sticky notes and colored stickers BRAINSTORM: Brainstorm a list of places where you regularly meet with other children. Below is an example of settings brainstormed by the Bumpe Kids Club in Sierra Leone. TIME 90 - 120 minutes 12 21, 23
Remember these settings can be more than just physical places. Rather, they are situations during specific times that you have experiences with groups of children and adults. Also remember that these are examples. The settings for your children’s group will likely be very different based on your specific cultural context! CREATE:Create the Daily Settings Chart using the list of daily settings the group brainstormed, along with the top ideas chosen from the Body Map Tool voting process. a. First, list the daily settings across the top. b. Next, return to the ideas generated during the Well-being Body Map. List the ideas for a happy and healthy life down the left column. Annex A – Page 11
EXPLAIN:Explain the overall voting process of the Daily Settings Chart. Be sure to explain how members will be voting for the setting that is “the best” for experiencing the specific idea in the left-hand column. For example, “Where is the best setting to have good relationships with adults?” Explain that each group member will be given colored stickers, one sticker per idea of well-being. If the left-hand column has 10 ideas, each member should have 10 stickers. Asa group, members will go to the chart and place their vote one idea at a time. Instead of asking members to vote for the setting where they experience “the best” of a specific idea, it might be better to phrase the question as in which setting they experience “the most” of something. For example, “Where do you have the most good relationships with adults?” This asks the quantity of good relationships, rather than the quality of relationships asked in the question, “Where do you experience the best relationships with adults?” Either may be used depending on the group’s preference. DECIDE: Go through each idea of well-being one-by-one. Allow each group member time to make their decision before being asked to place their sticker on the Daily Settings Chart. One way to pace the process is to read the question about the idea and listing each setting. Facilitators might say, “In which setting do you feel you have the best relationships with adults? Is it the children’s club? Is it the church? The school? The football field?” It is important to make sure children decide and vote for themselves. Limit discussion between group members that may influence decisions prior to votes by spreading out seating arrangements. However, some children may need help from others if they cannot read or have questions about the process. Additional facilitators may need to sit next to children who need help and ensure each child places their vote in the intended box.
VOTE:Ask all the children to walk up to the chart and place their vote for the setting of their choice at the same time. Asking all members to go up together limits members making choices based on what they see their peers’ choices. Make sure the stickers are placed in the appropriate row for the idea that is currently being discussed. Adapt the voting process as needed to the group’s specific needs. Giving one color sticker to boys and a different color to girls helps to see if boys and girls vote for differently. Instead different representing gender, different colors could represent roles within the club, such as general members and executive members. This is a great way to better understand the opinions of all group members. = Boys = Girls Adult facilitators or group members might circle groupings of votes to help members see patterns. When circling groups of votes, it may be helpful to explain the pattern with a comparative sentence. For example, “Children in the group feel understood in ___________ setting, more than __________ settings.”
VOTE FOR THE REVERSE:In addition to asking what the best setting is for each idea of well-being, you could also ask the reverse to understand what setting is the worst for each well-being idea. For example, you could ask not only which setting provides the safest environment, but where is the setting you feel the least safe. ANALYZE & DISCUSS:Look back at the completed chart and take note of the patterns that you see. Discuss the following questions: • Which settings received more votes than others? Are there any patterns in how members voted? • Are there any differences in opinion between boys and girls? Younger children and older children? General members and executive members? • How do members view the children’s group differently to the other settings? • PLAN:Use the information from the discussion to plan action steps for how the club might improve how they support specific ideas of well-being. Discuss the following questions: • What is our club already doing to support each idea of well-being? • What else might our group do to support each idea of well-being? • Depending on the amount of time available, the group might focus on a few issues, rather than going though all of the well-being ideas. Remember to set aside a enough amount of time for discussion. If needed, take a break if the group needs to rest before the discussion begins. It is important for the group to understand WHY members chose each setting as well as how they feel their group can may help support specific ideas of well-being. Annex A – Page 14
This picture shows a Daily Settings Chart created by the Moforay Child Rights Club in Sierra Leone. You’ll notice that a member of the club drew pictures beside each child well-being idea in order to help the members of the group who cannot read know what each sticky note said. Annex A – Page 15
? Analyzing and Preventing Risks C ? Key Questions: ? • What risks do girls and boys face as a result of their participation in the children’s group? • What is being done to minimize these risks and fears? • What actions and steps need to be taken to ensure safe participation of girls and boys in the children’s group? OBJECTIVE 1 3 Steps Identify risks girls and boys face as a result of their participation in children’s group activities, and plan actions and steps to ensure safe participation. 2 EXPLAIN:This activity involves two parts. Part one will explore the fears and risks associated with participating in the children’s group, and part two will explore the actions that minimize and prevent such fears and risks. MATERIALS Children may bring up sensitive issues. Adult facilitators should help the group create a safe space for discussion and connect children with the right support when needed. Flip chart paper Colored markers TIME 2 hours INTRODUCE PART 1: Explain that your group will be exploring the fears and risks they experience participating in the children’s group. 5-6, 15-17 CREATE: On four separate sheets of flip chart paper, write each of the following scenarios describing when children in the group might experience fears or risks: Annex A – Page 16
What risks and fears do boys and girls face when at home, work, or school AFTER children’s groupmeetings or activities. What risks and fears do boys and girls face when speaking out or being part of children’s group activities What risks and fears do boys and girls face when travelling to or from children’s group meetings or activities ? What risks and fears do boys and girls face when spending time with other children’s group members or adult facilitators DIVIDE:Divide into four small groups of approximately 6-8 members. Each group should receive one the scenario above. When dividing into groups, it may be useful to separate boys and girls, or members younger than 12 and older than 12. This may help the group understand specific risks and fears faced by each group. BRAINSTORM:In the small groups, brainstorm and list on the flip chart paper the possible risks and fears members face in the scenario. Include all risks and fears no matter how big or small. IDENTIFY:After the brainstorm is complete, identify the likelihood of each risk as High (H), Medium (M) or Low (L). For example, do you face this risk almost every day (H), every few week (M), or rarely (L). Travelling to or from children’s group meetings or activities Conflict or fighting with someone on the way H Being bitten by a snake L Girls may be harassed by older boys or men M Annex A – Page 17
INTRODUCE PART 2: Explain that the small groupswill now start planning the action step the group can take to minimize the risks and fears identified in Part 1. ACTION: Still in the small groups, chose two risks or fears that the small group identified and would like to discuss in depth for the remainder of the activity. All of the risks and fears listed are valuable and should be discussed. If you have more time, you can pick more than two for the discussion session. Remember that you can always come back to this activity in a later meeting and discuss other fears and risks in more depth. CREATE: On four separate sheets of flip chart paper, draw an action-planning chart like the one to the right and discuss the two risks or fears chosen by the small group. RISK 1: Conflict or fighting What is our children’s groupalready doing to prevent this risk/fear? We have rules in place for how to handle fighting when it happens in our group. What else can our children’s group do to prevent this risk/fear? Ask leaders to give a class on resolving conflicts peacefully Elect a Peace Monitor who helps negotiate conflicts when they occur DISCUSS: As a small group, discuss and list the actions the children’s group is already taking to prevent or lessen the risk or fear. RISK 2: Girls being harassed by older boys or men What is our children’s groupalready doing to prevent this risk/fear? DISCUSS: Now, discuss as a small group the other activities, actions, or effortsthe children’s group could take to prevent or lessen the risk or fear. What else can our children’s group do to prevent this risk/fear? Annex A – Page 18
These are examples of the Preventing and Analyzing Risks charts done by the the Nyngolingo Child Rights Club in Ghana, West Africa. Annex A – Page 19
REVIEW & DISCUSS:Come back together as a large group and review the suggestions for further action needed to ensure safe participation. ACTION: As a children’s group, make a collective action plan to take the steps discussed in this activity. You may also want to explore other tools in the Article 15 Resource Kit to further discuss protection issues and action planning for change such as Module 4 and 8. Adults can be encouraged to share any organizational Child Protection Policies that they have to help protect children in a child friendly way; and children’s group members may be encouraged to develop their own Child Protection Policies and/or Code of Conduct for children’s group members and for adult supporters. Children may raise some sensitive issues. Facilitators need to be aware of persons to whom they can make referrals and/or provide support to individual children if needed. Facilitators need to enter this session with open minds and listening ears as children may also raise concerns they have in interacting with facilitators and adult supporters. It is important not to be defensive but learn from what the young people have to say. Annex A – Page 20
The Article 15 Project Please visit CRC15.org for all Resource Kit modules. Roger Hart Pamela Wridt Blair Osler BijanKimiagar Ingrid Agud Claire O’Kane Paul Stephenson Ruthi Hoffman-Hanchett Annette Giertsen Ravi Karkara CERG is a Key Institution of the Childwatch International Research Network Character images created by CERG through www.bitstripsforschools.com. Bitstrips For Schools is not associated with The Article 15 Project.


![ICAO ANNEX 14 [HELIPORT DESIGN] WORKSHOP](https://cdn0.slideserve.com/682842/icao-annex-14-heliport-design-workshop-dt.jpg)