Download
1 / 23
230 likes | 391 Vues
9X15 build tutorial. CN Andress Kuo. D1 agenda-Board/tool setup. How to setup power supply How to setup cable cable connected How to setup ADB USB connected How to download built image to the target Question?. How to setup power supply. Working power voltage interval is 3.7v~4.2v.

E N D
9X15 build tutorial CN Andress Kuo
D1 agenda-Board/tool setup • How to setup power supply • How to setup cable cable connected • How to setup ADB USB connected • How to download built image to the target • Question?
How to setup power supply • Working power voltage interval is 3.7v~4.2v. • Working power current is 1A.
How to setup cable cable connected • 1. plug in debug cable on PC. • 2. Install USB to UART debug cable driver, The driver is under the folder with namely DebugCable_driver.zip, please unzip it.
How to setup ADB USB connected(1/2) • boot device up. • Plug in USB on PC, and connect to device. • install usb driver when it prompt to ask installing usb driver, The driver is under the folder with namely QDP_USB_HOST_DRIVER.zip, please unzip it. • After above steps done, Check ADB is avaiable no not.
How to setup ADB USB connected(2/2) • Unzip adb tool folder, The adb tool is under the folder with namely adb_fastboot_tool.zip. • Launch cmd windows, and path to adb tool folder. • Enter “adb shell” as below screenshot, it means that adb driver was installed successfully and adb tool is avaiable.
How to download built image to the target • Plug in debug cable on PC. • Open a hybrid terminal window and choose a COM port available. if your laptop is win7 system, you should install 3’rd hybrid terminal first, Because Microsoft is not long support hybrid terminal on win7. • Boot device up. • Keep pressing “space” key on hybrid terminal until below message occurred.
How to download built image to the target(cont.) • Connect to device by USB. • Installing fastboot driver when it prompts to ask driver location. • Path to fastboot driver, it is under QDP_USB_HOST_DRIVER folder. • After fastboot driver install successfully, you will see the driver is ready on device manager as below.
How to download built image to the target(cont.) • Copy image which you want to update to fastboot tool foler, it is under adb_fastboot_tool foder. • For example: update system image cmd as fastboot flash system “msm-9615-cdp-image- ipk-9615-cdp.rootfs.yaffs2”
How to download built image to the target(cont.) • For example: update userdata image cmd as fastboot flash userdata 9615-cdp-usr-image.usrfs.yaffs2
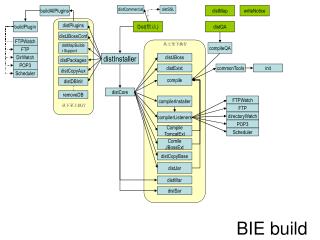
D2 agenda-Building environment setup • Tool installation • How to use build command • Question?
Tool installation • Already provided by mail.
How to use build command • Copy 2020.tar.gz into your build environment. • Unzip the package as below cmd, tar –xvf 2020.tar.gz • Need to clean build kernel first for generating related tool chain as below cmd: cd 2020/oe-core source build/conf/set_bb_env.sh Build9615 • you can start to use bitbake to build your code, we will have example at next course.
D3 agenda-Tutorial to build the code • For example to build the code • Question?
Example 1. cd external 2. mkdir helloworld 3. cd helloworld 4. Put your source code under the folder, you can refer to attached example “helloworld.c” for practice. 5. touch chksum 6. md5sum chksum it should generate a checksum as below, you need the value in step9.
Example(cont.) 7. cd oe-core/meta-msm/recipes 8. mkdir helloworld 9. make a .bb file, you can refer to attached helloworld_1.0.0.bb, and add checksum value of step6 into the .bb, you can refer to line5 on the .bb 10. cd oe-core/build 11. re-clean compile, running below cmd. 12. bitbake -cf clean helloworld 13. bitbake -cf compile helloworld bitbake -cf install helloworld
Example(cont.) 14. Tool will be generated on below patch. /2020/oe-core/build/tmp-eglibc/work/armv7a-vfp-neon-oe-linux-gnueabi/helloworld-1.0.0-r0/helloworld/helloworld$
D4 agenda-Hands-on session • Build an application and run it on the target. • How to debug your application. • Question?