Download
1 / 14
140 likes | 283 Vues
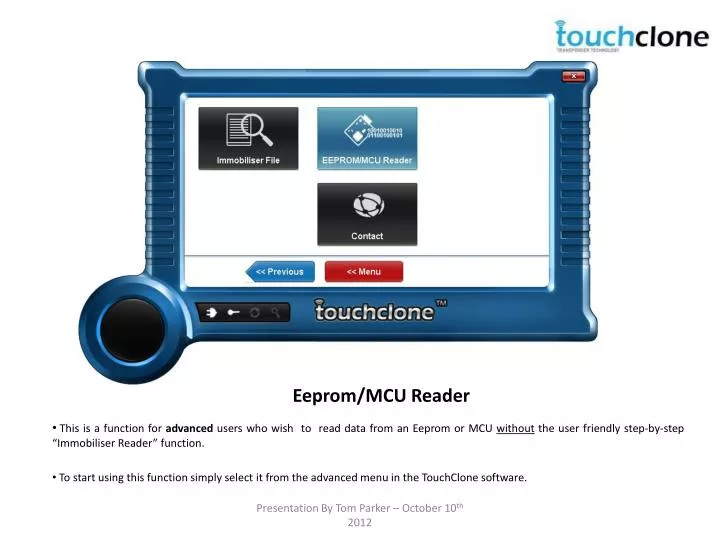
Eeprom/MCU Reader. This is a function for advanced users who wish to read data from an Eeprom or MCU without the user friendly step-by-step “Immobiliser Reader” function. To start using this function simply select it from the advanced menu in the TouchClone software.

E N D
Eeprom/MCU Reader This is a function for advanced users who wish to read data from an Eeprom or MCU without the user friendly step-by-step “Immobiliser Reader” function. To start using this function simply select it from the advanced menu in the TouchClone software. Presentation By Tom Parker – October 10th 2012
Read Immobiliser data from clip-on probes Selecting this option will require clipping onto the chip to be read using the TouchClone clip-on probes. This is the option to be used if no data has been read from the chip . For ‘how-to’ on this function use pages 4- Presentation By Tom Parker – October 10th 2012
Read Immobiliser data from dump file If data has already been read from the Eeprom or MCU then this function should be used. It allows the user to see all the data on the Eeprom/MCU with editing in cases where data needs to be written back to the Eeprom (advanced users). For this function go to page. Presentation By Tom Parker – October 10th 2012
The Eeprom/MCU reader interface. To understand what all the values do refer to the next slide. Presentation By Tom Parker – October 10th 2012
Procedure: • First select the chip type you wish to read from the list. The picture box to the left hand side will update providing you with the clipping on instructions for that chip. • On the right hand side you have a list of parameters you can modify to help read the data off in circuit. Most circuits tend to speak to the chip continuously when powered up - such communications can cause incorrect reads but using these settings you can 'work around' this. • Description of fields: • Power Up Delay - The time period after the immobiliser box is powered up before reading commences. Measured in milliseconds, the larger and more components on the board, the larger this value should be. For a single chip a value of 0 is sufficient. • Power Off Delay - The time period after the immobiliser box is powered down before it is turned back on. Larger boards with capacitors on can hold charge preventing the board from turning off as soon as power is removed. This value, measured in milliseconds allows you to make sure the board is turned off before repeating. • Byte Delay - The delay between reading bytes measured in microseconds. • Consecutive Byte Read - The number of bytes to be read consecutively before the box is turned off and restarted. If the value is zero the device will pull the data off without restarting the box. • Organisation - This option allows you to change the memory organisation of the EEPROM. Only available on some devices, this is often labeled as x8 or x16 on other software. Presentation By Tom Parker – October 10th 2012
Now to show a demonstration of the Read Immobiliser from clip-on probes Presentation By Tom Parker – October 10th 2012
Default Read Method If you have selected the chip you would like to read and have not changed any of the read method fields, the chip will be read using the default read method. Presentation By Tom Parker – October 10th 2012
Default Method Data At first glance, the data read from the Eeprom would seem to look valid . Upon closer inspection you can see that the data is copied in a 2 byte sequence. This indicates that the organisation field needs to be altered from 8x to 16x. You will also notice the second half of the data is mostly FFFs, indicating that there wasn’t a full extraction of data. Changing read method values would solve this. Technical support can aid you in finding the correct read method. Presentation By Tom Parker – October 10th 2012
Applying Hex Data If you think that data has been extracted successfully, TouchClone will try to indentify the immobiliser module for the process of producing transponders and pulling pin codes. In this case the read method of the eeprom is wrong and therefore the data extraction wasn’t completed. TouchClone will not recognise an incorrect Hex dump. Presentation By Tom Parker – October 10th 2012
Custom read method Once you have established that it is a 16x organisation you can then change the remaining parameters. This can be done by either with help from technical support or by using assumed patterns. The aim is to use a custom read method which will allow you to extract the complete data off the eeprom (in circuit) that can then be interpreted by TouchClone as an immobiliser module. Presentation By Tom Parker – October 10th 2012
Correct Hex Dump The new correct read method has drastically changed the hex dump to give a much healthier read (as shown above). You can now save this to the database for future reference or just save it locally as a bin file. Presentation By Tom Parker – October 10th 2012
TouchClone ID TouchClone now recognises the hex data and has identified it to be a supported module. There still may be multiple modules that match with the data you retrieved from the Eeprom, so be sure to do your feature lookup research beforehand to find out which TouchClone module you are working on. Best of luck. Presentation By Tom Parker – October 10th 2012