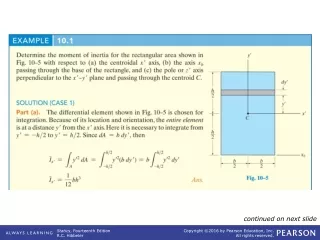
Advanced SQL*Plus Techniques: Utilizing Substitution Variables and Environment Customization
220 likes | 343 Vues
This guide explores advanced techniques in SQL*Plus, focusing on substitution variables and environmental customization. Learn to use the double ampersand (&&) to reuse variable values without additional prompts, creating a smoother user experience. We'll cover using the ACCEPT command for user input, defining user variables, and the importance of the DEFINE and UNDEFINE commands. Additionally, customization via the SET and COLUMN commands is examined, enabling better control of SQL*Plus output. Enhance your SQL*Plus proficiency with these essential skills!

Advanced SQL*Plus Techniques: Utilizing Substitution Variables and Environment Customization
E N D
Presentation Transcript
Using the && Substitution Variable • Use the double ampersand (&&) if you want to reuse the variable value without prompting the user each time. • The user will see the prompt for the value only once.
Using the && Substitution Variable SELECT employee_id, first_name, job_id, &&column_name FROM employees ORDER BY &column_name
Defining User Variable • You can predefine variables using one of two SQL *Plus commands: • DEFINE: Creates a CHAR datatype user variable • ACCEPT: Read user input and store it in a variable. • If you need to predefine a variable that includes spaces, you must enclose the value within single quotation marks when using the DEFINE commands.
The ACCEPT Command • Creates a customized prompt when accepting user input. • Explicitly defines a NUMBER or DATE datatype variable. • Hides user input for security reason. ACCEPT variable [datatype] [FORMAT format] [PROMPT text] [HIDE]
The ACCEPT Command In the syntax: • variable is the name of the variable that stores the value (If it does not exist, SQL*Plus creates it.) • datatype is NUMBER, CHAR, or DATE (CHAR has a maximum length limit of 240 bytes. DATE checks against a formal model, and the datatype is CHAR.) • FORMAT specifies the format model-for example, A10 or 9.999 • PROMPT displays the text before the user can enter the value. • HIDE suppresses what the user enters-for example, a password.
Using the ACCEPT Command SQL> ACCEPT p_dept_name PROMPT 'Provide the department name:‘ SQL> SELECT * 2 FROM departments 3 where department_name = UPPER ('&p_dept_name');
DEFINE and UNDEFINE commands • A variable remains defined until you either : • Use the UNDEFINE command to clear it • Exit SQL*Plus • You can verify your changes with the DEFINE command. • To define variable for every session, modify your login.sql file so that the variable are created at startup.
Using the DEFINE Command • Create a variable to hold the department name • Use the variable as you would with any other variable SQL> DEFINE p_dept_name = IT SQL> DEFINE p_dept_name DEFINE P_DEPT_NAME = "IT" (CHAR) SQL> SELECT * 2 FROM departments 3 WHERE department_name = UPPER ('&p_dept_name');
Customizing the SQL* Plus Environment • Use SET commands to control current session • Verify what you have set by using the SHOW command SET system_variable value SQL> SET ECHO ON SQL> SHOW ECHO echo ON
Continued…. • You can control the environment in which SQL*Plus is currently operating by using the SET commandes. • In this syntax: • system_variable : is a variable that controls one aspect of the session environment • value : is a value for the system variable. • You can verify what you have set by using the SHOW command. The SHOW command on the side checks whether ECHO had been set on or off. • To see all SET variable values, use the SHOW ALL command.
SET command variables The value n represents a numeric value.
Saving Customization in the login.sql File. • The login.sql file contains standard SET and other SQL*Plus commands that are implemented at login. The file is read and commands are implemented at login. • When you log out of your session, all customized settings are lost. • You can modify login.sql to contain additional SET commands. • All permanent settings to the login.sql file.
Using the COLUMN command • Create column headings • Display the current setting for the first_name column • Clear setting for the first_name column COLUMN first_name HEADING ‘Employee|Name’ FORMAT A15 COLUMN salary JUSTIFY LEFT FORMAT $99,990.00 COLUMN manager_id FORMAT 999999999 NULL ‘No Manager’ COLUMN first_name COLUMN first_name CLEAR
Displaying or Clearing Settings If you have a lengthy command, you can continue it on the next line by ending the current line with a hyphen (-)
Using the BREAK command • Suppresses duplicates and section rows • To suppress duplicates • To section out rows at break values • To ensure that the BREAK command works effectively, use the ORDER BY clause to order the columns that you are breaking on. SQL> BREAK ON first_name ON job SQL> BREAK ON first_name SKIP 4 ON job SKIP 2
Summary • Use SQL*Plus substitution variables to temporarily store values • Use SET commands to control current SQL*Plus environment • Use the ACCEPT and DEFINE commands to predefine variables in SQL*Plus • Use the COLUMN command to control the display of a column. • Use the BREAK command to suppress duplicates and section rows.