Download
1 / 29
290 likes | 452 Vues
Putting It All Together with xLights. Matt Brown ( dowdybrown on DIYLA & DIYC). Purpose Of This Class. Learn the capabilities of xLights Learn how to install and configure xLights Learn how to apply the capabilities of xLights to your Show. xLights Capabilities. Show scheduler

E N D
Putting It All Together with xLights Matt Brown (dowdybrown on DIYLA & DIYC)
Purpose Of This Class • Learn the capabilities of xLights • Learn how to install and configure xLights • Learn how to apply the capabilities of xLights to your Show
xLights Capabilities • Show scheduler • Tester • Sequence Converter
Benefits • Support for a wide variety of lighting controllers and networks • Reliable, flexible scheduling. Playlists can be scripted to run in any order and can respond to input from external sources. • Robust testing module for both traditional and RGB lights, including Smart Strings • Runs on Windows, Mac, and Linux
USB Driver • If you are using any type of USB dongle, ensure you have the FTDI VCP drivers installed. • If you have successfully used an LOR or Lynx dongle on your system, you already have the right driver installed. • This step is only required for Windows and Mac systems. FTDI drivers are already built in to most Linux distributions. • Drivers can be found here: http://www.ftdichip.com/FTDrivers.htm
Downloading xLights • Ready to run versions of xLights for Windows and Mac can be downloaded from SourceForge: http://sourceforge.net/projects/xlights/files/ • After downloading, just double-click on the file • Linux users need to compile xLights. Instructions are here: http://xlights.svn.sourceforge.net/viewvc/xlights/trunk/ToolConfig.txt?view=markup
Show Directory • xLights expects you to organize all of your sequence files and associated audio or video files into a single directory. • You can have a directory called "TestSequences" with some sequences you are testing. • For your 2012 show, you can have a directory called "2012 Show". • Don't bother starting xLights until you have this directory created. But once you do, fire up xLights (xMenu module).
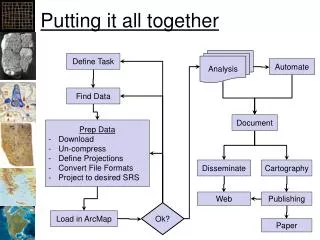
Main Menu (xMenu) Currently selected show directory Change show directory Define your lighting networks Define schedule, run schedule, and test lights Convert sequences from one format to another
Lighting Networks • The next thing you will need to do is define your lighting network(s). • xLights ignores most of the information about your lighting network contained in your LOR or Vixen sequence. Thus this step is very important.
Lighting Networks • Click on the "Network Setup" button to bring up the network definition grid. • Add a row for each network or universe used in your display. • If you have 1 USB dongle, then you just need one row in your table. • if you have a larger display with more than one network, xLights can drive a mixture of network types (DMX, LOR, Renard, Pixelnet, and E1.31 can be intermixed).
xScheduler • Create Playlist(s) • Create schedule • run schedule Or… • test lights
Create Playlist #1: Click “+” button to add a new playlist #4: Your new playlist will be added as a new tab #3: Click OK #2: Enter the name for your new playlist
Configure Playlist #1: Click the checkbox for the type of files you want included in your playlist #2: Select a file name in the box on the left, then click the “>” button to move it into the playlist. Repeat as necessary. #4: Click Save icon #3: Adjust playlist order by clicking on a file name then clicking the up or down buttons
Other Playlist Options Delete the current playlist If you sequence to movies instead of music, selecting “Movie Mode” for playback will show the movies full screen. Get help See how sequence channels are mapped to physical channels Add all items to playlist Remove item from playlist Play the selected item in the playlist Remove all items from playlist Set a delay after the item plays by selecting the item, then click the “Set Delay” button
Create Schedule • First thing to do is set the show’s start and end dates
Create Schedule Once dates are set, one or more playlists can be scheduled each day
Update Schedule Mass updates to the schedule are possible by selecting multiple playlists using Ctrl-Click or Shift-Click, then selecting Update or Delete selected items. Selected date headings are ignored.
Run Schedule The schedule will only run when the “Run Schedule” checkbox is checked. The state of this checkbox is remembered between program invocations.
Testing Your Lights Enter the testing module by clicking on the Test icon on the toolbar.
Standard Tests When finished testing, turn all lights off, then click close Select multiple channels by using shift-click or Ctrl-click. Then click the checkbox of any of the selected channels to activate all selections.
RGB Tests These tests treat lights in groups of 3.
RGB Cycle Tests These tests treat lights in groups of 3. Every group of 3 gets the same color.
xConverter • Convert sequences from one format to another
xConverter Formats • All output formats use 50 msec timing
xConverter Operations #2: List of selected files is displayed here #1: Select files to be converted #3: Choose output format #4: Select if you want all lights forced off at the end of the sequence #5: Start the conversion #6: Status messages will display here
Tip #1 • Do not play back Vixen or xseq files over an LOR network • This will work ok for 16-32 channels, but is not recommended • Use LOR controllers in DMX mode instead • LOR sequences can be efficiently played back to any type of network
Tip #2 • If you have a lot of channels, then use xConverter to convert your sequences to xseq format. • Xseq files load/start much faster