Download
1 / 13
140 likes | 440 Vues
16.2 In vivo gene cloning – the use of vectors. The importance of ‘sticky ends’. Last lesson, we discussed sticky ends that are left after the action of restriction endonucleases .

E N D
The importance of ‘sticky ends’. • Last lesson, we discussed sticky ends that are left after the action of restriction endonucleases. • These are highly important in genetic engineering, for the fact that they leave exposed bases– this is due to the staggered nature of the cut. • Due to the complementary base-pairing rules of DNA, sticky ends on one gene, will pair up with sticky ends of another bit of DNA that has also been cut by the same restriction endonuclease.
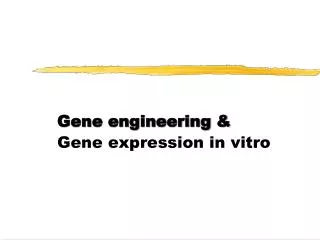
This gene (from a human) can be cut with a restriction enzymesuch as EcoRI KEY: Gene from Human Gene from E.coli Sticky End This is a section of DNA from E.coli. If this section of DNA from E.coli is also cut with EcoRI, a complimentary sticky end is produced. Sticky End If these two ‘cut’ pieces of DNA are mixed, recombinant DNA has been produced.
Once the bases have paired, they form their usual weak hydrogen bonds between each other. The only thing left to do, is form the link between the sugar-phosphate backbones, and this is done by the enzyme, DNA Ligase.
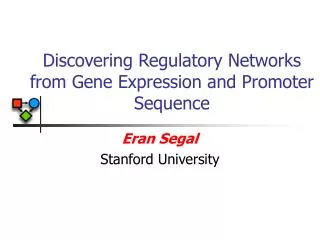
Inserting genes into Plasmids This is ‘Step 2’ (insertion) in the process of making a protein using gene technology • The real-life application of what we have just learnt, occurs when geneticists insert an animal or plant gene into plasmids. • Plasmids are small loops of DNA which are found in additionto the large circular chromosome that bacterial cells possess. • By inserting our chosen gene into a plasmid, the plasmid acts as a ‘carrier’, or vector, which we can then introduce back into a bacterial cell. Restriction Endonuclease Restriction Endonuclease A plasmid DNA coding for a desired protein As the DNA fragment was cut out using the same restriction endonuclease as used to cut the plasmid open, they have complimentary sticky ends. Remember, that DNA Ligase would once again be used to bond the sugar-phosphate backbones.
Introducing our recombinant plasmids into host cells • Introducing recombinant plasmids into bacterial cells is called transformation. • This is done by mixing the plasmids with the cells in a medium containing calcium ions. • The calcium ions make the bacterial cells permeable, allowing the plasmids to pass through, into the cell. However, only a few bacterial cells (approx 1%) will actually take up the plasmids. For this reason, we need to identify which ones have been successful. This is done with gene markers. Calcium ion medium This is ‘Step 3’ (transformation) of producing a protein by DNA technology
Using Gene Markers to identify successful host cells... • There are a number of different ways of using gene markers to identify whether a gene has been taken up by bacterial cells. • They all involve using a second, separate gene on the plasmid. This second gene is easily identifiable for one reason or another.... • It may be resistant to an antibiotic • It may make a fluorescent protein that is easily seen • It may produce an enzyme whose action can be identified Each of the 3 above mechanisms are actual methods of employing gene markers to identify bacterial cells that have taken up plasmids... They will be discussed on the next slides...
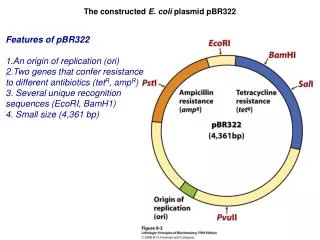
1. Antibiotic-Resistance Markers Any bacterial cell posessing this plasmid, would be resistant to both of the antibiotics, ampicillin and tetracycline. But what if we cut right in the middle of the tetracycline-resistance gene (with a restriction endonuclease), and insert a gene of our own interest? • Many bacteria contain antibiotic resistance genes in their plasmids. Some in fact, can have two genes for resistance to two different antibiotics, in the same plasmid. Gene for resistance to tetracycline Gene for resistance to ampicillin Bacteria with this plasmid would only be resistant to ampicillin, nottetracycline. How is this of any advantage to us?
First, the recombinant plasmids are introduced into bacterial host cells (transformation)
The bacteria is grown on agar treated with ampicillin Colonies are allowed to grow, but will only do so if they are resistant to ampicillin – i.e. Bacteria that took up the plasmid. A replica plate is now made. This is when you literally press the agar of one Petri-dish, onto the agar of a new Petri-dish, transferring bacterial cells from each colony onto the new agar. There is a missing colony, which has lost resistance to tetracycline. This must be a colony containing cells which have taken up the plasmid! This agar however, has been treated with tetracycline ? Colonies are allowed to develop
2. Fluorescent Markers Throughout nature, there are organisms such as jellyfish, that produce fluorescent proteins. These are proteins, which obviously have their own genes, which of course can be isolated and then introduced into bacterial cells via vectors. The range of natural fluorescent proteins can be seen on this Petri-dish. These are colonies of bacteria that are expressing the fluorescence genes! • This is a more recent method of finding out whether bacteria have taken up the desired plasmids. • All you have to do is first insert your gene of interest (such as insulin) into a gene for a fluorescent protein. • Then insert this insulin/fluorescence hybrid gene into a plasmid vector. • Then transfer the plasmids into bacterial cells! • Any cells that successfully took up plasmids, will be glowing on your Petri-dish!
3. Enzyme Markers • This method involves inserting your gene of interest (e.g. Insulin), into a gene that codes for an enzyme such as lactase. • There is a particular substrate that is usually colourless, but turns blue when lactase acts upon it. • If you insert you chosen gene into the gene that makes lactase, you will inactivate the lactase gene. • If you now grow bacterial cells on an agar medium containing the colourless substrate, any colonies that have taken up the plasmid, will not be able to change its colour to blue. • Any colourless spots will indicate to you, which cells have been transformed. The more boring of the 3 methods, but still important.
To Do. • Answer the summary questions on page 253.