Download
1 / 30
300 likes | 492 Vues
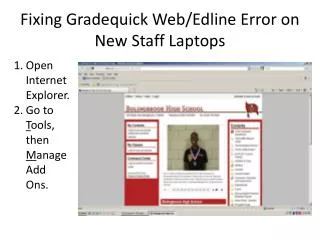
Edline. Managing Your Class: Adding a picture, changing the class title, printing activation codes, and looking up screen names. Log on at edline.net. Adding a Class Picture. Chose the class that you want to manage. Click on “Manage Class”. Click on the “Browse” button.

E N D
Edline Managing Your Class: Adding a picture, changing the class title, printing activation codes, and looking up screen names
Chose the class that you want to manage.
Click on “Manage Class”.
Click on the “Browse” button.
Double click on the picture you wish to use. NOTE: The picture must be less than 75 kb in Size.
Your picture is shown here.
Chose the class that you want to manage.
Click on “Manage Class”.
You can change or add to the name of the class. You can change or add to the caption under the home picture.
You should see the changes you have made.
Chose the class that you want to manage.
Click on “Manage Class”.
Click on “Print Activation Codes”.
Check “Group students and their parents separately”. Click on “next”.
Leave “As a web page I can print out” checked And click “Print”.
Click the print button on your browser, then click done. NOTE: Any student who is Already activated will Not show up on this List.
Click on home to print Activation Codes for other classes.
Chose the class that you want to manage.
Click on “Manage Class”
Click on “Members & Permissions”
This page will tell you if students are activated and also tells you what their screen name is. It’s a good idea to print this page out. Click “done” or “home” when your finished.
Resetting passwords • If a student has forgotten their password, then you will need to leave a note for Dan Meier. • The note should have the student’s name and their ID number as well as the word that you want the password changed to. • This password will be good one time and the student will be prompted to change their password once they log in with the temporary password