Download
1 / 9
90 likes | 269 Vues
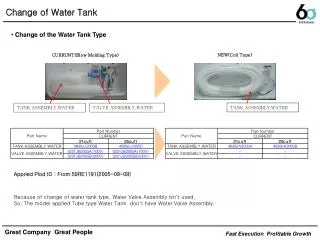
Change of Water Tank. Change of the Water Tank Type. NEW(Coil Type). CURRUNT(Blow Molding Type). TANK ASSEMBLY,WATER. TANK ASSEMBLY,WATER. VALVE ASSEMBLY,WATER. Appried Plod ID : From 59RE1191(2005-09-09). Because of change of water tank type, Water Valve Assembly isn ’ t used.

E N D
Change of Water Tank • Change of the Water Tank Type NEW(Coil Type) CURRUNT(Blow Molding Type) TANK ASSEMBLY,WATER TANK ASSEMBLY,WATER VALVE ASSEMBLY,WATER Appried Plod ID : From 59RE1191(2005-09-09) Because of change of water tank type, Water Valve Assembly isn’t used. So, The model applied Tube type Water Tank don’t have Water Valve Assembly.
Service Plan • Service Plan DefectParts ServiceParts Bolw Molding Type Coil Type Coil Type Blow molding type only must be used in product before the change. New parts must be used inproduct sets after the change only. Remember that you should not change tank type. It means you must change same type water tank. Blow Molding Type Coil Type
Change method of Coil type Water Tank • Change Process Please see the process explained in the following pages, to change the new type of the water tank. 1)Disconnect power 4)Remove the screws as shown in the picture below. 2)Pry out the dispenser cover with a flat head screwdriver and swing the cover to the right hand. 3)Disconnect the connector from display board and remove the cover. 5)Separate the holder and the tube.
Change method of Coil type Water Tank 8)Remove the screws as shown in the picture below. 6)Remove the restrainer on the upper right back of refrigerator. 7)Disconnect the connector from display board and remove the cover. 9)Separate the holder and the tube.
Change method of Coil type Water Tank 12)Remove the screws in each hole. 10)Remove the spring from the tube. 11)After remove the door basket, Remove the two caps with a flat head screwdriver 13)Remove the cover, You can see the old water tank.
Change method of Coil type Water Tank 16)The short tube of a new water tank inserts to the upper hole, And mount the new water tank. 14)) Pull out the tubes from the door, And remove the old water tank. 15)Stand by the new water tank, And note there are two kinds of the tubes about length. 17)The long tube of a new water tank inserts to the lower hole. Short tube Long tube
Change method of Coil type Water Tank 20)In the hinge side, Assemble the spring to the tube as shown in picture below . 18)Push the cover to door, Tighten the two screw in the two holes . spring 19)Assemble the two caps, Mount the door basket. 21)Insert the tube in the hole on the top of the refrigerator. Hole
Change method of Coil type Water Tank 24)Assemble the cover to the back of the refrigerator, Tighten the screws . 22)Assemble the cover of the hinge, Tighten the screw. 25)In the front of the refrigerator, Assemble the tube to the holder . 23)In upper and righ-hand side on the back of refrigerator, Assemble the tube to the connector. (Assemble method refer to label guide)
Change method of Coil type Water Tank 27)Connect the connector to the board and re-position the dispenser cover. 26)Mount the holder, Tighten the two screws.