Download
1 / 6
60 likes | 169 Vues
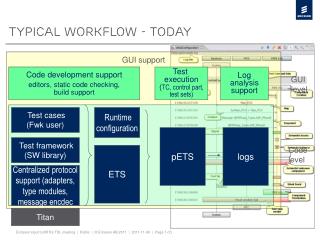
Typical printing workflow in Photoshop CS3. When opening a file, make sure to assign Adobe RBG 1998 as the working RBG space. Then, select File/Print in the drop-down menu shown at right.

E N D
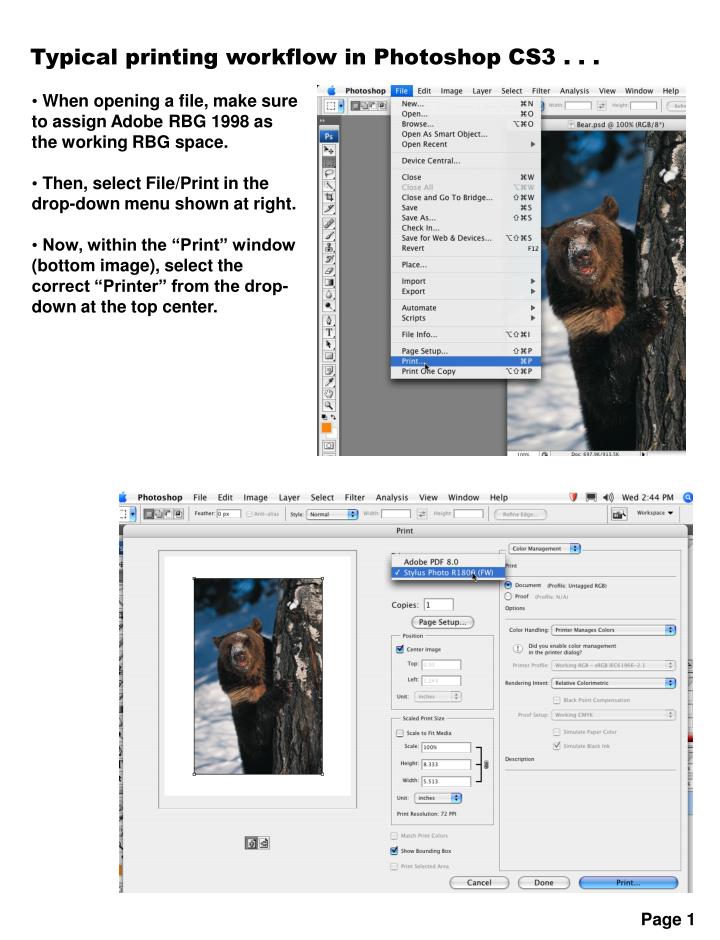
Typical printing workflow in Photoshop CS3 . . . • When opening a file, make sure to assign Adobe RBG 1998 as the working RBG space. • Then, select File/Print in the drop-down menu shown at right. • Now, within the “Print” window (bottom image), select the correct “Printer” from the drop-down at the top center. Page 1
Looking at the top right side of the print window, “Color Management” should be chosen from the top drop-down. Also, ensure that the “Document” button is selected. • Next, to the right of “Color Handling:”, choose “Photoshop Manages Colors”. • In the Printer Profile area, select the correct profile for the paper you’re using. This long list is in a scrolling drop-down. Also, the “Black Point Compensation” box should be checked. • Rendering Intent: “Perceptual” is a good choice for photo-quality images. • Now, select the “Page Setup” button as shown (at right) in the center of the window below the Printer selection. Page 2
In the Page Setup window (right), be sure to select the correct printer and the paper size. These are found in the drop-down menus: “Format For:” and “Paper Size:”. • Choose the appropriate button to reflect the paper “Orientation” you’ll use. (The arrows show which side of the paper will be printed first.) • Clicking “OK” in Page Setup returns you to the Print window. • From here, clicking on the “Print” button will advance you through the final print menu. Page 3
In the Print Menu window, first ensure the correct printer is selected. Then, select “Print Settings” in the third drop-down menu from the top. • Be sure to select the correct Media Type for the paper you’re using. • Next, select either “Color” inks or “Black” only. • Be sure to click the “Advanced Settings” button. • Beside Print Quality, choose “Best Photo” or “Photo-1440dpi” AND BE SURE to UNCHECK the “High Speed” box. • Now, return to the third drop-down from the top and select “Color Management” (shown at right). • Be sure to click “No Color Adjustment” and then click the “Print” button. A word of caution: An Epson R1800 printer was used in this example. This printer has a “gloss optimizer” feature which works only when using glossy paper stock. If turned on in the “Print Settings” window, it will apply the gloss coating to your entire sheet of paper. It’s particularly important to NOT USE the gloss optimizer when making test prints. Page 4
Creating quick, scaled test prints . . . • In the File/Print window, which you’ve seen earlier (bottom right), scaled test prints can be generated quickly. • Make sure you’ve chosen the correct paper size and orientation in the Page Setup window, which you’ve already seen. • Next, you can scale the image by either clicking and dragging a corner of the image to the desired size, or entering a value in the “Scale” field. • Uncheck the “Center Image” box and you can click and drag the image to a new position. Page 5
At this point, things should look familiar, except for the considerably smaller scaled image that can be positioned on a sheet of paper for testing (shown below). • Now, click the “Print” button and proceed through the Print menu as described on page 4 of this handout. Page 6