Download
1 / 37
370 likes | 516 Vues
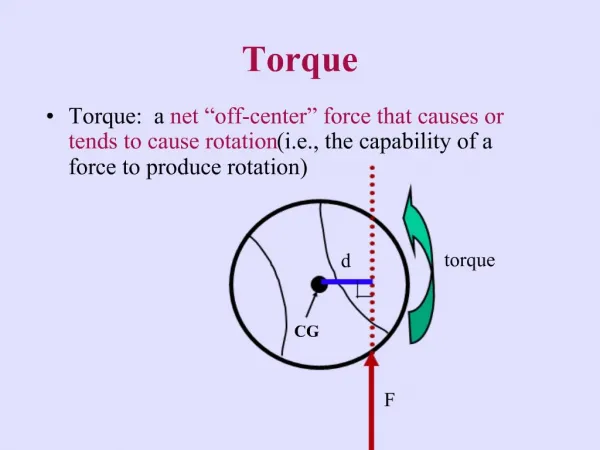
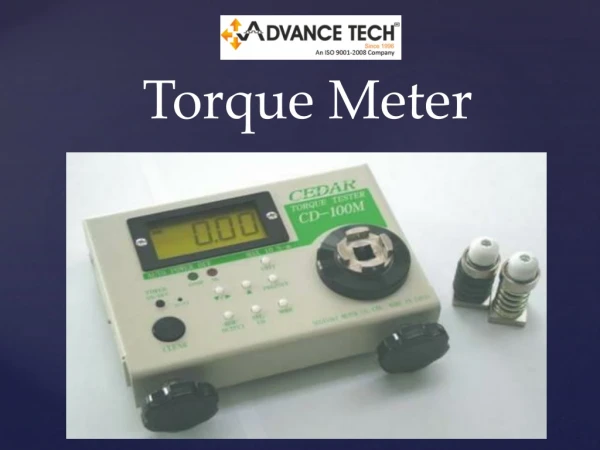
TS-1000 ELECTRONIC TORQUE METER. State-of-the-art torque meter for: Service and Repair Production and Assembly Torque Wrench Calibration. Click here to run demo. Click here for safety warnings. HOW IT WORKS.

E N D
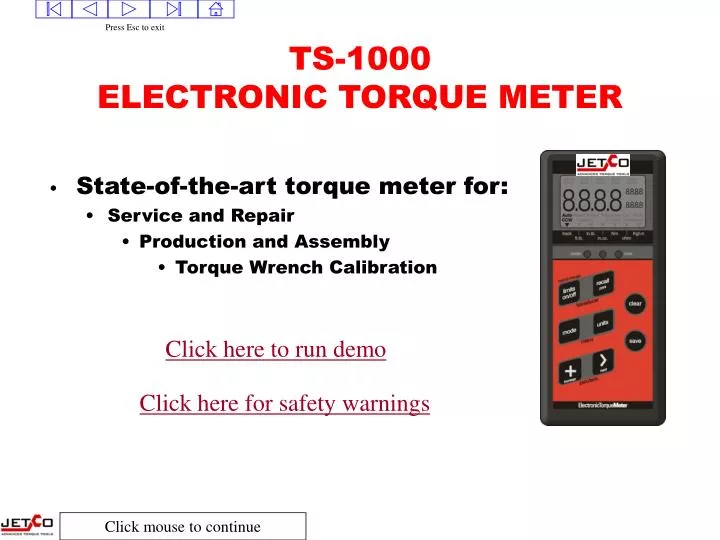
TS-1000ELECTRONIC TORQUE METER • State-of-the-art torque meter for: • Service and Repair • Production and Assembly • Torque Wrench Calibration Click here to run demo Click here for safety warnings
HOW IT WORKS The electronic torque meter connects to different types of torque transducers and displays the torque in real time torque units on a large digital LCD. You can read the actual applied torque with great accuracy. You can quickly set a target torque so the meter will prompt you if thetorque is within the desired limits.
TWO TYPES OF TRANSDUCERS ARE AVAILABLE • 1% In-line extension style • 0.5% Bench top style.
IN-LINE TRANSDUCERS One type of transducer, the in-line torque transducer, attaches between a wrench and the socket just like a conventional extension.It can be installed on a torque wrench to verify the output or record the torque or it can be installed on a conventional ratchet and used as an accurate digital torque wrench.
IN-LINE EXTENSIONTRANSDUCERS • 1% or better accuracy • Converts system into an accurate digital torque wrench. • Install between ratchet and socket Use straight female-male adapters if needed with no change in accuracy
BENCH TOP TRANSDUCERS • For torque tester/cal lab applications. • Calibrate/test all type torque wrenches • .5% or better accuracy • Converts meter into an ANSI type I, II or III tester • NIST traceable Cert. supplied Perfect for Calibration Labs.
Purchase one meter and use it with any type or range transducer. All transducers are “plug-and-play” Auto range detect Auto calibration set-up Auto Units set-up MIX AND MATCH TRANSDUCERTYPES WITH ONE METER You can expand the system as your needs change
AVAILABLE TORQUE RANGES: • Torque transducer ranges are available from 20 in.lb. to 500 ft.lb. • Other ranges, as low as 2 in.oz. and up to 9000 ft.lb. are available for special order.
BENEFITS • Sends torque data to a printer or computer for documentation. • Has settable target torque with lights and buzzer that tell you when to stop pulling on the wrench. Or if a tested wrench is in calibration. • ISO 9000 may require documentation of torque accuracy. • 4 times more accurate than a torque wrench. • Documents the actual torque reading (has memory). • Allows you to check your own torque wrenches for accuracy. • Displays multiple units so you do not need multiple torque wrenches for metric applications. • Has a broader usage range than conventional torque wrenches (10-100% of range rather than 20-100%).
QUICK START 1. Turn meter off 2. Plug in transducer 3. Turn meter on 4. Apply torque with transducer Clears torque on the display Saves torque on display
IF YOU GET STUCK…. • If you get stuck, the first thing to do is press the “clear” key. • If that does not get you back to operation mode then turn the meter off and back on again. The meter will turn back on in the mode and settings that were previously set.
SLEEP MODE The display will look like this when the meter goes into the battery saving-power down mode. Press the “clear” key to wake the meter up
MODES OF OPERATION There are three display modes to choose from: • PEAK MODE • The display holds the highest torque until cleared. • FIRST PEAK MODE • This mode is used to capture the click point of a micrometer (clicker) torque wrench or screwdriver (used to test and calibrate torque wrenches). • TRACK MODE • The display tracks torque and down as it is applied.
SELECTING THE MODE OF OPERATION (MODE KEY) • Peak mode is the most common mode to operate in. • To get to peak mode press the “mode” key until the display shows ‘Peak.’ • Press the “save” key to save the new mode. Set-up F Peak Saves mode Selects mode
UNITS • There are 6 different torque units that can be quickly selected with the “units” button: Ft.lb. N.m dN.m In.lb. cN.m In.oz. Each transducer can read in the corresponding unitsso there is no need to buy different Metric or American transducers.
CHANGING UNITS • Press the “units” button until the desired units show. Setup • Press “save” button to store new units.
TARGET TORQUE • You can quickly set a target torque with Go/No go limits. The limit values can be set as a % of a target torquefor example, 4% of 100 ft.lb. Or they can be set as actual high and low values for example, 96 ft.lb. to 104 ft.lb. The type of tolerance used depends on how you set up the meter under Menu (default is % of the target torque)
LIMITS SETTING LIMITS Tolerance is set to 4% Target torque is 100 ft.lb. Press the “limits” key once 04 % 100.0 To turn on the limits function RED Light turns on when torque is over 104 ft.lb. GREEN light turns on when torque is between 96 and 104 ft.lb. YELLOW light turns on when torque is under 96 ft.lb.
SETTING A NEW TARGET Press and hold the “limits” key for 1 second to set a new target torque.
SETTING A TARGET TORQUE • Hold “limits” key for 1 second to set a new target torque value. See next slide for instructions
After pressing and holding the “limits” key the current target torque will show. You can now quickly set the new target torque value. Here is how you set the value to 100.0 • Increase the blinking digit with “increase” key • Go to next digit with “next” key • Press “save” key when finished
ZEROING THE DISPLAY Make a habit of zeroing the display, even when the display shows “zero” • Press the “increase” and “next” keys at the same time to zero/tare the display. Make sure there is no torque on the transducer when pressing the zero/tare keys.
TO VIEW THE ATTACHED TRANSDUCER INFORMATION • Press “limits” and “recall” at the same time to view the range of the attached transducers Press “clear” key when finished viewing Range (50 in.lb.) Units Cal factor (millivolts/volt)
MENU FUNCTIONS There are 7 more advanced features under ‘Set-up Menu.’ • 7 Menu functions are: • Recall Memory (Recall) • Send Memory (Send) • Erase Memory (Erase) • Display reset method • Limits method (% or high low) • Change Filters (Filter) • Calibration (Cal)
SELECTING MENU SET-UP FUNCTIONS(see manual for details) Recall Memory Press “mode” and “units”to enter menu set-up Send Memory Press “save” to select shown set-up option Erase Memory Set Filters Set Tolerance type (% or Hi/lo) Press “clear” to exit Auto Reset method The display will look like this Press “next” key to scroll throughset-up functions Calibration (CAL)
1ST OPTION UNDER SET-UP:RECALL This function recalls the values in memory for you to view After pressing “save” from menu location ‘Recall’ you will see this on display This is the current number of values stored in memory Press “next” key toscroll through memory Torque Value Data number Units Press “clear” when finished
2ND OPTION UNDER SET-UP MENU: SEND This mode sends all values in memory out the RS232 serial port for printing or sending to a computer. As the data is sent the data number will count on the LCD See operation manual and Tech Tips for information on how to setup your printer or computer.
3RD OPTION UNDER SET-UP MENU: ERASE This function erases all torque data saved in memory From Set-up press “save” when Erase is displayed Press “save” again to erase Or Press “clear” to abort erase and return to operation
4TH OPTION UNDER SET-UP MENU: FILTERS • This is an option for setting filters. “500” Hz is common. (See the manual for a more detailed description on filters). Press “next” to select a new filter Press “save” to save the filter setting
5TH OPTION UNDER SET-UP MENU: TOLERANCE This function will pre-set the default tolerance mode You can choose between % of target or High and Low Refer to the operation manual for details on how to set the default tolerance mode
6TH OPTION UNDER SET-UP MENU: LCD RESET METHOD This option sets up how you want the LCD to clear the torque value on the display during operation Auto Reset ManualReset TimedReset Saves new Reset method See operation manual for a full description of reset methods
7TH OPTION UNDER SET-UP MENU: CAL • Cal is used to manually calibrate transducers. DO NOT select this mode unless you are familiar with the calibration procedures as stated in the manual. If you select this mode accidentally, turn the meter off, then on again to get out of calibration mode without changing calibration factors.
Refer to operation manual for a full description of how to operate this meter That is it! You can see that this torque meter is very powerful, easy to learn and use.
1. Order one TS-1000 kit Includes: Torque meter 110 volt charger 9 volt Nicd battery Serial output cable Manual Blow molded carrying case with bail handle 2. Order the transducer type and range(s) you need. HOW TO ORDER:
Safety Warnings: • Always use the proper range transducer for the application. Over torque may result in damage to the transducer or breakage, resulting in personal injury. Under torque may result in an incorrectly tightened fastener that could loosen, resulting in failure at a later date. • Never mount a transducer to a bench that is unstable or will tip when a torque is applied. • Always replace worn or rounded fasteners prior to applying torque. Slippage may occur resulting in personal injury. • Never try to recharge a non rechargeable battery. • Do not use a transducer if it has been over-torqued. • Never apply torque in a situation where tool breakage may result in a fall or slip resulting in personal injury. Pulling on the wrench, as opposed to pushing on the wrench may help avoid this situation. • Always wear safety glasses when operating this torque meter.