Download
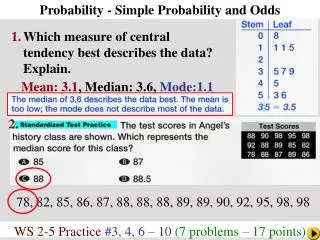
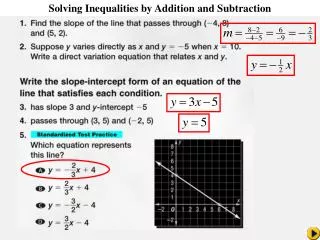
1 / 36
410 likes | 1.14k Vues
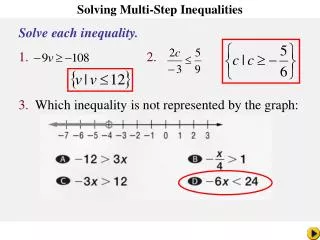
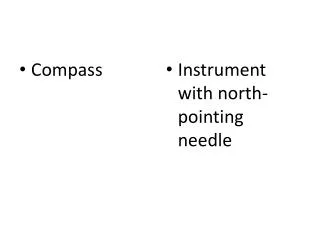
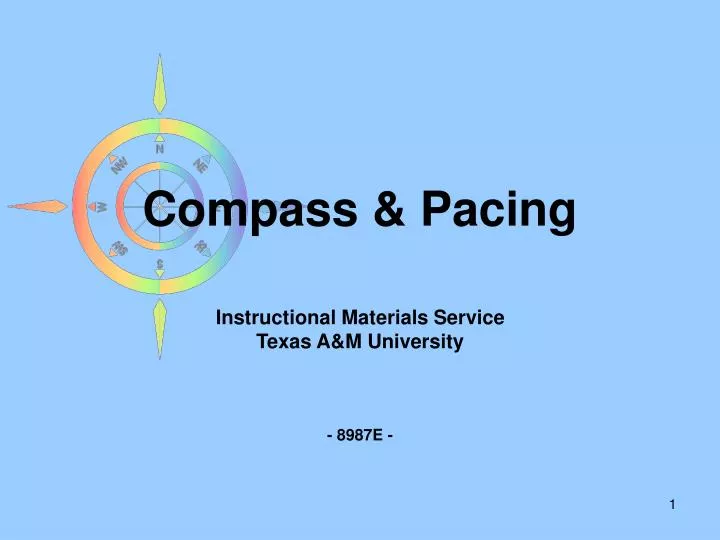
Compass & Pacing. Instructional Materials Service Texas A&M University - 8987E -. Compass & Pacing. Baseplate Compass Engineer’s Lensatic Compass Pacing Compass Use. Baseplate Compass. There are several grades and types of compasses. A good baseplate compass will have a:

E N D
Compass & Pacing Instructional Materials Service Texas A&M University - 8987E -
Compass& Pacing • Baseplate Compass • Engineer’s Lensatic Compass • Pacing • Compass Use
Baseplate Compass There are several grades and types of compasses. A good baseplate compass will have a: • Rotating, fluid-filled housing • Baseplate • Compass needle • North alignment needle • Direction-of-travel arrow
Scale Direction-of-travel arrow Magnifier North alignment Rotating housing Compass needle Orientation lines Compass housing Baseplate Compass
Baseplate Compass Baseplate compasses may include: • A scale • A magnifier • Templates • Lanyard (a wrist, or neck travel cord) Scale Direction-of-travel arrow Magnifier Slot for lanyard
Baseplate Compass • The fluid-filled housing slows the motion of the needle so the operator does not need to hold the compass motionless during use. Housing
Baseplate Compass • The compass housing includes degree marks, 0° to 360°. • The reading for North is both 0° and 360°. Housing
Baseplate Compass • The red end of the compass needle always points to Magnetic North. Northalignment Compassneedle
Engineer‘s Lensatic Compass Compass includes: • A fluid-filled housing • A Magnetic North arrow • Directional marks • A magnifying lens • A line-of-sight directional viewfinder
Pacing Two methods of pacing: • Pace equals two steps • Pace equals steps traveled in a 100-foot distance
Method 1: Pace Equals Two Steps
Pace Equals Two Steps Determining an accurate pace: • Measure a 100-foot distance between two markers, Point A and Point B. • The area between the markers should be flat and free of obstacles.
Pace Equals Two Steps • Travel from Point A to Point B, counting off each step. • Repeat several times recording step count each time.
Pace Equals Two Steps • Divided total number of steps recorded (120) by number of attempts completed (3)(120) steps ÷ (3) attempts = 40 steps • Average equals (40) steps.
Pace Equals Two Steps • Divide (100) distance by (40) step average100 ÷ 40 = (2.5) step length • Multiply (2.5) step length by (2). • 2.5 x 2 = 5 • Pace = 5 feet
Method 2: Steps Traveled in 100 Feet
Steps Traveled in 100 Feet • Once an average pace is established, it is possible to determine how many steps it will take to travel a given distance. In this example, 40 steps = 1 pace
Steps Traveled in 100 Feet Distance from point A to point B = (160) steps Pace = (40) steps Divide (160) distance from A to B by (40) steps 160 ÷ 40 = 4 Multiply 4 by (100) distance used to find pace 4 x 100 = 400 Distance to target is 400 feet
Steps Traveled in 100 Feet Calculate the number steps to travel a distance of 185 feet. • Divide (185) distance by 100 185 ÷ 100 = 1.85 Remember: 40 steps = 1 pace • Multiply 40 by 1.85 1.85 x 40 = 74 It will take 74 steps to travel 185 feet.
Pacing (Obstacles) • It is necessary to determine pace on uneven terrain, through ditches, grasses, trees, brush of various heights, and other obstacles.
Pacing Beginners should: • Use a measuring tape to accurately measure a 100-foot distance. • Practice on clean, level ground, using a natural walking gait. • Maintain a constant, reliable pace, regardless of the obstacles.
Compass Use • The Earth’s North and South poles act like a huge magnet. One pole is positive and one pole is negative. • Because magnetic and true North are not the same, corrections are made in surveying to compensate for this difference. The difference is referred to as magnetic declination.
Compass Use • The compass needle, which floats in the fluid-filled chamber, is magnetized. • Regardless of the compass position, the red needle is drawn to the Magnetic North Pole.
Compass Use • The circular rotating housing enclosing the needle is marked in degrees in increments from 0° to 360°. • Degrees are also referred to as the azimuth or bearing. Housing
Compass Use • Directional letters N, S, E, and W, are identified on the housing. NorthSouthEastWest
Compass Use Example: To find the direction-of-travel based on a compass reading of 210 feet at 320° from a specific location:
Reading 210 feet at 320° • Rotate the housing on the compass until the 320° mark lines up with the direction-of-travel arrow. Direction-of-travel arrow 320°
Reading 210 feet at 320° • Rotate the entire compass until the compass needle lines up in the North alignment position. Direction-of-travel arrow Needle in the North Alignment Position
Reading 210 feet at 320° • Holding the compass at eye level, use the direction-of-travel arrow to identify a distant landmark. • Walk in a straight line as indicated by the direction-of-travel arrow for a distance of 210 feet to the recorded location.
Compass Use • Note: All magnetic objects, such as belts, watches, keys, and other metal objects can interfere with the compass reading. • Hold compass away form metal objects when taking a reading.
Compass Use • Aerial maps are available through the Natural Resource Conservation Service or the Soil and Water Conservation District. • Maps should be read with a compass on a flat, horizontal surface, away from metal objects. • Readings may be taken from maps based on specific location and the direction to be traveled.
Compass Use • The ability to use a compass effectively is an essential skill for wildlife managers, biologists, and other scientists who work outdoors. It is also a beneficial tool for the outdoor enthusiast.
Acknowledgements Dr. Joe Dettling, Associate Professor, Instructional Materials Service, Texas A&M University, researched and developed the information used in this PowerPoint Presentation. Jerry Dornak, Agricultural Science & Technology Instructor, Goliad High School, Goliad, Texas and Dr. Terry Blankenship, Wildlife Biologist, Welder Wildlife Foundation, Sinton, Texas, reviewed material used this PowerPoint. Christine Stetter, Artist, Instructional Materials Service, Texas A&M University, developed and illustrated this PowerPoint Presentation. Vickie Marriott, Office Associate, Instructional Materials Service, Texas A&M University, edited the material in this PowerPoint Presentation.