Download
1 / 56
570 likes | 688 Vues
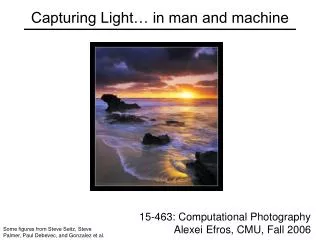
Capturing Ancient Light. Astrophotography Basic tools and techniques (and a little theory). Prepared for the OAS by Al Tuttle. Disclaimer.

E N D
Capturing Ancient Light Astrophotography Basic tools and techniques (and a little theory) Prepared for the OAS by Al Tuttle
Disclaimer • This presentation is an amateur work, prepared for demonstrating some of the principles of astrophotography to our local astronomy club members. As such, do not rely on any information contained herein as fact solely based on this document. • This presentation is for informal training purposes only. No monetary compensation may be associated with obtaining, transmitting, or using this presentation in any way whatsoever.
I’m an Amateur, NOT an expert • I’ve been doing this for a year…. Getting up to speed has been like drinking from a fire hose. • Let me say: • Many topics addressed here are deep and technical and I’ve read long, contentious dialogs debating the pros and cons of how to best accomplish some of the tasks. • I’m sure many things here are over simplified, or just plain wrong. • However you don’t need to know it all to take satisfying images. • Give it a try. Start small, work with what you have, and learn as you go.
Why do it?After all there’s Hubble • It’s fun! Lots of new things to learn. • You can “see” things you just can’t otherwise. • The pleasure of being able to say “I did that”. • Can be done under light polluted skies. Besides…… • Gives you something to do when you can’t sleep. • (Actually, you can often sleep while you do it) • Helps rid yourself of any of disposable income.
Astrophotography: Overview The basic types • Wide field images (Milky Way, Constellations, Star trails, etc) • Typical equipment is a 35mm film or DSLR camera & lens mounted on a stationary tripod, or equatorial mount. • Lunar & Planetary Pictures • For Lunar images, almost any camera will do. Film or DSLR camera for lunar images and webcams are the most common. • For the planets a CCD webcam coupled to a long focal length telescope can do an excellent job. • Deep Space Objects (DSOs) • CCD or CMOS camera capable of long exposure, a decent telescope on an equatorial mount.
Typical Prime Focus Setups Astrophotography: Overview The basic types (cont) • Images may be taken Afocal or at Prime Focus Typical Afocal Setup Also called Eyepiece Projection
Astrophotography: Overview The basic types (cont) • Images may be taken with a One Shot Color Camera Typical OSC Cameras & Connection to Scope (Note no filter wheel)
Astrophotography: Overview The basic types (cont) • Or with a Monochrome camera and color filters Typical Mono Camera and Filter Setup SBIG Integrated Wheel
Lunar & Planetary Imagining Lunar and Planetary Imaging • Almost any telescope, but a long focal length is helpful for planetary work. Barlows, Powermates also used. • DSLR cameras often used for Lunar images • Remarkable images of planets can now be taken with an inexpensive webcam. • Short video clips are taken at 10 to 30 frames/sec to collect hundreds or thousands of images. • The images are sorted for quality, registered, and stacked to create a much higher quality image than a single frame. • Free software is available to stack and process images (Registax, Kieth’s Image stacker, and others.)
Lunar & Planetary Imagining • Due to seeing conditions, it’s very difficult to capture a high quality, single frame image. • At left is typical movie clip. • Selecting, registering, and stacking yields photos like this. (actually much better than this)
The Ups and Downs Lunar & Planetary Imagining • Lunar/Planetary imaging is fast and fun • Due to the short exposure times, precise tracking and expensive mounts are not necessary. • Many video clips can be acquired in just a couple hours including setup. • Processing is fairly rapid, typically just a few hours work to sort and stack the best frames. • BUT! • Quality of the image is very dependant on seeing conditions. • Focusing can be very challenging • Webcam sensors are very small. Getting the image on the chip can be difficult.
Deep Sky Photography Deep Sky Photography • Dim targets mean longer exposures. • DSO imaging is usually done with dedicated CCD imagers or DSLR cameras. • Frame exposure times of 1 to 30 minutes are typical. Total times can be many hours. • Long exposures can place severe demands on the telescope mount to avoid tracking errors. • An equatorial mount is best. It can be done with an Alt-Azm mount, but field rotation will be an issue. • Processing is substantially more involved. • However, great images can still be captured and processed with relatively inexpensive gear.
Deep Sky Photography Basic Elements:(some things you’ll want to understand) • How your mount works and how well it tracks. • Your telescope and camera specs (pixel and sensor size, sensitivity, focal length, etc) • Image capture techniques and pertinent issues. (Focus tools, Sky background/exposure times, etc.) • Techniques to improve the quality of the raw data. • How to assemble the image.
Deep Sky Photography: The Mount Tracking: Know your mount • Knowing how your mount performs is essential. • Is it strong and on a stable tripod? • Rule of thumb is for photography, the weight on the mount should be half the “rated” capacity. • Very close polar alignment is important. The closer it is, the fewer corrections will have to be made. • Balance of the scopes and weights is also very important. • All motorized mounts have Periodic and Non-Periodic Errors. • Knowing how much of each, and how to mitigate the errors is important. • Some mounts have PE correction (PEC) built in.
Deep Sky Photography: The Mount The Equatorial Mount • The Go-To pointing system uses both RA & DEC. • When Tracking, the mount rotates on the RA Axis. • When Guiding, corrections are made to both RA & DEC.
Deep Sky Photography: Polar Alignment Polar Alignment: The better the RA axes is aligned with the NCP, the better the mount will track, and fewer corrections will have to be made.
Deep Sky Photography: The Mount Tracking: Balance the Load • Balance is very important to: • Keep the load on the gears to a low, safe level. • Minimize the effects of backlash (play) in the gears. • Minimize the non-periodic errors due to rotational friction. • The Balance is adjusted by moving the counterweights and/or OTA so that the RA axis is just a touch East heavy. Balance in DEC is less important, but most set it a little tail heavy.
Deep Sky Photography: The Mount Tracking: Guiding • You can manually guide. Not many folks do any more. • Auto-Guiding fixes a lot of problems. • Many would say it is required for long exposure imaging. • Corrections are made at the sub arc-second level. • Can easily correct for substantial PE and some Non-PE. • Some dedicated imagers like the SBIG ST and STL series of cameras can be ordered with an integrated 2nd “guide camera”, so no second scope or camera is needed. • The equipment used for auto-guiding does not have to be expensive. Inexpensive scopes and cameras can be used. • There is very capable free software available (PHD, Guide Dog, and others).
Deep Sky Photography: Guiding Guiding setups Piggyback and Side-by-side setups are common…. But watch out for flexure in either case.
Deep Sky Photography: Imagers Cameras… • Dedicated CCD cameras and DSLRs are the most commonly used for DSO imaging. • Sometimes modified DSLRs are used that have the I/R filter removed or replaced to enhance long wavelength response. • Cost goes from around $150 to many thousands. • Filters are also needed for “monochrome” CCD cameras…. But then…
Deep Sky Photography: Imagers Actually…. All CCD/CMOS cameras are Monochrome. • To get natural color, the light is filtered through Red, Green, and Blue filters. • The collected data is then added together to form the RGB composite (i.e. color) image. • “Color” cameras have the RGB filters dyed onto the CCD or CMOS sensor in a certain pattern. • A little better resolution is obtained with a monochrome camera, with separate filters.
Deep Sky Photography: Imagers Cameras… The Sensor • For OSC sensors, a picture might help • This represents a typical color CCD/CMOS sensor. • Note the pixels arranged in a grid. • The “filters” are dyed on the CCD in what’s called a Bayer Array. • Monochrome cameras don’t have the dye. Separate filters are used in front of the camera. Sensor in an OSC camera
Deep Sky Photography: Imagers Cameras… Sensor Specs • It can be confusing; Megapixels, Quantum Efficiency, ADUs, ABG, NABG, ….. . • Think of the sensor as a bunch of tiny buckets in a grid. • The number of buckets is the number of pixels…. Megapixels. • As a photon lands in a bucket, it adds to the charge the bucket contains. How easily it adds to the charge => QE. • When a bucket is full it’s called Saturated. • If full, a bucket may overflow into adjacent buckets. It’s called Blooming. • Some cameras control (gate) how that happens… they are called anti-blooming or ABG. If it doesn’t control it’s a NABG. • The charge for each pixel is converted to a pixel value (ADU) when an exposure is read out.
Deep Sky Photography: Imagers Cameras… Sensor Size Issues Sensors really should be matched to the telescope & target: • Field of view (FOV): Determined by the size of the sensor and the FL of the scope. • The native image size is determined by the sensor size. • Focal reducers can give some flexibility at the cost of resolution (and watch for color shift and vignette). • Large sensors are becoming available at reasonable cost. • Pixel size “should” be matched to the focal length. • A large pixel size sensor (e.g., 20 uM) on a short FL scope would be undersampling, giving chunky/square stars. • Values like .75 to 2.5 arc-secs/pixel is typically recommended depending on seeing conditions. (Check out The CCD Calculator, from the New Astronomy Press)
Deep Sky Photography: Imagers Cameras… Sensor Noise • CCD & CMOS sensors contribute noise to the image. • The noise is the result of defects (like hot pixels) and the electrical currents always present in the sensor (called dark current and bias noise). • The amount of noise is sensitive to temperature. The colder the chip is, the lower the noise. Rule of thumb, every 5 deg C, the noise is cut in half (down to about -15C.) • The more expensive dedicated imagers have a device (TEC) to cool the chip, and may have electronics to closely regulate the temperature. • Regulated temperature makes correcting for the noise much easier (makes subtraction of Dark Frames more accurate & consistent). • Some cooled cameras don’t regulate, but get the sensor so cold that Dark frames can be neglected.
Deep Sky Photography: Processing Image Capture & Processing…. • First a couple notes on image file formats: • Most common file type used is the FITS format for CCD imagers, and RAW for DSLR cameras. • These are lossless formats, preserving all the data captured. • FITS: Flexible Image Transport System. FITS is designed specifically for scientific data and hence includes provisions including human readable data along with image information. • Raw: So named as these files contains minimally processed data from the image sensor of a digital camera. • Other formats can also be used (TIFF, JPG, BMP) depending on what camera/software used. Note it’s best to use a 16-bit or better format to preserve as much data as possible.
Deep Sky Photography: Process Make an Image… The basics • Regardless of “color” or “monochrome” the process is fundamentally the same: • Collect images of each color desired (Typ: Lum, Red, Green, Blue). • Calibrate and stack the images for each channel. • Register/align the images. • Combine them into an RGB/LRGB composite (color) picture.
Deep Sky Photography: Processing Basic RGB Process…. • Monochrome cameras • Take, calibrate, and stack the R, G, B (L optional) images into “master” R, G, B, & (L) frames. • Most folks stretch, and clean up the final masters prior to color combining, but it can be done after. • Register (align) the master frames. • Color combine them by adding the masters together (there are several programs that will do this task for you). • Adjust the color levels and saturation. • Do final processing in your favorite photo editing software. Photoshop CS seems to be the favorite, but many folks use PS Elements, Paint Shop X2, or the Gimp (however these are 8-bit so only 256 shades of gray vice 65000).
Deep Sky Photography: Process Overview Process in Favorite Editor Take Images Calibrate, Stack Images Combine masters for color image (For OSC cameras, just one set of images is taken and processed.)
Deep Sky Photography: Processing Basic RGB Processing…. • OSC cameras • The data from the Bayer matrix of an OSC camera must be “de-bayered” to create the RGB(L) channels, then recombined into a color image. • Programs like Deep Sky Stacker will automate the process of calibrating, aligning, stacking, de-bayering, and creating the color image. OR • You can do it yourself. After calibrating each frame: • Use a program to de-bayer and extract the L, R, G, & B images as individual files. • Process (stretch, smooth, et. a.l.), Align and Stack each of the channels. • Then RGB(L) combine, just as would be done for a monochrome camera. • This is a little more work, but gives added control and the ability to stretch and clean up the L, R,G, & B masters prior to color combining. This typically results in a bit smoother image.
Deep Sky Photography: Down with Noise Signal vs Noise (S/N Ratio) • This concept is probably the single most important aspect of taking and processing your images. • Simply defined: Signal is the image info you meant to get, noise is the other stuff: • Such as dust on the optics, dark current, and hot pixels on the CCD. Some noise is random (dark current, stray light), some is not (hot pixels). • Several factors affect the total noise in the final image. • Some noise is under your direct control when imaging (exposure time, filters, optics, …. ) • Some noise is inherent in the equipment, and mitigating techniques are used during processing (e.g., Stacking).
Deep Sky Photography: Down with Noise Signal vs Noise: Taking Images • There are things that can be done to minimize noise as you take pictures: • Shoot under the darkest skies possible. • If in a light polluted area, use I/R and/or Light Pollution filters. • Exposure length (often called integration time), affects the signal to noise ratio. There are some pretty fancy formulas to figure out the optimum times, but in general: • Under dark skies: Shoot the longest exposures you can (but try to get at least 5 subs). • Under not so dark skies: Shorten the exposure time, and shoot many, many more subs. • With DSLR cameras, the ISO selected makes a difference.
Deep Sky Photography: Image Calibration Signal vs Noise: Image Calibration • First… some terminology: • Light Frame: The individual pictures you take of your target. • Dark Frame: An image taken with no light hitting the sensor. • Flat Frame: A half saturated white light picture used to correct for optical path problems • Flat Dark: Same as a Dark frame but at the exposure time of the Flat (it is applied to the Flat). • Bias Frame: A minimum time exposure dark frame taken to account for CCD internal baseline charge. (can be safely ignored unless doing advanced imaging & cal). • ADU or PV: Anolog Digital Units or Pixel Values. The “count” of how many photons hit a given pixel.
Deep Sky Photography: Image Calibration - Darks Image Calibration: • Images (Light frames) are “calibrated” to remove noise from the Sensor and Optics chain. • Dark Frames • Taken with the scope/camera covered and the sensor at the same temp as the Light frames to be taken. • The Dark frames exposure length should be the same as the Light frames. Several frames (5 to 8) should be taken and stacked/averaged to make a “master dark”. • The Master Dark frame is subtracted from the Light Frames. • This removes the noise added by hot pixels, dark current, and bias noise in the CCD itself.
Deep Sky Photography: Image Calibration - Flats • Flat frames • Used to correct for imperfections (dust, vignette, etc) in the optical train. • Taken at focus, under a uniform, white, dim source, at an exposure time long enough to about half saturate the CCD pixels. • Note this is process is very fast. Typical exposure lengths are 0.3 to 2 seconds each. • Like the darks, many frames should be taken, stacked and averaged. • After the Flat is stacked. It is normalized (each pixel value divided by the average PV of the frame). • The Flat is applied by dividing it into the Light frames. • Flat Darks • Flat Darks are taken at the same exposure time as the Flat frames. • Used just like regular dark frames against the individual Flat frames to corrects the Flat frames for CCD noise.
Deep Sky Photography: Image Stacking Image Stacking • After calibrating, images are stacked (averaged)in order to reduce other sources of random noise… increasing the S/N ratio. • Stacking lots of frames will significantly improve the image. However it’s not a linear relationship: • Stacking 4 frames will cut the noise in half. • Stacking 16 frames will cut it in half again. • The frames are aligned by picking a number of stars, and using those to index the placement of each image. • Stack: Various methods of averaging the data • Average, Median, K-sigma… Used for various situations like number of images, amount of noise, and others. • For example Median stacking will remove satellite trails, Averaging won’t.
Deep Sky Photography: Other Tools Resources Websites www.cloudynights.com (visit the forums here… great people willing to help) www.starizona.com (good site for equipment and info) www.newastro.com (good resource for book, info, software) groups.yahoo.com (great set of forums) www.astromart.com (good deals can be found) www.sbig.com (good products, and good info) www.starklabs.com (solid, practical, inexpensive software) Books Handbook of Astronomical Image Processing, William Bell & James Burnell The New CCD Astronomy (Ron Wodaski, The New Astronomy Press)
Deep Sky Photography: Other Tools Resources - Software Capture & Processing AIP4Win (Comes with Book) PixInsight (LE version is free, but dated) CCDSoft (Software Bisque) CCDOps (SBIG Software) Envisage (Meade Autostar Suite) Nebulosity (Low Price) Deep Sky Stacker (Free) Maxim DL AstroArt Registax (Free) Guidedog (Free) PHD Guiding (Free) Photo Processing PhotoShop CS3, CS2, Elements Paint Shop Pro X2 The Gimp (Open Source) Planetarium and Tools Stellarium The Sky Voyager4 CCD Calculator (The New Astronomy Press) AstroPlanner WCS - Drift Alignment Software
Deep Sky Photography: Equipment My Gear
1st Night Out M31 - Mono DSI Pro Your first try is bound to be better than mine.
2nd Attempt - M13 - Mono DSI Pro I felt real good about this one…. considering
Another Early Attempt M81 - Mono DSI Pro Starting to feel this is actually possible