Download
1 / 15
150 likes | 260 Vues
Simonweb On C all C alendar Tutorial. https://simonweb.eushc.org/. Login and Password. Click here to login. Note: Logins and Passwords are case sensitive. Your Assigned Groups for Scheduling. Note:. Click on scheduler.

E N D
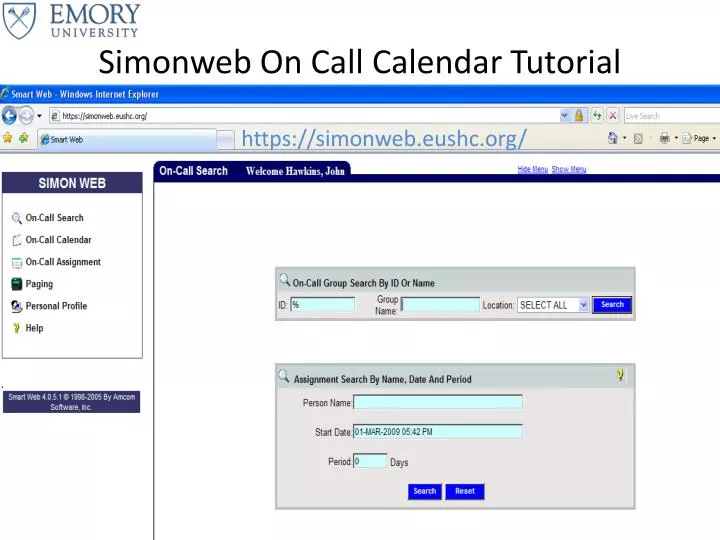
Simonweb On Call Calendar Tutorial https://simonweb.eushc.org/
Login and Password Click here to login Note: Logins and Passwords are case sensitive
Your Assigned Groups for Scheduling Note: Click on scheduler The plus sign next to a folder will allow you to collapse a folder containing more calendars. Note: Only highlighted groups are available for scheduling.
Assignment Scheduler Toolbar Click the Save button frequently . Click the Save button to add the assignment. The Delete button will remove and delete information in the highlighted field. The Add New button inserts a new assignment field in the scheduler. d. Click the Refresh button to update the assignment schedules. The new assignment is included. e. The List button to displays a list of the group members. f. The Block button offers the ability to assign and schedule large blocks of time. Block can be an effective tool provided your schedule remains static with few deviations or changes. g. With the Members Admin button , you are able to add and delete members of the on call group. The Exit button will take you back to the On Call Assignment view. Any information not save will be lost. Note: You will not be prompted “are you sure?” after clicking the button. The action will be immediate and lost information can not be retrieved.
Location Buttons You can use the set of location buttons at the bottom of the screen to navigate and find the shift assignment you want to change: • Click the First button to display the first set of ten assignments. The list is sorted by the date and time, with the earliest date and time at the beginning of the list. • Click the Next Set button to display the next 10 assignments. • Click the Previous Set button to select the previous set of 10 assignments. • Click the Last button to display the remaining list of assignments
Assign Buttons • Click the Assign Same Shift button. A new row is inserted with • the same date and time as the selected member. • Click the Assign Next Shift button. A new row is inserted with • the date and time of the next shift. • Click the Assign Next Day button. A new row is inserted with the • same shift time and an updated date range. For example, if the • original shift was for June 5, the added shift will be for June 6. the • times for both shifts are the same.
Working in the Highlighted Assignment Field Here you are able to add individuals to assignments, change the start/end dates, and times Click the radio button to highlight the assignment field Once highlighted the field below each heading becomes active and you are able to update the information Note: Any changes to the Start/End date time field must be made in the same format.
Updating an On-Call Assignment 1. Click on the Radiobutton , to the left of the Msg ID field in the row of the shift assignment you want to change. 2. To change the member, place the cursor in the Msg ID or Name field and 3. Click the List button. A list of the on-call group members displays. Select a member from the list. 4. You can update the start and end dates and times for the shift by manually entering new dates and times into the Start and End fields. 5. Click the Save button to add the assignment. 6. Click the Refresh button to update the assignment schedules.
Updating an On-Call Assignment 3. Click the list button 1. Highlight field by clicking in the radio button 2. Place cursor in Msg Id field 4. Select member from the list and click select 5. Record saved successfully
Block Scheduler The Block Scheduler is accessed by clicking on the block link next to the underlined name, as shown below. 1. Click on dates you want to select and they will turn Orange. Click on the Orange date to unselect and it will turn white/gray again. 2. With the dates you want selected (orange), enter in a Name of the individual you want to work that shift. Click Find and if your search was not exact then you will have to choose the correct person from a list. 3. Choose the shift that you want. By clicking on Next Shift you can see what shifts you have assigned to the group. You can edit the time of the shift by clicking in the field and typing in the new shift. 4. Click Update and you will see the orange blocks turn green because they are now assigned. 5. If you are going to enter in a new shift for the same day then you can click on the days again, they will turn orange. You will see off to the left of the window Schedules... so you know what is already assigned for that day. 6. Follow steps 2 -4 to enter in the new shift. *** You are able to assign more than one day at a time by clicking on more than one day and highlighting the day-so you can do weeks at a time!!! .
Block Scheduler Assignment 2. Select person to schedule 1. Select the date range 3. 4 .