Download
1 / 11
110 likes | 204 Vues
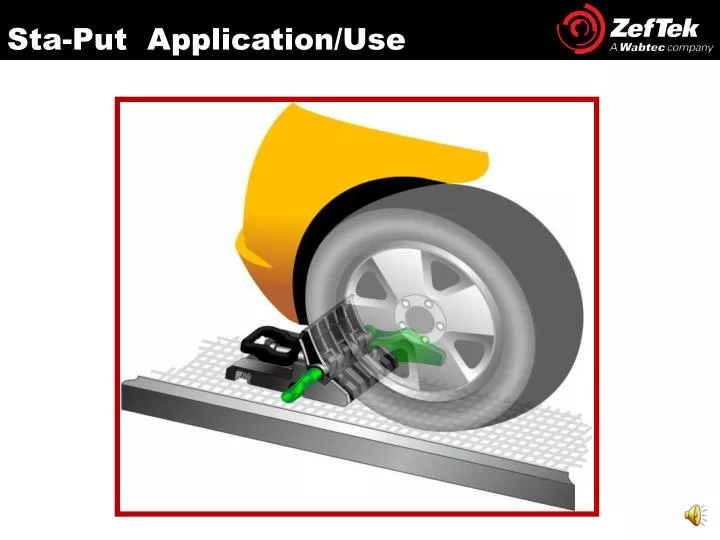
Sta-Put Application/Use. Application: STEP 1. Remove the Sta-Put™ device from the side screen. Step # 1: Holding the Chock Release Handle , pull upward to release the Sta-Put TM device from the side screen Universal Chock Hanger.

E N D
Application: STEP 1 Remove the Sta-Put™device from the side screen Step # 1: Holding the Chock Release Handle, pull upward to release the Sta-PutTMdevice from the side screen Universal Chock Hanger. The Chock Release Handle is located on the opposite side of Lateral Restraint. Lateral Restraint
Application: STEP 2 Rotate the Sta-Put™ face plate(s) into position Step # 2: Rotate the Sta-PutTMFace Plate(s) into position (High, Medium or Low). Following the vehicle manufacturer and AAR clearance guidelines, set to the highest acceptable position. Rotate the Face Plate upward into position. “High” position: Both the Tall and Short face plates are upright. “Medium” position: The Tall face plate is collapsed and the Short face plate is upright. “Low” position: Both the Tall and Short face plates are collapsed.
Application: STEP 3 Placement of the Sta-Put™Devices (4 per vehicle) Step # 3: One (1) Sta-PutTM device is placed on the outboard side of each wheel. Four(4) devices are required per vehicle as shown below (2 Red, 2 Green). The red or greenrelease levers should face away from the vehicle. The blacklateral restraints will rest against the inside wheel wall.
Application: STEP 4 Disengage the Locking Pin. Step # 4: Pull the Release Lever backward to disengage the Locking Pin. Once disengaged, the Sta-PutTM slides easily across the grating. Locking Pin Release Lever
Application: STEP 5 Position the Sta-Put™device. Step # 5: Position the Sta-PutTM against the wheel. Ensure both Face Plate(s)and the Lateral Restraint are seated as close to the wheel as possible.* Lateral Restraint is seated as close to the wheel as possible. Face Plate is seated as close to the wheel as possible. * AAR Guidelines allow up to ¾” space between the chock device and the vehicle wheel.
Application: STEP 6A Use the Release Lever to engage the Locking Pin. Step # 6A: Push down or step on the black Articulating Block. Next, push the Release Lever toward the wheel to engage the locking pin. #1- Push Downor Step Onthe Articulating Block … #2 …then push the Release Lever forward to engage the locking pin.
Application: STEP 6B Engage the release lever. Step # 6B: If the Locking Pin does not easily engage, move the Sta-PutTM back 1/2 of a grating increment. When fully engaged the locking pin will be flush with the rear of the Pin Housing. CORRECT:The Locking Pin is flush with Pin Housing and fully engaged. CORRECT: Example of 1/2of a grating increment. If the locking pin does not easily engage move the Sta-PutTM back one-half grating increment from the tire. INCORRECT: Example of 1 full grating increment. INCORRECT: The Locking Pin extends past the pin housing and is not fully engaged.
Removal: Releasing the Sta-Put™ from the grate. Removal: To release the Sta-PutTMdevice, #1 Push the Release Lever away from the wheel with your hand OR foot to disengage the locking pin. #2 Pull the Sta-putTM away from the wheel (to release the hooked teeth from the grating). # 3 Lift upward to remove the chock. #2 Pull the Sta-Put™ backward and upto release the hooked teeth from the grate. #3: Remove the Sta-Put™ from the grating. #1: Disengage the Locking Pin.
Storage: Secure the Sta-Put™to the side screen hanger. Storage:#1)Pull the Face Plates upward, then fold to “Low” (or storage position). #2) With the Lateral Restraint toward the deck, engage the Release Lever to secure the chock to the ZefTek’s Universal Chock Hanger. Engage the Release Lever to secure the side screen Universal Chock Hanger. Pull the Face Plate up… …then fold down to storage position. #2: Secure the Sta-PutTM in the side screen Universal Chock Hanger. #1: Fold Face Plates downward to storage (Low) position.
For further information Contact: FCGCustomerService@Wabtec.com