Download
1 / 14
140 likes | 265 Vues
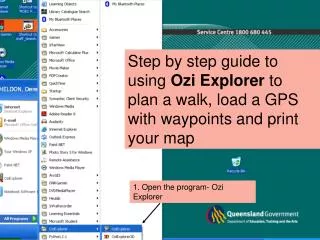
Using Ozi Explorer to Plan your campout walk. Step by step guide to using Ozi Explorer to plan a walk, load a GPS with waypoints and print your map. 1. Open the program- Ozi Explorer. 2. From the opening screen hit the load button --then open recent maps --then qld Mosaic south.map.

E N D
Using Ozi Explorer to Plan your campout walk Step by step guide to using Ozi Explorer to plan a walk, load a GPS with waypoints and print your map 1. Open the program- Ozi Explorer
2. From the opening screen hit the load button --then open recent maps --then qld Mosaic south.map
4. Use Zoom control- to about 25% to get roughly right scale- you can adjust this at any time 3. Click on where you think you are This is a mosaic of all the 1:25,000 maps of southern Queensland
6. Drag tool to move map to where you want it 5. Zoom in/ out
Waypoint tool 7. Enter waypoints • Segments and Waypoints • Look at your route-start/finish/which way do you want to go? • Divide it into segments each must start and finish at an easy to recognise landmark (called a waypoint) • Segments should not be too long • Each segment should be more or less a straight line, and follow a single feature. • Now enter the waypoints with the tool onto your map screen.
8. Use measuring tool to measure the distance and direction between waypoints. Click beside the waypoints you wish to measure between Distance and bearings between waypoints 1 & 2 9. Now enter this data into your (paper) route plan (next slide)
Route planning chart- start filling in values from map building -40m +15m 0.47 121 South along road Road jun.
11. Use contours to work out height gain and loss and enter these into your route plan These lines are 10metre contours so from wpt 1 to wpt 2 you go down (towards water) 40m and up 15m
Loading GPS with Waypoints 12. Plug your GPS into the lead that connects it to the computer and switch on the GPS- now use the Garmin control to get the Waypoints from the computer into the GPS
14. Selected to scale 15. Adjust scale 16. Selection tool
19. Colour? 17. Use cursor to select map boundary 18. Get correct orientation 19. Preview (next slide)
20. If this is what you want then print- if not close and adjust.-you may have to go back to previous screen and use the setup button to send this to the correct printer
Almost done- • Now finish off the Planning Chart and head off for your walk. • Use your map, compass, GPS and Planning Chart to navigate the walk one segment at a time. Enjoy your walk!