Download
1 / 71
710 likes | 847 Vues
Flight Reservation Module. Implementation of Flight Reservation. Topics covered. Exporting Data-tables. Checkpoints and CheckProperty method. Testing ActiveX test objects. Mapping objects using filter. Implementation of Req0010 to Req0015. Before you start….

E N D
Flight Reservation Module Implementation of Flight Reservation Dani Vainstein & Monika Arora Gautam
Topics covered • Exporting Data-tables. • Checkpoints and CheckProperty method. • Testing ActiveX test objects. • Mapping objects using filter. • Implementation of • Req0010 to Req0015 Dani Vainstein & Monika Arora Gautam
Before you start… • Before starting the presentation, read about the following topics in QTP help. • WinObject object. • ActiveX object. • Run-time properties. • WinMenu.CheckItemProperty method. • ExitActionIteration statement. • WinMenu.ExpandMenu property. • WinMenu.BuildPath method. • DataTable object. Dani Vainstein & Monika Arora Gautam
guiFR Module Open a new blank test and save it as “guiFR” under the folder FR\RA\GL Automation FR LIB RA BL GL RS DOC DAT SETTING TESTS RES BATCH ENV guiFR 4 Dani Vainstein & Monika Arora Gautam
guiFR - Introduction • We are going to create a new test, classified as a GUI module, and a reusable action. • The module name would be guiFR, because it will handles the “Flight Reservation” window. • This action will be called GuiFR because the reusable action is going to handle all the operations on FR windows . • The guiFR will receive a single input parameter (StepName) of String type. • As you might have noticed in previous presentations all guiXX actions have one and only one input parameter. Dani Vainstein & Monika Arora Gautam
guiFR Settings From Menu Edit Action Action Properties 6 Dani Vainstein & Monika Arora Gautam
guiFR - General Tab Change Action Name Add Description Mark Reusable 7 Dani Vainstein & Monika Arora Gautam
Parameters Tab – Add StepName Add a new Input Parameter ( Click on + ) Add StepName Input Parameter Add Description Type String Default Leave Empty Click OK 8 Dani Vainstein & Monika Arora Gautam
Adding Objects to Local Repository Open the Flight Application from Start All Programs QuickTest Professional Sample Applications Flight. Login to FR. 9 Dani Vainstein & Monika Arora Gautam
Adding Objects to Local Repository Open the local object repository from Menu Resources Object Repository. Or just press < Ctrl + R > in QTP application. Click Add objects in toolbar or select Object > Add objects to local repository from menu-bar. QTP will show an hand icon. Click Add objects in toolbar Or Object Add objects To Local… 10 Dani Vainstein & Monika Arora Gautam
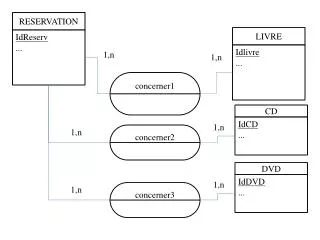
Verify WinObject is unchecked under Miscellaneous Mapping objects Select The Window Title With the point hand Dani Vainstein & Monika Arora Gautam
Mapping Objects Dani Vainstein & Monika Arora Gautam
Naming conventions All the objects will be added to the local repository. While mapping the FR window we can see how naming conventions can be effective. Which button is Button_2? and Button_4? Which object is MaskEdBox? Rename all objects; use the “Highlight in Application” and “Locate in Repository” features. When an object was located, right-click on the object logical name ( left pane ) and select “Rename”. 13 Dani Vainstein & Monika Arora Gautam
Naming conventions Extended View Compact View 14 Dani Vainstein & Monika Arora Gautam
guiFR Header '*********************************************************************** '@Author : advancedQTP '@Date Created : <ddd MMM dd, yyyy> '@QTP Version : 9.2 '@Description : The guiFR Module Stores all the actions required for the Main screen. '@Input Parameter : Name:=StepName, Type:=String, Default:=, Description:=The Step code name. '@Out Parameter : None. '@Gui Window : Window "Flight Reservation" '@Addins : ActiveX '@Modifications : <#n By <Name>, Date: <dd-mmm-yyyy>> (Later modification on top) ' <#n-1 By <Name>, Date: <dd-mmm-yyyy> '*********************************************************************** Option Explicit Dani Vainstein & Monika Arora Gautam
guiFR Template Option Explicit Dim msg SelectCaseLCase( Parameter.Item( "StepName" ) ) Case ... Case ... CaseElse Reporter.ReportEvent micWarning, "NotImplementedException", Parameter( "StepName" ) ExitAction( micWarning ) EndSelect Dani Vainstein & Monika Arora Gautam
Implementing Req0010 • There are 6 bitmap checkpoints and 6 property checks. • It is not possible to merge a bitmap checkpoint to a Standard checkpoint, so we are going to use the CheckProperty method of the WinButton object. Dani Vainstein & Monika Arora Gautam
Implementing Req0010 • Add a new “Case” to the Select Case statement. • Remember to use lower-case since the Select Case condition is converted to lower case ( LCase Function ) Dani Vainstein & Monika Arora Gautam
Avoid This!!! Req0010 – Bitmap Checkpoints • To insert a bitmap checkpoint we must be in “Record” mode. • Before pressing RECORD, place the cursor below the Case “req0010” be sure only one instance of “Flight Reservation” application is opened. • Put the cursor on line 19 ( just below case “req0010” ) Dani Vainstein & Monika Arora Gautam
Name: Req0010a Timeout : 2 Inserting a Bitmap Checkpoint • Be sure you are in Recording Mode ( Status Bar Message blinking ) • Select from menu : Insert Checkpoint Bitmap checkpoint. • With the pointing hand, select the “New Order” button. • Then without stopping continue to the rest of buttons one after another. Dani Vainstein & Monika Arora Gautam
Req0010 - Implementation • Place the cursor below the last checkpoint and press F7. • You will see the step generator. • Category : Test Objects. • Click the object icon on right. Dani Vainstein & Monika Arora Gautam
Req0010a – Using the Step Generator Type: Button Name: New Dani Vainstein & Monika Arora Gautam
Req0010a – Using the Step Generator Operation: CheckProperty PropertyName: enabled Documentation: Click For Documentation PropertyValue True Timeout 2000 Dani Vainstein & Monika Arora Gautam
Step Generator… • For some reason the Step Generator, converts “Any” values to string. So we need to fix the strings “True” to Boolean True. • Repeat above steps for rest of the bitmap checkpoints. Fix Manually Dani Vainstein & Monika Arora Gautam
Checkpoints • Place the cursor below the checkpoint created for “req0010b” and press F7. • Repeat Steps discussed from slide # 21 to 24. • Repeat above steps for rest of the bitmap checkpoints. • Do not forget to change string “True” to boolean TRUE and for Delete “PropertyValue” should be FALSE. Dani Vainstein & Monika Arora Gautam
Req0010 Case - Modifying Modify Script for better look and fit to code standards Dani Vainstein & Monika Arora Gautam
Req0010 Case – Keyword View Dani Vainstein & Monika Arora Gautam
Implementing Req0011 • Req0011 checks also the properties of the “Date of Flight” field. • The “Date of Flight” field is an ActiveX object we have to test 5 properties. • “Flight From” and “Flight To” has two properties to be tested. To test these 2 properties we will use standard checkpoints. Dani Vainstein & Monika Arora Gautam
Implementing Req0011 • Press on record, and insert a standard checkpoint for this object. Dani Vainstein & Monika Arora Gautam
Implementing Req0011a • Rename the checkpoint to “Req0011a” and only check the required properties Dani Vainstein & Monika Arora Gautam
Modifying Checkpoints • If you find that you made a mistake on selecting properties you can always edit you checkpoints. • Select the word “Checkpoint” and right-click. • In the popup menu select “Checkpoint Properties…” Dani Vainstein & Monika Arora Gautam
Implementing Req0011b and Req0011c. • Add a standard checkpoint for “Fly From” and “Fly To”. • Give the name “Req0011b” and “Req0011c” respectively. Dani Vainstein & Monika Arora Gautam
Implementing Req0011d • Since Req0011d checks only one property, we will insert the checkProperty method manually or via “Step Generator” . • Use QTP intellisense when typing. Dani Vainstein & Monika Arora Gautam
Implementing Req0012 Dani Vainstein & Monika Arora Gautam
Implementing Req0012 • All the fields from “a” to “i” except “e” are disabled all the time, they are just information fields. • The thing that we need to test here is not that fields should be enabled but that fields are not displaying any data, all fields should be empty. Dani Vainstein & Monika Arora Gautam
Implementing Req0013 Dani Vainstein & Monika Arora Gautam
Implementing Req0013 Dani Vainstein & Monika Arora Gautam
Implementing Req0013 – Menu Defaults • We are checking the WinMenu object. • To check a menu item, we are going to use the CheckItemProperty method because it is not supported by any standard checkpoint. • Menu item exists. • Window( “FR” ).WinMenu( “Menu” ).CheckItemProperty “<item>”, “Exists”, True, 2000 • Menu item enabled. • Window( “FR” ).WinMenu( “Menu” ).CheckItemProperty “<item>”, “Enabled”, True, 2000 • Menu item index. • Window( “FR” ).WinMenu( “Menu” ).CheckItemProperty “<item>”, “Index”, <n>, 2000 • Menu item label. • Window( “FR” ).WinMenu( “Menu” ).CheckItemProperty “<item>”, “Label”, <label>, 2000 • Menu item SubMenuCount. • Window( “FR” ).WinMenu( “Menu” ).CheckItemProperty “<item>”, “SubMenuCount”, < count >, 2000 Dani Vainstein & Monika Arora Gautam
Implementing Req0013 – Menu Defaults • We need to “check” 15 menu items and 7 properties each ( 105 lines of code ). • We can repeat the code ‘7’ times, for each menu item; that will work, but, it will require a lot of coding, and if, in the future, something changes in Menu, then it will require more time in maintenance. • For this specific requirement I have chosen a “smart” method. • I will create an excel sheet with the expected results and use the QTP iteration mechanism, so now, the only thing left is to maintain an excel-sheet, and not the code. • Earlier we learned how to import an excel sheet, now we’ll see how to export an excel sheet. • Select the Local Sheet “guiFR” Dani Vainstein & Monika Arora Gautam
Req0013 Process Design < CHECK > Index : Start <n> Rows Loop <rows> Index? Y Index Failed Exists? Y Exists HasSubMenu? Y HasSubMenu Enabled? Y Enabled SubMenuCount? Label? Y Y SubMenuCount Label Dani Vainstein & Monika Arora Gautam
Req0013 Process Design < CHECK > Index : Start <n> Rows Loop <rows> Index? Y Index Failed Exists? Y Exists HasSubMenu? Y HasSubMenu Enabled? Y Enabled SubMenuCount? Label? Y Y SubMenuCount Label Dani Vainstein & Monika Arora Gautam
Exporting a Data-Sheet • If you don’t see the Data Table select from menu View Data Table • Or from the toolbar as shown below. View Data Table Dani Vainstein & Monika Arora Gautam
Inserting a new Data-Column • You can insert/change the name of a column for a parameter by double-clicking the column heading cell. Dani Vainstein & Monika Arora Gautam
Inserting a new Data-Column • Add the follow columns : “itemPath”, “menuItem”, “Exists”, “Enabled”, “HasSubMenu”, “Index”, “Label”, “SubMenuCount” Dani Vainstein & Monika Arora Gautam
Exporting Data Table Dani Vainstein & Monika Arora Gautam
Modifying Datasheet • Open FR\DAT\FR.xls • Delete line no. 2 ( remove the cell frames ) • Rename sheet to “MenuDefaults” • You can optionally remove “Sheet2” and “Sheet3” Dani Vainstein & Monika Arora Gautam
Entering Data Dani Vainstein & Monika Arora Gautam
Excel Options • When I first wrote the excel file and run it, I found something very strange. My checkpoint failed with the following message : • If you have a sharp eye you can notice a minor difference.. • If you still didn’t notice the difference, I'll tell you; the expected 3 dots, are wider than the actual 3 dots...mmmm Dani Vainstein & Monika Arora Gautam
Excel Options • I researched, and almost got crazy, but then I found a solution. • The last 3 dots are NOT 3 characters, “those” are actually a single “symbol” character. • And why is it a 'single symbol' character? Because that is the way microsoft has designed it. Dani Vainstein & Monika Arora Gautam
Excel Options • If you just type the string “Open Order...” in MS-Excel and press ENTER, you will see the following difference: And not • The difference can be seen in better in “Courier New” font. • That’s the main reason that I recommend to use the “Courier” or “Courier New” fonts. • The AutoCorrect feature is defined by default to change the 3 dots. • Select in Excel menu : Tools > AutoCorrect Options... > AutoCorrect Tab • Uncheck the option “Replace text as you type”. Dani Vainstein & Monika Arora Gautam