Download
1 / 37
1.46k likes | 6.18k Vues
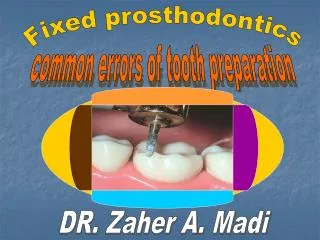
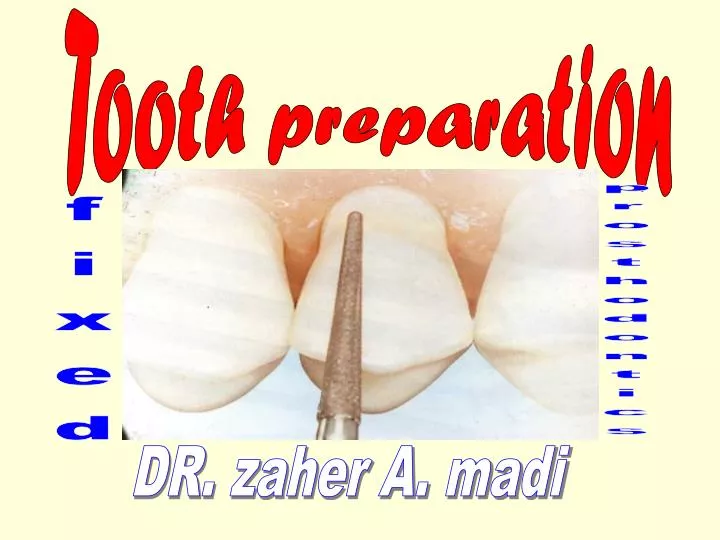
Tooth preparation. prosthodontics. fixed. DR. zaher A. madi. Tooth preparation. Tooth preparation is defined as the mechanical treatment of dental lesions, or injury of hard tissue of teeth to restore a toth to orginal form

E N D
Tooth preparation prosthodontics fixed DR. zaher A. madi
Tooth preparation Tooth preparation is defined as the mechanical treatment of dental lesions, or injury of hard tissue of teeth to restore a toth to orginal form Adequte tooth preparation,can determine the success of fixed prosthesis .
Principles of preparation Mechanical esthetical Biologic - Color selection -Type of material - Restoration design - Preservation of tooth structure - path of insertion - Retention and resistance - Adequate reduction of tooth structures - Marginal integrity (finish line ) - Smoothing and rounding the angles -Pulp consideration - Periodontal consideration
Mechanical principles 1- preservation of tooth structures - minimal reduction - partial veener crown or laminate (partial coverage) versus full veener crown (full coverage) - Supragingival margin versus subgingival margin Supra-ging At crest Sub-ging
2- path of insertion It’s the specific direction in which a prosthesis is placed onto the abutment or removed from the abutment . Any diviation (undercut) from this line will result in distoration of patterm wax and failure of restoration seating Axial reduction must be with Taper - - facio-lingual reduction { height of contour must be removed to eliminate any divergent (undercut) with taper 5 – 10 “ } - mesio-distal reduction (proximal) { removal of divergence in occlusal third to eliminate any undercuts , and mesio-distal inclination (taper 5-10”) of the path must parallel to adjacent proximal contact of adjacent teeth }
Taper its defined as a convergance between two opposing axial walls , in occluso-axial junction Two opposing surfaces , each with a 3 degree of inclination would give the preparation a total of 6 degree taper taper must be 5- 10 degree of inclination Why tapered ? 1- To visualize preparation walls 2- To prevent the undercuts 3- To compensate for inaccuracies in the fabrication process 4- To permit complete seating of the restoration during cementation
Taper More tilting toward the tooth create excessive convergence(Taper) Weak retention tilting bur slightly toward the tooth create taper 5 – 10 C”
Undercut Its defined as a divergence between opposing axial walls , in a cervical –occlusal direction . If the cervical diameter of tooth preparation at the margin is narrow than at the occluso-axial junction (reverse taper) , it well be impossible to seat a complete crown Undercuts can be present wherer tw axial walls faces in opposite directions For example :- the mesial wall of a complete crown prparation can be undercut relative to the distal wall , and the buccal wall can be undercut relative to the lingual wall Tilting the bur away from tooth create undercut No setting
3- Retention and resistance Retention It’s the quality of the preparation to prevent removal of the restoration along the axis of the tooth ( its path of insertion ) Retention depend on the factors :- 1 - magnitude of the dislodging forces 2 - geometry of preparation - taper preparation - duplicating anatomical form of occlusal surface preparation - type of prparation (full crown more retentive than partial crown) 3 - roughness of the internal surface of the restoration ( air-abrasion – oxide layer -- microretention 4 - type and film thickness of luting agent ( cement)
Resistance It’s the ability of the preparation to prevent dislodgement of the restoration by forces , directed in apical , oblique or horizontal direction Factors affecting resistance :- 1- length of preparation The more occluso-gingival dimension ,the more resisatnce resistance is increased due to the amount of tooth structure interfering with (lateral or oblique force) the arc of rotation
2- Taper The resisatnce is increased by decreasing the taper of the preparation 3 – Ratio of diameter to length of preparation There is a balance ratio between the diameter and height ,which provide more resisatnce 4 – occlusal irrgularity of reduction Duplicating the anatomical form of occlusal surface during preparation , increase the resisatnce .(flat reduction of the occlusal surface of the tooth may decrease the resistance )
4 –adequate Reduction of the tooth structure Steps of tooth reduction (preparation) Occlusal (incisal) reduction Axial reduction - buccal (facial) - lingual (palatal) - mesial proximal - distal
1- occlusal (incisal) reduction Occlusal and incisal reduction is preformed toprovide adequate clearance between he preparaed surface and opposing teeth . The occlusal and incisal surfaces must be reduced by minimum 1,5 mm clearance for (full metal crown) and 2mm clearance for (full ceramic and metal ceramic crown) To allow:- - adequate thickness of restorative material (metal – ceramic) to be enough strong (to prevent fracture of crown) - To form anatomical morphology in occlusal surface of the restoration to be more esthetic
Adequate clearance more strength of restoration Adequate clearance adequate anatomical form more esthetic and more chewing effect
- Occulsal depth cuts Occlusal cut acts as a guide for reduction ,and placed using round bur No2 (1,5mm) or by round ended-taper bur on the grooves and cusps Depth cuts
To complete occlusal reduction the remaining tooth structures between the depth cuts is then uniformly removed by (round ended- taper bur ) or by (wheel-shaped bur ). The reduction of occlusal surface should be uniformly and follows anatomical contour ,which permit to increase the retention and resistance of the restoration Note : flat plane reduction of the occlusal surface may be acceptable in older patients with attretion on the occlusal surface
- Functional cusp bevel Its provided in the functional cusp area (deep contact of occlusion) to increase the thickness of the restoration in occluso-axial junction The functional cusp is reduced more than nonfunctional cusp for 0,5 mm Note: Functional cusp bevel in the mandibular molars buccal cusps Functional cusp bevel in the maxillary molars palatal cusps Funct. Cusp bevel
Lack of functional cusp bevel may produce several problems :- 1- can cause a thin area or perforation 2- may result in over- contouring and poor occlusion
- Evaluation of the clearance To evaluate clearance between the preparaed and opposing teeth , the mandible and maxilla must be closed in centric occlusion , 1,5 – 2 mm of interocclusal space must present , this space space can be measured by using the strip of utility red wax hwn the patient in bite or by using reduction gauge its should pass through the occlusal surface without obstraction
Axial Reduction Axial reduction commonly includes the entire circumference of the tooth( buccal – lingual – mesial distal surfaces ) Buccal and lingual reduction The buccal and lingual surfaces must be reduced so that the restoraton can be reestablish tooth contour ` - Depth cuts for adequate and uniform reduction is achieved , can use the depth cuts in buccal and lingual surfaces as guide to preparation . Depth cut of reduction in the buccal and ligual surfaces 1 – 1.5 mm . By taper round-ended diamnod bur makiing 2 -3 depth cuts equally placed along the mesio-distal dimension of buccal and lingual surfaces in the posteriro teeth .
To complete the preparation of buccal and lingaul surfaces in posteriro teeth , use the taper round – ended diamond bur , to remove the reaminimg structures between depth cut to obtain uniformly reduction . The bur should be tilted toward the surface during reduction to obtain taper . The reduction of buccal and ligual surfaces should be taper 5 – 10 degree occluso-gingivally with finish line ( chamfer or edge – knife )
tilting bur slightly toward the tooth create taper 5 – 10 C”
In the buccal and lingual surfaces the hieght of contour and any divergence should be removed to eliminate the undercuts , the over reduction of the axail surfaces will lead to loss of retention . More tilting toward the tooth create excessive convergence(Taper) Tilting the bur away from tooth create undercut No setting Hieght of contour and undrcut
Mesial and distal (proximal) reduction The reduction form of the proximal walls ( surfaces) , should be taper occlusogingivaly 5 – 10 degree with chamfer or edge-knife finish line Reduction of proximal surfaces complete by using the taper round-ended diamond bur with tip 0.8 mm , interproximal space must be 0.8 – 1mm and not less than 0.6 mm . Insufficient reduction of the proximal walls leads to inadequate embrasure with predictable periodontal implications Access to proximal reduction Care must be taken during the proximal reduction to avoid the damage of adjacent tooth or restoration with rotary instrument . - break the contact with adjacent teeth by carbide bur 169L or by needle diamond bur , work bur through the proximal area in occluso-gingival and buccolingual “sawing’ motion until gingival contact is broken with adjacent teeth .
break the contact with adjacent teeth • Making or creating “flanges or enamel lip” on the buccal and ligual surfaces during their reduction , which serves as a guide to avoid the contact with adjacent teeth and help to complete the preparation of the proximal surfaces . • Using the matrix band – matrix band can be placed around the adjacent teeth to protect it from the abrasive contact Note :- Tapare round –ended and needle diamond burs are used to reduction of proximal surfaces
Preparation from buccal or lingual to proximal Flange or enamel lip Inter-proximal reduction not les than 0.6 mm
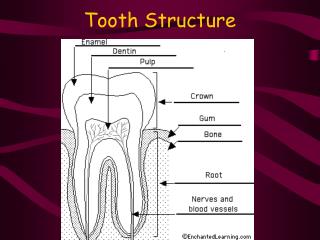
Formation of finish line Finish line It’s the point at which the preparation terminates on the tooth Finish line serves many functions 1- its delinate the estent of the cut in apical direction of the restoration 2- the finish line is one of the features that indicate and evaluate the precision (correctness) of impression 3- the correct marginal adaptation of the wax pattern depends on an obvious finish line 4- evident finish line helps in the evaluation of quality of the die
Finish line location Supra –gingival location – finish line located above the gingiva and its easy to manipulation and save for periodonatal tissue (more healthy ) but ( non- esthetic) Sub-gingival location – finish line located in the free gingiva ( sulcus) requires special care to avoid excessive soft tissue trauma from rotary instruments , the gingiva must be carefully held out of contact with bur by placing a retraction cord in the gingival sulcus ( high esthetics ) . At the gingiva located at the gingivl margin border its not helathy because causing secondary caries ( poor oral hyeigyne)
There are four basic types of finish lines 1- edge –knife (chesil) Its an extremely thin finish line , this line terminate on the cementum and formed by needle diamond burs or by thin flame . Its used in the posterior teeth for ful metal and gold crown , used for inaccessible areas of oral cavity (limited mouth opening ) , and used in drifting or maloaligned teeth in mesial surface - difficult to wax up and cast - difficult to produce smooth margin - susceptible to distoration
2- Chamfer It’s a concave extra-coronal finish line that is possess a curved slope from the axial wall till margin . The chamfer formed by taper round ended bur , chamfer used for cast metal crown , metal-acrylic veneer crown , metal ceramic crown in the posterior teeth and in the lingual margin for metal-ceramic crown in the anterior teeth { chamfer seem as a negative image of a tip of round-ended bur } - less stress and good success rate - improper (excessive deep) reduction will produce an desirable fragile piece of enamel (lipping) Chamfer depth 0.5mm
- shoulder subgingival located finish line , which extend in gingival sulcus (crevice) to .05 –o.8mm and has 1mm depth .it should be terminated on enamel . Shoulder formation require using the retraction cord to prevent gingival injury during procedure , retraction cord placed into gingival sulcus , the cord provides about 1mm gingival displacement , which allows the shoulder to be formed at the level of cord and located cervically without trauma from rotary instruments . Shoulder is formed by using flat-end bur , and used for metal ceramic and all-ceramic Restorations ,specially in anterior teeth to gain the restoration more retention and very Esthetic appearance 0.8-1mm(free gingiva) 1,5mm(attached gingiva) Supracrestal fiber tissue
Placing retraction cord Cord is placed with retracted gingiva and forming shoulder Cord is removed and completely formed shoulder Impression with negative details of shoulder Cord packer Retraction cord(ultra-pack)
Beveled shoulder – its modification or simislar to shoulder with bevel about 0.2mm of width ,and forms an angle of 45 degree relative to the floor of shoulder . . This finish line improve marginal adaptation of the restoration . beveled shoulder indicated for all-ceramic and metal-ceramic restorations To form beveled shoulder , too need a retraction of gingiva to avoid gingival trauma Beveled shoulder is formed by using bevel-end cylinder bur or by torpedo bur 1 mm 0.2mm 0.2 mm 2- 3 mm Ging.-sulcus Bevel-end cylinder bur Bevel with 2mm and 45C` angle
smoothing the preparation and rounding line angles All prepared surfaces should be smoothed by using fine diamond bur or by carbide bur to remove any rough areas and undercuts. The sharp line angles should be rounded , this procedure reduce the stress that develops when occlusal forces are applied to the restoration . When the wax pattern is invested that is less possibility to air will be trapped and cause internal nodules on the cast . The smoothing of the prepared tooth surfaces achieved without using water spray to maximize visual observation . Using the air as a coolant and short intermittent contact of abrasive instrument can avoid pulpal irritation . Smoothing surfaces and rounding incisal edge and lingual lines Smoothing all surfaces and rounding all sharps lines with 45C` angles