Download
1 / 17
170 likes | 297 Vues
Animation and Explanation Slides for Lenses. On the back of Page 1. Code for diagrams. Types of Lines: Solid Lines = Light Rays Dashed Lines = Virtual Rays Dotted Lines = Guide lines (not a ray) Colors: Blue = Incident Light Rays Red = Reflected Light Rays Green = Virtual Rays

E N D
Animation and Explanation Slides for Lenses
On the back of Page 1 Code for diagrams Types of Lines: Solid Lines = Light Rays Dashed Lines = Virtual Rays Dotted Lines = Guide lines (not a ray) Colors: Blue = Incident Light Rays Red = Reflected Light Rays Green = Virtual Rays Other: Empty Block Arrow = Object Filled Block Arrow = Image
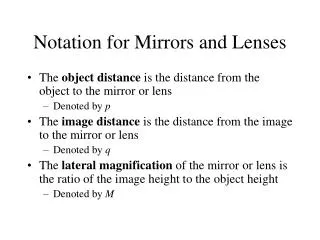
Rules for Lens Diagrams • Always draw the “check line” last. • 2 Rays are required to prove the image exists: • Ray 1: Start at the top of the object and draw a ray to the lens that is parallel to the normal. Refract through the lens to the focal point. • Ray 2: If possible*, start at the top of the object and draw a ray through the focal point to the lens. Refract through the lens with a ray that is parallel to the normal. • Ray 3: Draw the “check line” from the top of the object through the intersection of the normal and the lens.
Explanation of Images • Real or Virtual? • If refracted light converges (meets together), a REAL image is formed • If refracted light diverges (spreads apart), a VIRTUAL image is formed • If refracted light is parallel, no image is formed. • Upright or Inverted? • If the refracted rays cross above the normal, image is UPRIGHT. • If refracted rays cross below the normal, image is INVERTED. • Reduced, Same Size, or Enlarged? • If the image formed is shorter than the original, it is REDUCED. • If the image formed is the same height as the original, it is SAME SIZE. • If the image formed is taller than the original, it is ENLARGED.
Convex Lens: Beyond 2F 2F F F 2F Image: Real Inverted Reduced
Convex Lens: @2F 2F F F 2F Image: Real Inverted Same Size
Convex Lens: Between 2F and F 2F 2F F F F F 2F 2F Image: Real Inverted Enlarged
Convex Lens: @ F 2F 2F F F F F 2F 2F Image: No image formed from parallel rays
Convex Lens: Between F and Lens 2F F F 2F Image: Virtual Upright Enlarged
Concave Lens: Any Placement 2F F F 2F Image: Virtual Upright Reduced