Download
1 / 10
100 likes | 242 Vues
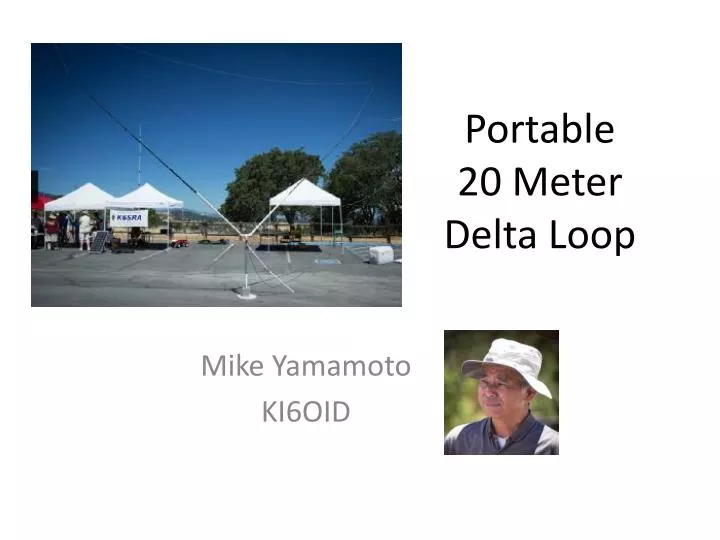
Portable 20 Meter Delta Loop. Mike Yamamoto KI6OID. These two images were the inspiration for this 20m apex down Delta Loop. Here is my version of the 20m delta loop at the Bay-Net Field Day in 2014. Parts List.

E N D
Portable20 MeterDelta Loop Mike Yamamoto KI6OID
These two images were the inspiration for this 20m apex down Delta Loop.
Here is my version of the 20m delta loop at the Bay-Net Field Day in 2014
Parts List • 2 - Cabelas Model CCT-165, 16.5 foot Crappie fishing poles ($10.99 each), available from www.cabelas.com. • Link to pole These parts are for PVC fishing pole center stand available from any hardware store: • 2 - PVC 10 foot 1-1/4" plumbing pipe • 2 - PVC 1-1/4" 45 degree pipe couplers • 1 - PVC 1-1/4" "T" pipe coupler • 3 - PVC 1-1/4" straight pipe coupler • 1 - 4 oz. can PVC cement • These parts are for the PVC support base and available at any hardware store: • 2 foot diameter 5/8" plywood circular disc • 1/2" galvanized pipe flange. • 2 foot length of galvanized 1/2" pipe (threaded at least at one end) • 70 feet of 18 to 20 gauge magnet or lightly insulated wire (light to minimize weight and wire sag).
Construction • Step 1 - Take one 10' pipe and cut off two ~ 52" lengths. These pipe lengths will contain the fishing poles and be supported by the PVC center stand. From ~ 12" from one end drill hole and screw in any 1" sheet metal screw, this will be the pole stop. • Step 2 - Using basic PVC pipe assembly skills construct the PVC center support shown in photo, using the 45 Degree, T, straight couplers, and PVC cement . The straight couplers will support the 52" pipe which in turn will contain the fishing pole. Do not cement the 52" pipe into the straight couplers. • Step 3 - Cut a 3 foot length of the 1-1/4" PVC pipe and install into the bottom of the center stand "T" coupler, do not glue this. This pipe will help stabilize the center stand on the 1/2" pipe base. • Step 4 - Fasten the 1/2" pipe flange to the center of the plywood disc. Screw in the 2 foot length of 1/2" galvanized pipe into the flange. Note, I found a short length of PVC pipe diameter that closely fit onto the 1/2" galv pipe and I glued it to the galvanized pipe as a spacer between the galv pipe and the PVC center support. • Step 4 - Insert the PVC center stand onto the 1/2" pipe on wood disc. Next, insert the 52" PVC arms into the Center stand. • Step 5 - Sand or file off the base of the fishing pole so that it fits into the 1-1/4" PVC pipe. Once this is done then insert the pole into the 1-1/4" PVC pipe and now you have the completed stand. • Step 6 - Take the extended (16.5') fishing poles out of stand and thread 22 gauge wire from the center stand at pole bottom into one pole tip and then through the other tip and down to the center stand. I tend to wrap the wire around the poles ends to minimize the wire from short cutting (secant) the tension bent fishing pole which of course minimizes the loop length. Insert the poles into the center stand arms and fasten or tape the wire ends to the center stand, cut off excess wire, and then connect to a 4:1 balun. Loop resonant frequency is adjusted by the wire length, but bandwidth was found to be fairly broad so length tuning may not be that necessary.
Delta Loop Background Wire Length at mid-band • Length of the wire: Divide the desired resonant frequency in Mhz by 1005. • Use a 4:1 balun at the feed point. • Add an RF choke at the feed point. Wind 6 to 8 turns of coax around a coffee can at the feedpoint to keep RF out of the shack and to provide a higher impedance path for lightening. Source: W5SDC
Parts Typical 4:1 balun Install at the feed point. Example of the coaxial feedline choke then feeding the balun RF choke made with 8-10 turns of feedline coax