Download
1 / 33
330 likes | 412 Vues
WAO 2012 Bevatron Decommission and Demolition. Jim Morel Lawrence Berkeley National Laboratory. Welcome to the San Francisco Bay Area. Thanks goes to : Joseph Harkins, Lawrence Berkeley Laboratory And Robert Cronin, CH2M Hill for much of the technical information used in the presentation.

E N D
WAO 2012Bevatron Decommission and Demolition Jim Morel Lawrence Berkeley National Laboratory Welcome to the San Francisco Bay Area
Thanks goes to : Joseph Harkins, Lawrence Berkeley Laboratory And Robert Cronin, CH2M Hill for much of the technical information used in the presentation.
The Bevatron • The Bevatron was built in the 50’s at the Berkeley’s Rad Lab for a cost of $9 million ( ~$76 million 2012 $$). • It began operation in 1954. • Bevatron was a initially a proton accelerator. • It was built to discover the anti-proton (discovered in 1955). • They also discovered the anti-neutron.
The Bevatron • 180 feet diameter accelerator. • Beam space was 4 square feet in cross section. • The vacuum system was tremendous. • The magnet was 12,000 tons. • Concrete shielding 13,500 tons. • It was built with no shielding on top, • but shielding was added when the • sky shine was discovered. • Motor generators ramped up the magnet in • 1.85 seconds for each 5 second cycle. • It used a lot of power, this cost a lot and led to its demise.
The Life of the Bevatron 1953-1993 • The Bevatron experienced several reincarnations over the years. • Converted from protons to heavy ion accelerator for High Energy Physics experiments. • It was linked to the HILAC as its ion source. • Converted to a nuclear medicine treatment center. • Finally Bevatron was shutdown • in 1993. Ed Lofgren, chief of operations when the Bevatron started up, hitting the “Accelerator Off” button to finally turn off the Bevatron. (HILAC-Heavy Ion Linear Accelerator)
Decommissioning the Bevatron • The power/utilities were turned off for the accelerator and the building was to be used for its office space. • Documentation/documents were “archived” off site. • The Bevatron had a lot of cool stuff… • There was still useful equipment in the facility. • The equipment was inventoried and distributed to other parts of Berkeley Lab. • Additionally other Department of Energy (DOE) facilities benefited from this.
Decommissioning the Bevatron • De-staffing of the Bevatron • When the Bevatron was shutdown the scientists, technicians and engineers were reassigned elsewhere. • They walked away and left things as they were. • Essentially everyone went on the next great project. • The useful office rooms were used for training. • The building sat idle for 15 years (1993-2008) while • DOE considered what to do with the facility.
Decommissioning the Bevatron • The fate of the Bevatron would be decided by the DOE managers at a later date, 15 years later. Then things changed in 2008 • The DOE decided to resolve the Bevatron problem. • After a change in administration and with a new DOE secretary, Dr. Chu, the demolition of the Bevatron project was supported and financed. • Surprise? Dr. Chu was an ex-LBNL Director- he knew the problem had to be resolved.
Demolition of the Bevatron 2008-2012 • The project was scheduled to take 4 years and • cost $50 million. It was going to be a big deal. • Project Milestones • Isolate utilities and remove stored hazards • Remove concrete shielding and the accelerator • Abate Hazardous Materials • Demolish 125,000 square feet metal frame structure • Remove shallow foundations and slabs • Remediate soils and then backfill
Milestone1: Isolate Old Utilities and Establish Reliable Utilities They established a boundary where all utilities had to be severed and then worked outward from there to where isolation breaks could be implemented. Re-establish Reliable Utilities In order to work in the building they needed power and other utilities that were reliable and manageable.
Milestone 2: Remove Shielding Blocks • Removed shield blocks • Used existing lift points • Rad characterized • Packaged • Disposed per WMP
Milestone 2: Remove Shield Blocks • Removed shield blocks • Used existing lift points • Rad characterized • Packaged • Disposed per WMP
When the Accelerator was removed then the interior of the building was cleared. Milestone 2: Remove Bevatron Accelerator
Milestone 3: Abate Hazardous Materials Then they removed stored hazardous materials. Before the building super-structure was demolished there was abatement of the structure’s interior & exterior.
Milestone 4: Demolish the Building Structure • Retaining walls were reinforced.
Milestone 4: Demolish the Building Structure • The building super-structure was pre-weakened.
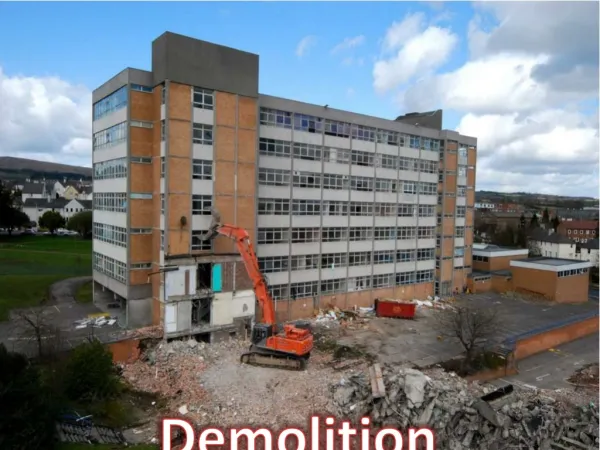
Milestone 4: Demolish the Building Structure The super-structure was brought down in a controlled drop.
Milestone 5: Remove Foundations and Slabs • Removed foundation system including pile/caisson caps, grade beams, shallow caissons, and facility floor • Demolished deep tunnel • Removed cooling tower basins
Milestone 5: Remove Foundations and Slabs This process took over a year to complete because they had to methodically manage the hazards in the foundations and the soil.
Milestone 6: Remediate soils and then backfill In order to remediate the soil they needed a Hazard Map. • Hazard mapping began early, • Hazardous materials mapping required “due diligence”, • Developed at Lawrence Livermore National Laboratory (LLNL), • Utilized a LLNL consultant to reconstruct hazard history, • Start with records search • Operating conditions • Machine changes • Emergency events (spills, fires, etc.) • Inventory management
Milestone 6: Remediate soils and then backfill Hazards Mapping (cont.) • Interview personnel involved during operations • Operators • Scientists • Technicians • EH&S • Fire Department • Construction crafts • Combine the information into a map of the facility • Areas of known contamination • Areas of prior clean up • Areas of suspected contamination
Milestone 6: Remediate soils and then backfill Developed a Hazard Map
Milestone 6: Remediate soils and then backfill Hazards Mapping (cont.) • Map was provided to the contractor to conduct samples of each area to characterize found hazards. • Map was provided as a bid document to demolition contractor to inform their remediation efforts. • The contractor was able to segregate the hazard, • reuse material (soil) and backfill the excavation site.
Milestone 6: Remediate soils and then backfill Radiological Evaluation Waste Materials • They expected very few surface contaminated objects • Activation products were predicted to be in: • Accelerator components, concrete shield blocks, floor slabs and foundations, and steel structures • For The Blocks • Initially DOE OK’d characterization protocol • They used handheld Na-I, set a MDC of 2 pCi/g • They used a “clean” reference block for a baseline • An external lab analyzed the reference block (No MDC) • Found activation products < 2 pCi/g in reference block • DOE revised the protocol-said had radioactive material
Milestone 6: Remediate soils and then backfill Rad Evaluation Criteria (cont.) Initial Protocol Estimate Revised DOE Protocol
Milestone 6: Remediate soils and then backfill Rad Evaluation Criteria (cont.) • Under revised DOE protocol • Had expected to release 60% of shielding blocks; • Actual blocks release reduced to 20% • Had expected to release ~75% of slabs and foundations; • Actual slabs and foundations release reduced to ~20% • This impacted remediation of blocks, slabs and foundations and cost several millions (~10) more • Lesson - Specify MDC early, clearly & oversee analysis
Milestone 6: Remediate soils and then backfill Tritium Levels • Tritium History and the Expected Levels • Activation produced mainly prior to 1974, (36 years) • Significant quantities were not expected • It was expected to be found near other activation products • It was expected to be found in soil and groundwater under thin floors • Found Tritium in unexpected places and concentrations • Under 54-inch foundations • Was not under slabs with highest activation products • Levels were at more than 4000 pCi/L • Was inconsistent with expected equilibrium condition
Milestone 6: Remediate soils and then backfill Levels Tritium (cont.) • How did it get there? • First they discounted possible sources: • Adjacent facility, Accelerator experiments • Historically there were no known tritium releases • Possible sources • Accelerator cooling water spill/leak • Movement from high activation areas to • low activation areas from groundwater flow • However it got there it had to be remediated.
Milestone 6: Remediate soils and then backfill Debris segregated for disposal or for backfill.
Final Site Configuration Retaining walls remain New drain lines To existing storm drain
Project Completed The Bevatron