Download
1 / 21
210 likes | 353 Vues
“ There’s a Probe For That”. Brianna Rapini and Connie Rowe. Instructions to join this session on DyKnow. 1. Open DyKnow. You can do this by clicking on and typing “DyKnow.” 2. Before logging in, you will need to change your communication settings.

E N D
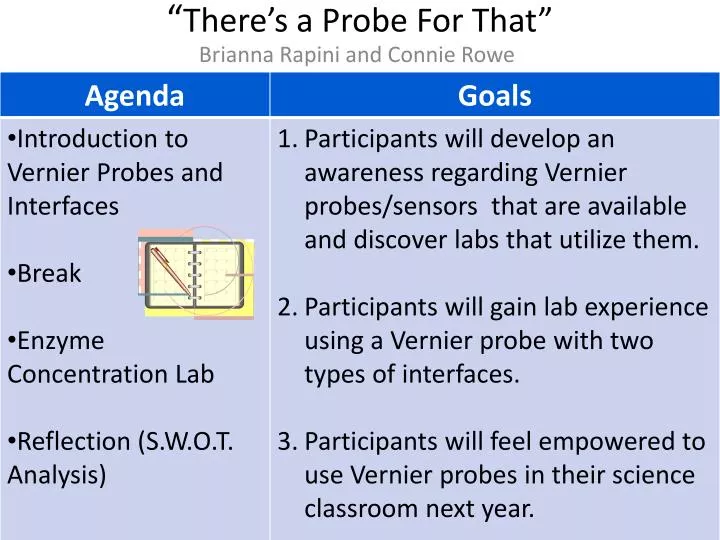
“There’s a Probe For That” Brianna Rapini and Connie Rowe
Instructions to join this session on DyKnow 1. Open DyKnow. You can do this by clicking on and typing “DyKnow.” 2. Before logging in, you will need to change your communication settings. 3. Once in, you need to change your settings to match this (if from KC, you already have this).
Brainstorm Write at least two major obstacles you face when trying to implement labs in your science course.
Our Audience What science course do you expect to teach next year that you are most interested in using Vernier technology? • Aquatic Science • Biology • Chemistry • Physics • Environmental Science • Other
Vernier Probes and Sensors Highlighted ones are the most common at campuses, but this varies. Ask your department chair or specialist.
How do I know whether probes will work for my particular lab? • Vernier has a database with over 400 labs on their website. http://www.vernier.com/experiments/ • Type in the topic that you are interested in finding a lab for in the search feature, or as an alternative, view the Vernier Lab Books listed at the bottom of the link. • Full versions of all these labs (which include safety information, teacher notes, and keys) are available in the full lab books. Your campus can order these. (Check with your department chair or specialist as many campuses already have many of these books!)
In order to actually see data that the probe(s) collect(s), it must be connected to some kind of interface. An interface is the component that communicates and connects with the probe. The Interfaces LabQuest Needs no computer, probe(s) connect(s) directly to it, and can visualize data directly on interface. LabPro and CBL2 can connect probe(s) to TI graphing calculators like TI-84. LabPro can also connect to a computer. Go!Linkconnects single probe directly to a student tablet or computer. EasyLinkconnects single probe directly to a TI-84 Plus or TI-Nspire.
The Software: Vernier LoggerPro(or LoggerLite at some campuses) • Students and teachers should install using RAP on their tablets. • Necessary if the interface you use connects to a computer (i.e. GoLink or CBL). • Not necessary if the interface does not need computer connection (i.e. LabQuest).
How to download Vernier LoggerPro (or LoggerLite) 1. Click Start 2. Click Control Panel 3. Click “Run Advertised Programs” and then search for the software
LabQuest Section • These only connect to computers with LabQuest software. While included on CD in each LabQuest box, your tablet may not allow you to install without admin. installation. However, the beauty of the LabQuest is that you do not need a computer to see data. • Each LabQuest box should contain (1) an adapter (to charge LabQuest), (2) a USB cable (if you do decide to connect to computer but again please see above), and (3) a LabQuest computer CD. • Plug your LabQuest in to an outlet using the adapter for at least 8 hours before lab day (great to do overnight before lab) and charge should last through day.
Another reason to look at LabQuest Interface… • Each high school has received a class set of TI-Nspires. • Recall that they must have an EasyLink connector in order to connect to a Vernier probe. • Plugging in the probe to the EasyLink launches the built in software. There are many similarities in the icons (on the software) to LabQuest. • TI-Nspires also have the ability to do lab activities on their own without probes. http://education.ti.com/en/us/activity/search/subject
If there is ever something wrong and you do not get a screen that looks like this, try clicking this “home” button and “labquest app” On /Off Button. Sometimes you have to hold it down for a moment.
Before you start:Make sure to click on “Rate” to decide how often to take data. START: Hit the “Collect Arrow” button. Either of these will start it. When you are running the experiment, you can hit it again to STOP data collection.
In Graph Mode… SLOPE: Click “Analyze” and then “Tangent.” You can highlight an interesting portion of your graph to see the slope. If you click this, there is an option to “autoscale once.” Use this to have your graph scaled correctly for your data. Remember, you must click this icon to see the graph.
In X/Y Table Mode… • This is the mode to see all your data all together. Is it taking samples too frequently or too slowly? Go back to dashboard, and you can click “rate” to alter how often it takes data. X/Y Table Mode Icon Click the dashboard icon to go back if you need to alter how often your LabQuest is taking data. Once you go back to the dashboard, click on “rate” on the right side. You have to stop the experiment first in order to change this. You can scroll up and down to see data.
To clear data and start over new…click “File” and then “New”It will ask you if you want to save or discard your data.
Troubleshooting Q: I don’t seem to be on any screens that look like the pictures above. A: Touch the “home” icon at the bottom and select “labquest app.” Q: No matter what I do, the LabQuest will not turn on or function correctly. A: If not charged, you can plug in. Try holding the on button down for a minute. If this does not help---there is a small, gray reset button on the back of the labquest. Use the stylus to push.
The Effect of Enzyme Concentration on the Rate of a Reaction Time: 30 MinutesObjective: Increase understanding of using Vernier probeware with two different interfaces (LabQuest and Go Link).
Practice using the Vernier experiment database -Visit http://www.vernier.com/experiments/ -Type “enzymes” -Please read through the background and procedure. We will only test out Part I and use only test tubes 1 and 2 (see data sheet handout).
Before You Leave… SWOT Analysis of Using Vernier Probes in Your Classroom