Download
1 / 40
400 likes | 479 Vues
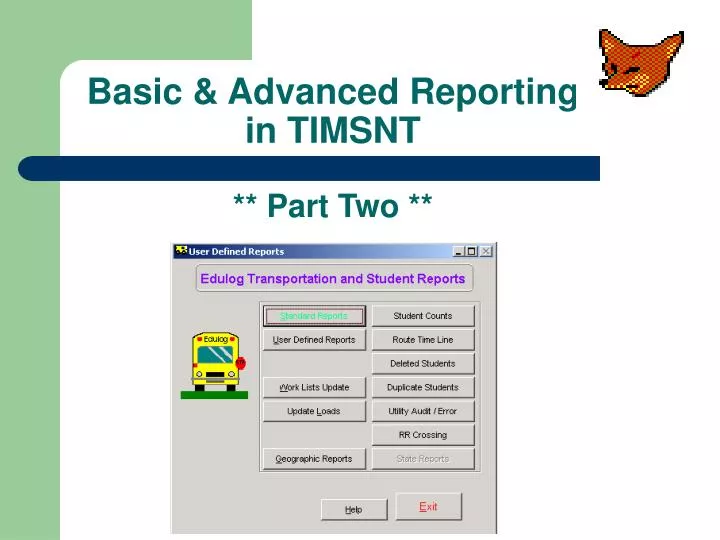
Basic & Advanced Reporting in TIMSNT ** Part Two **. Example: Standard Reports on Run. If you press “Run Query” without making any changes, you get all runs for all schools. Leave the Output Device box marked “Screen” and run the Query. Output Report: Run Summary Displayed to Screen.

E N D
Example: Standard Reports on Run • If you press “Run Query” without making any changes, you get all runs for all schools • Leave the Output Device box marked “Screen” and run the Query
Example: Run Summary By School • Change Sort Order to alter the order of the report • Change Filter (Search) to refine the search
Changing the Sort • Experiment with different sort orders • Notice that the sort reverts to no selection each time
Standard Run Filter Standard filter shows only runs that are not deadhead (“-”) and not garage runs (“*”) • You can change this filter with the Edit button
Ask For One School By deleting the existing filters, and adding a new one of your own, you can select only the runs you want
User Defined Reporting: Schools Route Time Line Produces reports that contain information on the schools in your system. With these queries, you can examine bell times, grades and programs for schools, as well as school boundary and eligibility information.
User Defined Reporting: All Student and Transportation All Student and Transportation Produces reports on students with transportation assignments in your system. You can produce a standard listing of students, or you can generate bus passes with these queries.
User Defined Reporting: Students with Trips Students with Trips Produces reports on students in your system. If you select only student fields for this report, you can obtain a listing of all the students in the database. If you select any trip fields, you will get only those students who have trips assigned. You can examine regular education students, special education students, and unmatched students (students whose addresses do not match the geocode) with these queries. You can also produce reports on the numbers of students at schools in your system.
User Defined Reporting:Student Transportation Student Transportation Produces reports with various combinations of student and transportation information (on stops, runs, and routes). You can produce passenger lists and student eligibility reports with these queries.
User Defined Reporting: Stops/Runs/Routes Stops / Runs / Routes Produces reports with various combinations of information on stops, runs, and routes in your system. You can produce reports on run and route mileage and average speeds with these queries.
User Defined Reporting: Inactive Stops and Vehicles Inactive Stops Produces reports on stops that are not assigned to runs. You can also examine information on students assigned to such stops with these queries. Vehicles Produces reports on the vehicles in your district’s transportation fleet.
User Defined Reporting: Bus Passes Bus Passes Produces bus pass reports which list various types of transportation information for students. While you can create your own bus pass reports, you may find it easier to make a copy of one of the existing Bus Pass queries and modify the copy as desired.
Standard Reports within the User Defined Reporting Section • The list of reports starting with the word ‘Standard’ are templates that cannot be run or used except to copy to another name. • Once copied, the report can be run as-is, or modified and saved to a new form • The name of your copied report cannot begin with ‘Standard’ • You can go back to the original ‘Standard’ report and copy it again as often as you like. A couple of things about the Standard reports:
Deleting and Restoring Standard reports Deleting and Restoring Standard ReportsWithin the User Defined Reporting Section There are two executables (programs) in ELT/EXE/REPORT that will allow you to REMOVE or RESTORE the Standard reports in User Defined Reports delstand.exe - Deletes all the Standard reports restorestand.exe - restores all the Standard reports Neither of these executables will delete any customized reports
Customizing User Defined Reporting: Students with Trips • Lets begin with an example of customizing a no match list. • The report we’ll use is located in Students with Trips. • The report name is ‘Standard unmatched students’.
To begin, choose ‘Copy’ and enter an identifying report name. Customizing Students with Trips(continued) Select ‘Standard unmatched students’. Notice that a number of buttons are not active for ‘Standard’ reports.
Notice that all of the button options are now active for the selected report. Customizing Students with Trips(continued) Our new report named ‘No Match list’ now appears in the reports list.
Defining the Buttons Defining the ButtonsWithin User Defined Reporting Section • ----- Selects current query to setup and run • ----- Creates a new query • ----- Modifies query’s filter • ----- Makes a copy of the current query • ----- Changes title of the current query • ----- Permanently removes the current query • ----- Returns to your prior screen
Customizing Students with Trips(continued) Lets choose ‘Select’ on our new ‘no match list’ report and see what happens…
Report Setup Options Lets you set the conditions that the records must meet to be included in the query results Lets you select what format Query Maker should use for your query results. Allows you to select which fields Query Maker will include in the query results. Allows you to specify how Query Maker will sort the records that are included in the query. This option will display the query results in an on-screen table before Query Maker outputs to your chosen output type. Eliminates duplicate records from the result. Can increase query processing time. Prepares and displays query results. Selects the records that match the filter conditions you specified and generates the output type you selected.
Run Query and Start Report Choosing’Run Query’ displays the following menu…
Output Example: Students not Matched to the Geocode When you select ‘Start Report’ your report is displayed (or printed or sent to a disk file if you chose that option) … Notice that this report does not display Home Phone
Editing Reports User Defined Reporting: Editing Reports Suppose we are not interested in this report displaying the Edulog ID number, but in place would prefer the Student’s Home Phone. How do we edit our report to display what we want? This is where simplicity meets complexity! The reports editing tools are not very clear. But if you follow some standard conventions, you’ll do fine.
We’ll use our ‘No Match list’ for this example. Editing Reports User Defined Reporting:Edit Output Fields 1st – we would want to know if the Home Phone field is being sent to our output.
More Choices Already In Report Editing Reports User Defined Reporting:Edit Output Fields (continued) Is the Student’s home phone field included in our query?
Editing Reports Adding a Field for the Query It’s wasn’t there, so we added it by double-clicking on it, sending it to the right side. The order is not important.When finished, click Done. (Note: Just because it is included in the query does not mean it will automatically be displayed in our report.)
Editing Reports Run the Query Run the Query again…
Choose Edit Form Editing Reports Report Designer: Edit Form You are now in the Report Designer. Here you can see that Edulog ID is represented by the field name studnt_id_. This is the field we want to replace with Home Phone.
Choose View > Table Designer Editing Reports Report Designer (continued)Table Designer Before we can edit the field, we need to identify the ‘expression’ or syntax name for home phone. It is very important to get the correct spelling of the expression or else Query Maker will produce an error message. Notice: home phone has one _ in its name.
Editing Reports Report Designer (continued)Editing Field Properties The idea here is to edit out the studnt_id_ field and replace it with our home_phone field. Right-click on the studnt_id_ field and choose Properties
Editing Reports Report Designer (continued)Report Expression In the Expression field, type home_phone over the studnt_id_
Editing Reports Report Designer (continued)Editing the Header Items Home_phone has now replaced studnt_id_ Next: lets change the header above home_phone to reflect what the field contains.
Once displayed…. Select then highlight Edulog ID and type Home Phone # Choose View > Report Controls Toolbar Editing Reports Report Designer (continued)Report Control Toolbar Before we can modify any text, we must first display our Report Control Toolbar.
Report Designer (continued)Preview Your Changes It is imperative that you ‘Preview’ your work before exiting and saving your report Always preview your work to make sure that the fields are spelled correctly. Otherwise if they are not, your report will have to be redone from scratch!!!!
Editing Reports Report Designer (continued)Saving Your Changes Close the report and choose YES when prompted to save your changes.
Editing Reports Start Report to View Customized Report Choose Start report to view your updated report!! That’s it!
Basic & Advanced Reporting in TIMSNT** End of Part Two ** To Continue. . . Go back to the web page and click Basic & Advanced Reporting in TIMSNT, Part Three