Download
1 / 53
600 likes | 816 Vues
Avalanche Avoidance and Rescue. Outline. Who’s at risk. Types of avalanches. • What causes avalanches. Avalanche avoidance. • Companion/beacon rescue. • Details about the Unit’s DTS Tracker and its use. Winter mountain recreation has exploded in recent years. New user groups

E N D
Outline Who’s at risk Types of avalanches • What causes avalanches Avalanche avoidance • Companion/beacon rescue • Details about the Unit’s DTS Tracker and its use
Winter mountain recreation has exploded in recent years • New user groups • Snowboarders • Snowmobilers • Open gate policies • Media • New technologies • Snowboards/splitboards • Alpine touring gear • Telemark gear (plastic and fat) • Snow safety equipment • Powerful snowmobiles
About 97% of people killed in avalanches die while playing Source: AAA U.S. Avalanche fatalities by activity, 1990 to 2002
Recreationists are at risk because they don’t understand the causes of avalanches
Almost all fatal avalanches are slab avalanches
Point release (loose snow) avalanches are more easily predicted and usually less dangerous
If you understand the cause ofavalanches you can avoid them • Weather • Terrain • Snowpack • Human Factors
Most avalanches occur during and immediately after storms... • New snow adds weight (stress) to the snowpack • New snow takes time to bond to layer underneath
Temperature, elevation and aspect (orientation) all affect snow stability •Rapidly warming temperatures can weaken the snowpack • You can have stability at one elevation but as you climb or descend the snow profile can change •Similarly, a slope at one aspect can be safe but at a slightly different aspect can be very unstable
The majority of avalanches occur on slopes between 30˚ and 45˚ 60˚ 45˚ 30˚ 15˚ 0˚
The majority of avalanches occur on slopes between 30˚and 45˚ 28˚ 33˚
Most slabs release on the bulge of convex slopes Slabs can be triggered from above and below the slope Slope shape also needs to be considered Convexity Concavity
Dense trees can act as “anchors” and points of safety
A weak snowpack usually consists of a strong layer overlying a weak layer • Learn to evaluate the snowpack • There’s no substitute for on-snow avalanche instruction • Take a Level I avalanche course • Practice
Most killer avalanches aresmall and human triggered 1. Skier 2. Slope convexity 3. Roughly 30 degrees 4. Debris slid into concavity
Know before you go! • Call local avalanche forecast center • Know the snowpack history • Talk to others who have been out • Talk to ski patrol
Human factors • Attitude : people sometimes ignore danger signs due to pride, ego and ambition • Time : weekend warrior syndrome • Blue Sky : sunny weather sometimes draws people too soon after a storm • Herding Instinct : people think less in large groups
With good back country habits, youcan avoid avalanche danger 1. Expose only one person at a time 2. Get out of the way at the bottom 3. Never cross above your partner 4. Have an escape route planned 5. Remove pole straps and safety straps 6. Travel in the same route when possible 7. Keep your partner in sight 8. Travel to points of safety
Consider the terrainconsequences in route selection Will I go over a cliff? Will I get crushed by trees? Will I get cut by sharp rocks? Will I be buried?
Good route selection can limit exposure to hazardous terrain Is there a better alternative?
Good route selection can limit exposure to hazardous terrain Without exposure to the steep slopes
Trauma 25% Asphyxiation 75% Source: AAA Asphyxiation is the cause of most avalanche fatalities
…but if you get to them fast enough, you can save them If recovered within 15 minutes, chances of survival are almost 92% At 35 minutes, survival rate drops to 37% Recovered Alive (%) After that, the success rate is extremely low.1 Source:AAA (422 completely buried victims) Time in minutes
Only a member of your party or a companion will likely save your life (68%) (15%) cover white Source:CAIC
…and most likely only if you have an avalanche transceiver Source: AAA Search times in 100mx100m area
If an avalanche occurs Victim • If caught, yell so other people see you. Then close your mouth. • If you can grab a tree or dig into the slope, do it. • Discard gear like skis and poles. • Fight with all of your effort, try to stay on the surface. • As the snow slows, try to thrust a hand upward above the snow surface. • Before the snow stops, try to clear an air space in front of your face. • If buried, do not panic! Stay calm and try to relax.
If an avalanche occurs Rescuer(s) • Watch the victim(s) as they are carried down the slope. Look for “last seen point.” • Make sure it is safe to begin a search. • Organize the search party. • Mark the area where the victim was last seen and begin search here. Look for any clues. • Begin beacon search • When victim is located, confirm depth and location with probe dig fast but carefully.
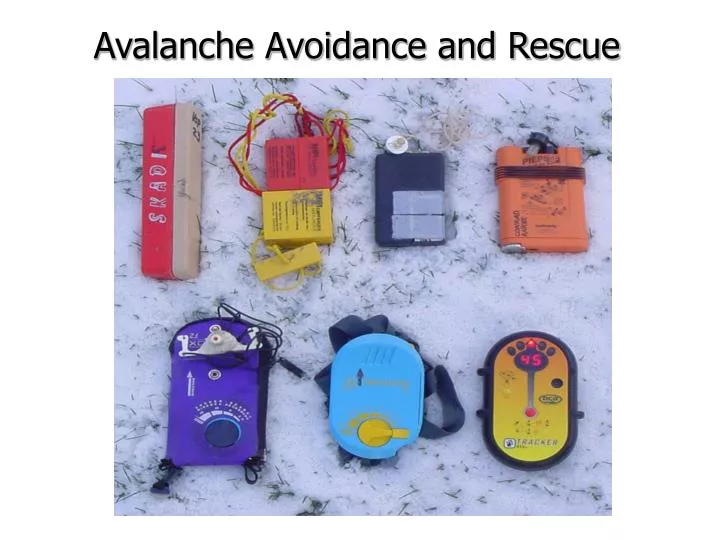
What do you need for a rescue? 1. Avalanche beacon follows electronic signal to buried victim 2. Probe verifies depth and location of buried victim 3. Shovel removes snow
Signal strength depends upon distance receiving unit volume sendingunit distance Colorado Avalanche Information Center
Signal strength depends upon orientation Maximum Colorado Avalanche Information Center
Signal strength depends upon orientation Minimum Colorado Avalanche Information Center
There are three phases of a transceiver search Objective: Detect strong signal Coarse Search >40m Fine Search 40-3m Objective: Get close to buried transmitter (about 3 meters) Objective: Locate strongest signal, minimize probe and digging area Pinpoint Search <3m
Effective range for most modern transceivers: 10-15 meters This translates to a strip width of 20-30 meters Standard coarse search strip is 20 meters
Fine search techniques Grid Tangent Flux
Coarse search Signal picked up here, fine search begins Pinpoint search
The three search phases would looksomething like this for a single searcher: 1. Coarse search 2. Fine search 3. Pinpoint search
What about two searchers? 1. Coarse Probe and shovel! 2. Fine 3. Pinpoint
What about a last seen point? Eliminates this area for searching Last seen point Search begins at star
Six people skiing Fracture Victims Debris area
Four rescuers and two victims Last seen point, search begins here
The four searchers will begin their search at the last seen point. Two will pinpoint while the other two probe and prepare to shovel.
Frequency 457 kHz Three AAA batteries 250 hours in transmit, 50 hours in search Receive range up to 50 meters Normal effective range is 10 meter radius Normal search mode window is 180° Special search mode widow is 75° Minimum temperature range at 66% battery is -10° C (14° F) for transmit and -20° C(-4° F) for search Basics Specifications of DTS Tracker Beacon
Black strap is the waist strap, red is shoulder Can unbuckle beacon to extend it without removing waist strap During start up, should have 95 to 99% battery display After start up, enters transmit (tr) mode and side light flashes To enter search mode, hold Search/Transmit Button down until display changes to “SE” and beacon beeps three times Directional LED points along the flux line Distance along flux line is in meters To go back to transmit mode, push the Search/Transmit Button Basics of Operating DTS Tracker Beacon
Auto-Revert System Hold down Options Button while starting “Ar” will be shown in display After 5 minutes in search mode, beacon will sound 10 second alarm then switch to transmit mode unless Search/Transmit Button is pushed Options for DTS Tracker Beacon
Special Mode While in search mode, hold down Options Button until “SP” is displayed Normal search only indicates the strongest signal within about 10 meters. Special search indicates all signals within search window no matter what strength Search window is reduced from 180° to 75° Options for DTS Tracker Beacon
Turning Off The Vastly Annoying Beep To stop the beeping sounds in search mode, push the Options Button until “L0” is displayed To turn the sound back on, push the Options Button until “L1” is displayed Options for DTS Tracker Beacon
Turn all beacons to search Start at last seen location and use coarse search pattern to find a signal Look for surface clues while moving Move beacon in slow horizontal and vertical pattern to help find a signal Once a signal is located, mark the location and follow the flux line indicated with the top LED and decreasing distance Move rapidly to 10 meters then start moving slowly to around 3 meters Once at about 3 meters, start to move very slowly and use pinpoint bracket or line method to locate closest point for probing Hold beacon right on snow surface Ignore spike readings and LED fluctuation when this close Single Victim Search With DTS Tracker