Download

1 / 68
690 likes | 883 Vues
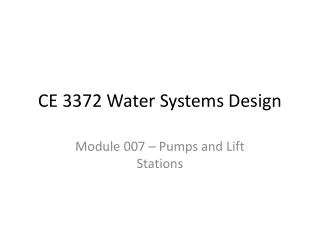
LRAC – LRAH Air-cooled water chillers Air / water heat pumps 6 – 40kW. 1600. 1400. 1200. 1000. 800. kW. 600. 400. 200. 0. 40. 35. 30. 25. kW. 20. 15. 10. 5. Product range. Water tank, pump and expansion tank. Fan nozzle. Condensing coil. Evaporator. Fans.

E N D
LRAC – LRAH Air-cooled water chillers Air / water heat pumps 6 – 40kW
1600 1400 1200 1000 800 kW 600 400 200 0
40 35 30 25 kW 20 15 10 5 Product range
Water tank, pump and expansion tank Fan nozzle Condensing coil Evaporator Fans Local user terminal Electrical panel RAL7037 colour Compressor casing
VERSIONS Options offered by this version None (min T = 9°C) Low environmental temperature (min T = - 20°C) Low water temperature ( - 10°C) Low environmental temperature + water Hydronic options - Pump Pump and tank Operating options R410A with EEV R410A with EEV and Hot Gas Options offered by this version None (min T = 9°C) Low environmental temp. (min T = - 20°C) Low water temperature ( - 10°C) Low environmental temperature + water Hydronic options None Pump Pump and tank Operating options R410A - Low noise T. O. P.
VERSIONS Control UPCOxs Serial connections RS485 serial outlet (UPCOxs) TCP/IP interface (UPCOxs) LonWoks/FTT10 (UPCOxs) Local network LAN connected unit (UPCOxs) Control UECH Serial connections RS485 (UECH) serial outlet Local network - Low noise T. O. P.
Top Operating Performance • Efficiency, protection, control • electronic thermostatic valve satisfies the requirements of partial loads, guaranteeing excellent results in terms of energy efficiency, and adapting to the outside temperature • special circulation with injection of hot gas permits continuous operation with a constant output temperature even against a 0 to 100% variation in the load • integrated UpCOxs system enables • maintenance of ±1.5°C T with EEV, even with no tank • complete management of all the alarms • intelligent defrost management (LRAH) and anti-ice up evaporator • LAN connection • external BMS connection
Energy efficiency • R410A • Twin compressor above 20 kW • Electronic expansion valve (EEV) available for T.O.P. version
Low environmental impact • R410A - ODP zero - GWP In line - TEWI Inferior (-14% Vs R407C) • extremely low noise levels
Reliability • Scroll compressor • fans manufactured in polymeric material • stainless steel thermostatic valve • evolved control (T.O.P.) • painstaking care taken over detail
Low noise levels • standard modulatingcontrol • three blade, scythe-type fans guaranteeing extremely low sound impact • sound absorbent polyurethane nozzle • oversized batteries • compressor in largerframework • insulated compressor opening
Easy installation and maintenance • unit fitted with in-cabin tank and pump • R410A: easy fill up • vertical layout • wall mounted installation (max. 10 kW) • compact • can be set to dischargedefrost condensation
Versatility • Low noise version • T.O.P. version for industrial/ technological applications • double choice of controls • wide-ranging connectivity to external BMS • max. 10 LAN with T.O.P.
Precision • Low noise version with self-adapting control for basic version with control on return • T.O.P. version with control on chilled water delivery with specific predictive PID-type algorithm • 1.5°C tolerance on set-point • T.O.P. version with hot gas by-pass device for constant outgoing temperature against 0 - 100% variations in the load
UECH 210-211 is a compact device enabling users to control the following types of conditioning units: • air-air • air-water • water-water • condensing single circuit, with 1 or 2 compressors (steps). The speed of the cooling fan can be proportionally controlled for currents of max 2A without using any external device. Main features: • thermoregulation on the input or output sensor depending on the configuration; • condensation control; • input, which can be configured for NTC temperature sensor or 4...20 mA signal; • automatic changeover; • boiler control or integration resistances for heating; • internal fan control for max 3 steps in the air-air application; • dynamic set-point; • parameter setting either using keypad or personal computer; • remote keypad (to max. 100 m) which can be connected directly without serial interfaces; • 4-20 mA or 0-10 V (optional internal card) output; • user interface with menu, 2 different levels of access via password; EXP200 expansion is only available for the UECH 211 model.
A: alarm output B: LC filter C: External fan regulator D: ON/OFF fan relay E: Compressor relay F: Pump relay G: Inversion valve relay H: Heating relay
UECH210 models: analogical optional output which can be used to pilot 4-20mA or 0-10V fans. UECH211 models: digital, open collector optional output used to pilot the relays of the second compressor.
User Interface The interface allows the user to carry out all the operations linked with the use of the unit, and in particular to: • set the operating mode • manage alarm situations • check the state of the resources The device is able to communicate any kind of information inherent to its state, configuration and alarms by means of a display and the LEDs present on the front. Select the operating mode: • if heat mode is enabled, the following sequence occurs every time the key is pressed: stand-by > cooling > heating > stand-by • if the heat mode is not enabled, the sequence will be: stand-by > cooling > stand-by • In menu mode, it becomes the SCROLL UP or UP value (increase in value) key.
User Interface • Actuates the alarm reset, as well as switching the instrument on and off. • Pressed once, it will reset all manually reset alarms which are not active; • If the key is pressed for 2 seconds, the instrument will go from ON to OFF or OFF to ON. When OFF, only the decimal point on the display remains lit. • In menu mode, it becomes the SCROLL DOWN or DOWN value (decrease in value) key. “Mode” and “on-off” keys pressed at the same time: • If both keys are pressed and released within 2 seconds, the visualization menu will drop a level. If both keys are pressed for more than 2 seconds, it will rise up a level. • If the last level of a menu is visualized, pressing and releasing within two second will the system will rise by a level anyway.
User Interface On the display, the following will be shown during normal visualization: • Adjustment temperature, in tenths of Celsius degrees with a decimal point or Fahrenheit without a decimal point; • The alarm code if at least one is active. If more than one alarm is active, the first is visualized according to the Alarm Table (see further). • If the thermoregulation is not based on analogical inputs and depends on the state of a digital input (AI1 or AI2 configured as digital inputs) the “ON” or “OFF” label is visualized depending on the state of the thermoregulator (active – inactive). • In menu mode, visualization depends on the position in which it is found. Labels and codes are used to help the user identify the function set. • Decimal point: when the hours of operation are visualized this indicates that the value must be multiplied x 100. • If a numerical value is visualized on the display and neither the HEAT nor COOL LEDs are on, the controller is in STAND-BY mode.
Remote Keypad • The remote display keypad is a faithful copy of the visualization of the information on the instrument and has the same LEDs. • The functions are identical to those listed previously. • The only difference is the use of the UP and DOWN keys (value increase and decrease) separated by the MODE and ON/OFF keys. The connection is illustrated below: The clamps of the remote keyboard must be associated with the following colours: • 24 > blue • 25 > red • 26 > black WARNING! The clamp connections of the remote keyboard are inverted compared with those of the connector.
The unit arrives from the factory on stand-by, i.e. only the reading value of the input sensor will be visualized on the display, but no operating organ is active. To activate the unit, press the UP key and a LED will light up under the cool symbol. If the unit is enabled for heating too, every time UP is pressed, the following modes will appear in sequence: stand-by>cooling>heating>stand-by. If, on the other hand, you wish to switch the entire unit off completely, press the DOWN key for 3 seconds (the decimal LED will remain on). To switch on, press the DOWN key for 3 seconds. In case of a blackout, when the power supply returns, the control will return to the state it was in before the back out. If de-frosting was in progress, the procedure will be annulled. All timings in progress will be annulled and restarted.
Step-by-step procedure for modifying the cooling set-point a. Press the UP and DOWN keys once together to view the SET code b. Press UP and DOWN together again to view the COO code. This is the parameter for modifying the cooling set-point. Press the UP and DOWN keys again to view the parameter to modify. c. Press UP to increase the value or DOWN to decrease the value until you reach the value required. d. After setting the value, press the UP and DOWN keys for 5 seconds until the system drops a level. Repeat this procedure until the value of the sensor connected is visualized. Step-by-step procedure for modifying the heating set-point a. Press the UP and DOWN keys once together to view the SET code b. Press UP and DOWN together again to view the COO code. Press the UP or DOWN key to view the HEA parameter. c. Confirm by pressing the UP and DOWN keys, the parameter to modify will be visualised d. Repeat steps c and d Note: If no key is pressed for 60 seconds after activation of the procedure, the display will return to the normal operating mode without memorizing any parameters which had been modified.
Reading the temperature sensors connected The sensors connected can be read once only, through the following procedure: a. Press the UP and DOWN keys once together – the SET code will be visualised b. Scroll using the UP or DOWN keys until the TP parameter is visualised c. Confirm by pressing UP and DOWN, the T01 parameter will be visualised d. Confirm, again using UP and DOWN, the reading value being carried out at that moment will be visualised e. To return back a level, press UP and DOWN for 5 seconds f. To visualise the value of the other sensors, scroll using the UP or DOWN keys until you reach the parameter required, then confirm. g. To exit the masks, press UP and DOWN for 5 seconds and repeat until you have exited all levels. The table below describes its functions:
Activation of contacts ID4 and ID5 Should the user wish to activate the remote on/off (ID4) by means of an external contact, s/he must simply remove the pin-strip connected to the unit terminal board (see wiring diagram). Should the user wish to activate the summer/winter exchange contact (ID5) by means of an external contact, s/he must remove the pin-strip connected to the unit terminal board (see wiring diagram), access configuration parameter H27 and modify the parameter. Modify the parameter as follows: a. Press UP and DOWN once together, the SET code will appear on the display; b. Scroll using UP or DOWN until the PASS parameter appears on the display; c. Confirm by pressing UP and DOWN together, and key in the USER 22 password; d. Confirm by pressing UP and DOWN together, scroll to the CNF parameter; e. Confirm by pressing UP and DOWN together, scroll to the H27 parameter; f. Confirm by pressing UP and DOWN together, modify the parameter setting it to 1; g. Confirm by pressing UP and DOWN together; h. Exit the screens by pressing UP and DOWN together for 5 seconds, then repeat until exiting the system completely.
Configuration for the low temperature version In the event that the machines are used in the special low temperature version, you are advised to read the instruction manual which is attached regarding the introduction of the anti-freeze and the modification of some working parameters. In order to change these parameters, it is necessary to enter with the password USER (see the attached envelope). Simultaneously push the two buttons once; when the word PASS is found, insert the code and confirm it by pushing the two buttons once more. Then scroll through the screens described below: CNF Parameter H04: Set-point min in cool = -20 G01: Set-point cool = -2 CP Parameter C08: Accumulated compensation ability = 0 disabled FRO Parameter R10: Set minimum antifreeze resistance = -20 ALL Parameter A11: Antifreeze alarm set = -20 This type of configuration is carried out to produce water at a temperature of -5°C.
Alarms UECH 210/211 carries out a complete system diagnostics. Alarms are manually resettable by pressing and releasing the ON/OFF key. The activation of an alarm causes three effects: • the end users involved are blocked; • signalling on the keypad display; • signalling by a solid state output with transistor (12-24V~ with max 500mA current). Signalling is formed of an “Enn” type code (nn indicates a 2 figure number which identifies the type of alarm), listed below:
The microprocessor control independently manages unit operation. The control unit consists of: a microprocessor control card, installed in the electrical panel; a graphic user interface installed in the control unit; the possibility to connect another user terminal with the same functions by means of an RJ11 connector. The adjustment programme is in the microprocessor control card, on which all the operating parameters are memorised. These parameters can be visualised and set using the user interface. The control system enables the following functions: temperature control based on the set-points which can be set using the user interface; setting a double temperature set-point (both during cooling and heating), which is commutable by remote control; complete alarm detection system; storage of all alarm events;
alarm signal contacts, which can be configured using the user interface; • programming of the automatic restart when the power supply returns; • remote controlled switching on/off of the unit; • control of all the compressor operating times and rotation of compressor activation in order to guarantee efficiency and reliability; • electronic thermostatic valve adjustment and fault signalling; • passwords for 2 programming levels (settings and service, refer to envelope supplied with manual); • communication with a supervision system by means of an RS485 serial card (optional); • counting of operation hours and number of start ups of the most important components; • display of all of the values read by the sensors connected to the control card; • management of the clock/calendar (clock card optional); • differentiated weekly on/off time bands (with optional clock card): Weekday – Pre-holiday – Holiday; • override function, with which users can manually control the operation of the main components, without excluding the remote control device.
The user interface consists of: rear-lit 4x20 pixel LCD display; 6 keys for navigating and modifying the parameters.
Before starting up the unit, Uniflair recommends checking that the voltage connected is the one specified on the adhesive label applied to the unit. If the unit is a three-phase unit, check the sequences of the L1 L2 L3 phases since they could cause the control itself not to switch on. Check the electrical connections from other devices external to the unit, as well as the hydraulic connections made. Insert the general switch and check that the incorporated machine control unit display switches on. The unit which has just been switched on will be on stand-by and will display the output water temperature as well as information concerning machine start up. If the clock card has been inserted, the time and day will also be displayed Local start up using the keypad: Press ENTER once to start up the unit. Press and hold down the ENTER key for 3 seconds to switch the unit off. Automatic start up: the control is configured so that the unit can be switched on/off via: 1. a remote ON/OFF contact; 2. supervision system (only in units equipped with a serial card); 3. programmed automatic time bands (only in units equipped with a clock card).
Press the UP or DOWN keys to display the masks containing the unit operating parameters in reading mode only. To modify the parameters, key in the password contained the envelope enclosed with this manual. There are two passwords, one for the service menu and one for the settings menu.
Depending on the machine configuration, some of these masks may not be displayed. The ―read only‖ masks which do not require a password are: historical alarm I/O state 1. Press UP on the main mask until the 2nd mask is displayed; 2. Press ENTER and select the parameter required using UP or DOWN; 3. Press ENTER to confirm; 4. Once entered scroll using UP or DOWN; 5. Press ESCAPE to exit.
The reading-only and writing masks in the settings level are: alarm address unit interconnection clock calendar set-point counter 1. Press and hold down the Prg key for 3 seconds from the main mask; 2. Key in the settings password (refer to envelope); 3. Press ENTER and select the mask required using UP or DOWN; 4. Press ENTER to confirm, select the item required using the UP or DOWN keys; 5. Press ENTER to confirm; 6. Once entered scroll using UP or DOWN and select the item required using ENTER again; 7. Press ESCAPE to exit.
The read-only and writing masks in the service level are: service menu 1. From the main mask press UP until the 1st mask is displayed; 2. Press ENTER and select the item required using UP or DOWN; 3. Press ENTER to confirm; 4. Press and hold down the Prg key for 3 seconds and key in the configuration menu password; (refer to envelope). Press ENTER to confirm; 5. Once entered, scroll using UP or DOWN, confirm the item to modify, press UP or DOWN and reconfirm to save the parameter; 6. Press ESCAPE to exit.
Service menu: this mask provides access to the machine configuration. After introducing the password, the user will access the mask below: HARDWARE CONFIGURATION The unit adjustment programme must be ―configured‖, that is, adapted to the machine in which it is to be installed. All of the elements which the unit is equipped with and which the microprocessor must control, have to be defined during this phase. This work is usually only necessary when the control is installed on the machine, and therefore carried out at the factory during final testing. It may, however, be necessary to intervene if subsequent modifications have been made to the machine. The masks regarding configuration are in English and reserved for assistance technicians, who can modify the data memorised in the microprocessor from the mask below.
Program Set-up This operation is carried out automatically should the programme be replaced. It may be useful if data (set-points, configurations, etc.) become ―dirty‖ as it permits the user to clear the memory (including those data relating to the unit HARDWARE configuration). All set-points are automatically reset to the factory set values (refer to “DEFAULT VALUES"). The control must be reconfigured after this operation, and any set-points which are different to the default values readjusted. N.B. Even when only one configuration parameter is modified (therefore also when the programme has to be replaced), the RAM memory must also be zeroed. This is done by cutting off the power supply to the control for a few seconds. Al.Page Clear-up The Historical alarm clear up enables the user to delete all of the alarm events stored in the memory. Hardware Set-up Enables the user to recognise the devices connected to the control automatically. This operation is useful if the user wishes to add an option to the card, replace a sensor or when the display shows "NC" instead of reading a temperature sensor.
DELAY SETTINGS • This mask concerns the behaviour in the initial transients and makes it possible to set: • - the machine switch on delay after a power cut (‗POWER ON DELAY‘). It is used to prevent contemporary start up in multiple installations. In LAN units there is automatically a progressive start up sequence (unit 1, unit 2, …) with 5 second intervals between one unit and the next. • - the initial period – from compressor start up – during which the low pressure switch reading is ignored (‗LPSTAT DELAY‘). This permits compressor start up even in extremely cold weather. • the time which elapses between the start-up of the unit and the adjustment start (‗START TRANS.‘) is the period considered necessary to obtain control system stability. During this period, the reading of the FS air flow switch is also ignored. • The delay in the water temperature alarm signal from unit start up (‗Temp Al. Delay‘). • The anti-hunting time constant (‗ANTI HUNTING CONSTANT OF ROOM TEMP. CONTROL‘) which prevents excessive heat ranges. This value must be higher than the heat inertia in the air-conditioned environment. • the delay of the water flow alarm during start up and operation. • - the compressor operating time during start up, re-start up and the minimum switch on time.
MANUAL CONTROL During normal operation, all of the components which the unit is equipped with are managed automatically. Nevertheless, in order to facilitate maintenance and adjustment work and during emergencies, it is possible to override manually the following (independently from the switch on adjustment process of the single components): the unit circulation pump (Unit start-Up); compressor 1/2 (Compressor 1/2); the condenser fan speed in % 000 Y1 and Y3 output activation in % 000 The safety devices are active even during manual operation. EXV The operating parameters of the electronic thermostatic valve are found in this mask: type of valve operating temperatures and pressures LOP and MOP timings for any alarm activations.
Historical Alarms: this mask displays the alarm sequence stored. The microprocessor stores the last 100 events in its memory. All memorised alarms can be read in series by pressing the UP or DOWN keys. The counter threshold overrun is not memorised and therefore not read. The first event shown in the sequence corresponds to the last alarm which has triggered. In controls equipped with clock cards (optional) the date and hour is associated with every alarm which triggers. Set-point: this mask displays the set-points and other factory pre-set adjustment parameters, to enable the control to operate correctly, maintaining the water temperature at standard conditions. o Cooling set-point o Heating set-point o Temperature alarm set-point
Counter: this mask displays and enables the user to establish the intervals of maintenance for the unit components. When the device involved exceeds the operating hours threshold indicated, the microprocessor signals the request for maintenance by triggering the alarm. The number of hours accumulated, the trigger threshold and number of compressor start ups are shown on the masks. The user can access the mask to modify the limits and/or reset the counter by keying in the password in settings mode. I/O state: this and the successive masks enable the user to check the state of the card inputs and outputs. The abbreviations displayed on the display are identical to those used to identify the components both inside the unit and on the relative documents (wiring diagrams). o IDx = digital inputs o Bx = analogical inputs o Cx = digital outputs o Yx = analogical outputs
Mask no. 3 Programme version: this mask displays the version of the programme, the bios and the boot which are contained in the control and the LAN address of the board. Mask no. 4 Mode: this mask displays the possibility of choosing between the summer and winter work season by using the keypad and typing in the settings password. The keypad command will be ignored if a remote contact is inserted (refer to Mask 1: unit interconn.).