Download
1 / 1
10 likes | 113 Vues
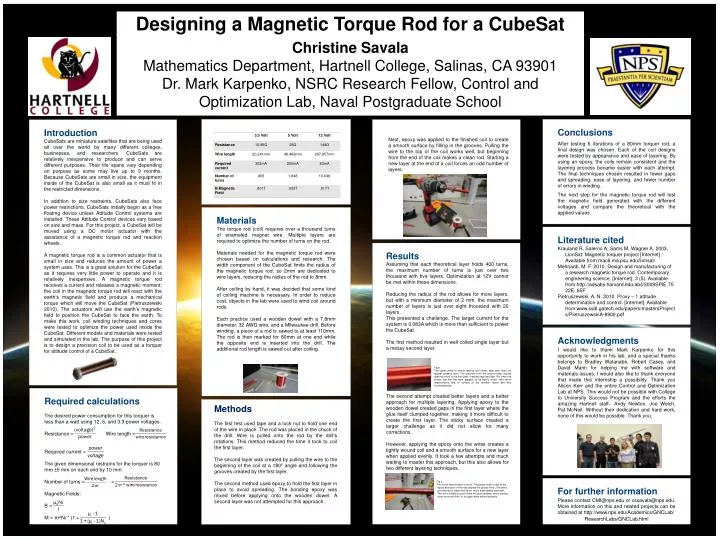
Designing a M agnetic T orque R od for a CubeSat . Christine Savala Mathematics Department, Hartnell College , Salinas, CA 93901 Dr. Mark Karpenko , NSRC Research Fellow, Control and Optimization Lab, Naval Postgraduate School. Conclusions

E N D
Designing a Magnetic Torque Rod for a CubeSat Christine SavalaMathematics Department, Hartnell College, Salinas, CA 93901 Dr. Mark Karpenko, NSRC Research Fellow, Control and Optimization Lab, Naval Postgraduate School Conclusions After testing 6 iterations of a 80mm torquer rod, a final design was chosen. Each of the coil designs were tested by appearance and ease of layering. By using an epoxy, the coils remain consistent and the layering process became easier with each attempt. The final techniques chosen resulted in fewer gaps and spreading, ease of layering, and fewer number of errors in winding. The next step for the magnetic torque rod will test the magnetic field generated with the different voltages and compare the theoretical with the applied values. Introduction CubeSats are miniature satellites that are being used all over the world by many different colleges, businesses, and researchers. CubeSats are relatively inexpensive to produce and can serve different purposes. Their life spans vary depending on purpose as some may live up to 9 months. Because CubeSats are small in size, the equipment inside of the CubeSat is also small as it must fit in the restricted dimensions. In addition to size restraints, CubeSats also face power restrictions. CubeSats initially begin as a free floating device unless Attitude Control systems are installed. These Attitude Control devices vary based on size and mass. For this project, a CubeSat will be moved using a DC motor actuator with the assistance of a magnetic torque rod and reaction wheels. A magnetic torque rod is a common actuator that is small in size and reduces the amount of power a system uses. This is a great solution for the CubeSat as it requires very little power to operate and it is relatively inexpensive. A magnetic torque rod receives a current and releases a magnetic moment; the coil in the magnetic torque rod will react with the earth’s magnetic field and produce a mechanical torque which will move the CubeSat (Pietruszewski 2010). The actuators will use the earth’s magnetic field to position the CubeSat to face the earth. To make this work, coil winding techniques and cores were tested to optimize the power used inside the CubeSat. Different models and materials were tested and simulated in the lab. The purpose of this project is to design a precision coil to be used as a torquer for attitude control of a CubeSat. Next, Next, epoxy was applied to the finished coil to create a smooth surface by filling in the grooves. Pulling the wire to the top of the coil works well, but beginning from the end of the coil makes a clean rod. Starting a new layer at the end of a coil forces an odd number of layers. Materials The torque rod (coil) requires over a thousand turns of enameled magnet wire. Multiple layers are required to optimize the number of turns on the rod. Materials needed for the magnetic torque rod were chosen based on calculations and research. The width component of the CubeSat limits the radius of the magnetic torque rod, so 2mm are dedicated to wire layers, reducing the radius of the rod to 8mm. After coiling by hand, it was decided that some kind of coiling machine is necessary. In order to reduce cost, objects in the lab were used to wind coil around rods. Each practice used a wooden dowel with a 7.8mm diameter, 32 AWG wire, and a Milwaukee drill. Before winding, a piece of a rod is sawed to at least 110mm. The rod is then marked for 80mm at one end while the opposite end is inserted into the drill. The additional rod length is sawed out after coiling. Literature cited KraulandR, Salerno A, Sams M, Wagner A. 2003. LionSat: Magnetic torquer project [Internet] Available from:mac6.ma.psu.edu/lionsat/ Mehrjardi, M. F. 2010. Design and manufacturing of a research magnetic torque rod. Contemporary engineering science. [Internet]; 3 (5). Available from:http://adsabs.harvard.edu/abs/2009SPIE.7522E..65F Pietruszewski, A. N. 2010. Proxy – 1 attitude determination and control. [Internet]. Available from:www.ssdl.gatech.edu/papers/mastersProjects/PietruszewskiA-8900.pdf Results Assuming that each theoretical layer holds 400 turns, the maximum number of turns is just over two thousand with five layers. Optimization at 12V cannot be met within these dimensions. Reducing the radius of the rod allows for more layers, but with a minimum diameter of 2 mm, the maximum number of layers is just over eight thousand with 20 layers. This presented a challenge. The target current for the system is 0.083A which is more than sufficient to power the CubeSat. The first method resulted in well coiled single layer but a messy second layer. The second attempt created better layers and a better approach for multiple layering. Applying epoxy to the wooden dowel created gaps in the first layer where the glue itself clumped together, making it more difficult to create the first layer. The sticky surface created a larger challenge as it did not allow for many corrections. However, applying the epoxy onto the wires creates a tightly wound coil and a smooth surface for a new layer when applied evenly. It took a few attempts and much waiting to master this approach, but this also allows for two different layering techniques. Fig b. This is the second layer of a rod. The glossy finish is due to the epoxy and each of the rods display this glossy finish. The wires are secured in place and do not move after setting overnight. The rod is initially smooth when the glue hardens, which creates clean turns and little to no gaps when wound properly. Acknowledgments I would like to thank Mark Karpenko for this opportunity to work in his lab, and a special thanks belongs to Bradley Watanabe, Robert Casey, and David Mann for helping me with software and materials issues. I would also like to thank everyone that made this internship a possibility. Thank you Alison Kerr and the entire Control and Optimization Lab at NPS. This would not be possible with College to University Success Program and the efforts the amazing Hartnell staff– Andy Newton, Joe Welch, Pat McNeil. Without their dedication and hard work, none of this would be possible. Thank you. Fig a. The upper dowel is double layered and shows sags and does not appear properly level. The pressure from the second layer caused spacing errors in the first layer, creating sags and dips The lower rod shows that the first layer appears to be tightly coiled with minor imperfections due to surface of the wooden dowel and wire inconsistencies.. Required calculations The desired power consumption for this torquer is less than a watt using 12, 5, and 3.3 power voltages. Resistance = Wire length = Required current = The given dimensional restrains for the torquer is 80 mm ±5 mm on each end by 10 mm. Number of turns = = Magnetic Fields: B = M = πr2Ni * (1 + ) . Methods The first test used tape and a lock nut to hold one end of the wire in place. The rod was placed in the chuck of the drill. Wire is pulled onto the rod by the drill’s rotations. This method reduced the time it took to coil the first layer. The second layer was created by pulling the wire to the beginning of the coil at a 180º angle and following the grooves created by the first layer. The second method used epoxy to hold the first layer in place to avoid spreading. The bonding epoxy was mixed before applying onto the wooden dowel. A second layer was not attempted for this approach. For further information Please contact CMI@nps.eduor cssavala@nps.edu. More information on this and related projects can be obtained at http://www.nps.edu/Academics/GNCLab/ ResearchLabs/GNCLab.html