Download
1 / 21
270 likes | 744 Vues
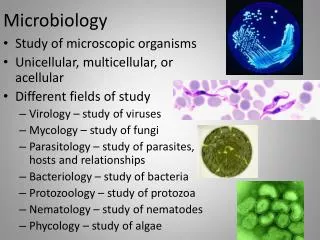
Microbiology Techniques. 2008. Media Types. How to hold an Inoculating Loop. Flaming the Loop. Streak Plate http://www.sumanasinc.com/webcontent/anisamples/microbiology/streakplate.html. Triple streak. Streaking and flaming. Flame the loop to sterilize it and let cool.

E N D
Streak Platehttp://www.sumanasinc.com/webcontent/anisamples/microbiology/streakplate.html
Streaking and flaming • Flame the loop to sterilize it and let cool. • Position the plate so that the spot of inoculum is nearest the hand not holding the loop (the opposite hand). • Lift the plate lid with the opposite hand; just enough to get the loop inside and touch the loop to the inoculum spot. It is often helpful to treat the inoculating loop as if it were a pencil - steadying the loop by resting the heel of the hand against the lab bench. • Move the loop back and forth across the spot and then gradually continue toward the center of the plate as you sweep back and forth. Use a very gentle and even pressure. • When creating each phase, do not worry about keeping each pass across the plate separate from previous ones. • When about 30% of the plate has been covered by the first streaking phase, remove the loop and flame sterilize it. • Repeat the above procedure for the second phase, but this time pick up some inoculum by crossing into the first phase 2-3 times and then not passing into it again (Figure 1-5). • Repeat as necessary for the third and fourth phases. After streaking the plate, flame sterilize the loop before setting it down.
Transfer 2 • 1. Wrap fingers of non dominant hand around the culture tube containing broth for transfer • 2. Using the pinkie finger of your dominant hand twist the red cap from the tube. Hold in your pinkie and do not place it on the counter • 3. Pass the mouth of the culture tube across the flame • 4. Direct the inoculating needle into the broth. • 5. Flame the mouth of your broth culture tube and replace the cap. Place it in your rack • 6. Pick up the slant in your non dominant hand • 7. Twist off the red cap • 8. Flame the mouth of the slant tube • 9. Direct the inoculating needle into the tube and “ stab” the agar in the base( butt) • 10. Withdraw on the entry line and when you reach the surface make a simple streak along the face. • 11. Flame the mouth of the tube and replace the cap. • 12. Flame your inoculating needle and replace in your rack.
Transfer 3 • Steps for Transfer of Broth to Broth • Hold loop or needle with dominant hand( right ) • Flame the loop • Hold culture tube in left hand • Remove red cap with pinkie of right hand • Flame mouth of culture tube • Place loop into broth( water) • Flame mouth of culture tube and close • Open culture tube with broth( should be labeled) • Dip loop into new broth and mix • Flame mouth of tube and close • Flame loop • Place to the side of your rack
Colony Morphology • Colony morphology • Color • Shape • Margin • Elevation
The Smear • Using aseptic technique remove a colony from a plate or cells from your slant. Be carefully to gently touch the surface of your culture with the inoculating loop. • Make a circular motion in the middle of the circle to spread the cells equally in this region of the slide • Add a drop of water in the middle • Mix again • Let Air dry • Run the slide through the flame until the slide is warm ( The frosted side should be down) This fixes the bacteria to the slide • Let the slide cool • Place in the metal tray or in the rack
Gram Stain • All staining work is to be done at the sink • Care should be taken to work directly over the sink • Place 1 drop of crystal violet stain on the smear ( 1 minute) • Rock or roll the slide to cover the area • Use the water bottle to drip water down the slide • Place 1 drop of iodine on the slide ( 1 minute) • Place 1 drop of alcohol on the slide 10 seconds ( KEY – do not leave on longer than 10 seconds or it will decolorize) • Place 1 drop of saffranin on the slide for 1 minute • Rinse with water from the bottle • Let the slide air dry
Review of Bacterial Cell Morphology • http://science.nhmccd.edu/biol/wellmeyer/bacteria/bacmorph.htm