Download
1 / 40
400 likes | 546 Vues
Office Ribbon, Quick Access Toolbar and Options. Streamline tasks in Office 2010. Related Workshops. Styles and Formatting in Word 2010 . FSRC Workshops. Access workshop information and materials: http://www.csus.edu/irt/fsrc/workshops.html Download Sample Files.

E N D
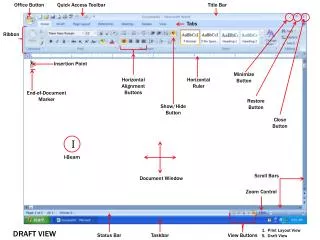
Office Ribbon, Quick Access Toolbar and Options Streamline tasks in Office 2010
Related Workshops • Styles and Formatting in Word 2010
FSRC Workshops • Access workshop information and materials: http://www.csus.edu/irt/fsrc/workshops.html • Download Sample Files
Announcements • We understand scheduling conflicts. Feel free to politely exit the room early if necessary. Please log out of your workstation. • We encourage you to ask questions, but if you find that you need further assistance, additional resources are available. Ask us after the workshop ends.
Pre-Requisites • Basic understanding of Office 2010
Objectives • Learn basic terms for the Ribbon • Learn the top Ribbon features • Learn about Office Options • Learn where the Quick Access Toolbar is located. • Learn how to customize the quick access toolbar • Learn Access Keys
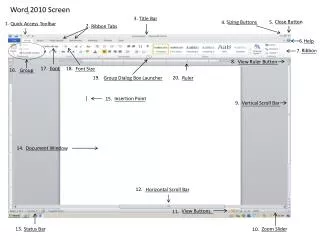
KeyTerms • Ribbon • Context Menu at top of the Office Word Window. • Tab • Groups of similar tools and functions • Group • Sub-sets of tools within each tab Demonstration: Open Word and Show the Ribbon
Customization • Commands in the Ribbon are organized in logical groups that are collected under tabs. • Re-order Tabs • Create Custom Tabs and Groups • Commands can only be added to custom groups Demonstration Open the customize ribbon menu (pg. 5)
Adding a New Tab • Tabs are groups of similar tools and functions. • Ability to create a new tab with custom groups for specific user needs. Demonstration + Activity 1 & 2 Add a tab and group (pg. 3-4)
Removing Tabs/Groups • Removing tabs and groups from ribbon is easy Demonstration + Activity 3 Remove tab and groups (pg. 4)
Hiding the Ribbon • The ribbon can be minimized for better viewing purposes. • There are three ways to hide the Ribbon • The Caret • Right Click on ribbon > Minimize ribbon • Double-Click a Tab Demonstration + Activity 4 Hide and Un-Hide the Ribbon (pg. 7)
Access Keys • Access keys provide a way to quickly use a command by pressing a few keystrokes, no matter where you are in the program. Demonstration + Activity 5 Activate the Access Keys (pg. 8)
Accessibility Checker • Overview of inaccessible content and provides information on how to fix errors • Helps you create a more accessible document Demonstration
Navigation pane • See all headings in a document, their relative position, and current position. • Headings are necessary for users of assistive technology (low vision/blindusers). Demonstration + Activity 6 Open Sample file and navigation pane (pg. 9)
Backstage View • File tab (Backstage) replaces Office Button. • Save, print, check for issues, share, etc. from the File Tab.
Recent Documents & Places • Locate files quickly and easily • Use Pushpins to “lock” documents or places you use or go to often • Specify # of documents to keep in Recent (50 max) • Clear Recent’s content from Options • Right click pinned item >“remove from list” • Right click unpinned item > “clear unpinned items/places” Demonstration + Activity 7 Use pushpins to lock a file to the Recent Tab (pg. 10) try unpinning it as well.
AutoRecover & AutoSave • File Tab > Options > Save • Specify time for autorecover (10 min default) • Keep last autosave checkbox selected Demonstration: Change auto-recover to 5 min.
Recover Unsaved Files • Recent file that was closed w/out saving • Previously Saved Draft, new edits not saved • Go to Manage Versions or Recent areas to recover unsaved work Demonstration: Look under the Managed Versions menu
Set Default Working Folder • Avoid browsing through folders each Save • Save and Save As automatically save in default location Demo & Activity: Change Default File Location to your U Drive.
Personalize Copy of Office • Have your initials appear when you add comments • Document Properties will show your information Demo & Activity: Enter your username and initials in appropriate fields under personalize
Add/See Document Properties • Add a Title, Tags (keywords), Comments • Improves searches if posted to web and also on local computer • Size, pages, words, dates information Demo & Activity: Add a title, author and 3 tags for document
Change The Color Scheme • 3 Color Schemes to Choose From • Blue (default), black, silver • Changes apply to all office applications • Look under Options > General
Accessing the Quick Access Toolbar QATB • Located above Ribbon next to application button or below the Ribbon • Frequently used commands on QATB: save, undo, redo, etc. • Commands are independent of tab currently displaying on ribbon Demonstration + Activity 11 Move the Quick Access Toolbar below the Ribbon (pg. 14)
Customize the Toolbar • The toolbar is completely customizable using three methods: • Right click on Ribbon Area • Backstage view • Quick Access Drop Down Menu Demonstration + Activity 8 Access the QATB using all three options (pg. 12-13)
Add a command to QATB • Only commands can be added to QATB • Options specific to commands e.g. individual styles or indent/space values cannot be added Demonstration + Activity 9 & 10 Add/Remove a command to the QATB (pg. 13)
Reset QATB • Reset removes any non-default commands. • Look under “Customize Toolbar” Demonstration + Activity 12: Reset Quick Access Toolbar
Document Compatibility • See document’s title bar to see what mode it opened: • Word 2010 (.docx) • Word 2007 Compatibility mode (.doc) • Word 97-2003 Compatibility mode (.doc)
Convert Files to a 2010 Format • Some Office 2010 features are not available when working in compatibility mode. • Converting document decreases file size automatically. • File Tab > Info > Convert
Summary • Basic terms for the Ribbon • Customize the Ribbon • Locate and Use Office Options • Locate the QATB • Customize the QATB • Document Compatibility
Safari e-Books @ Library • Go to library website and click advanced search • Enter a Search Term: “Microsoft Word” • Select “Electronic Bk” for Material Type and click submit. • Click on a search result and click “Connect to this resource online” • Safari Books Online will display content
Workshop Survey • Please provide your feedback by going to: http://www.csus.edu/irt/FSRC/workshops.html • Click the link to Staff Workshops Survey • Complete Survey
Resources for Further Assistance Faculty Staff Resource Center www.csus.edu/irt/fsrc 916-278-6112 fsrc@csus.edu Service Desk www.csus.edu/irt/servicedesk 916-278-7337 servicedesk@csus.edu