Download
1 / 29
330 likes | 806 Vues
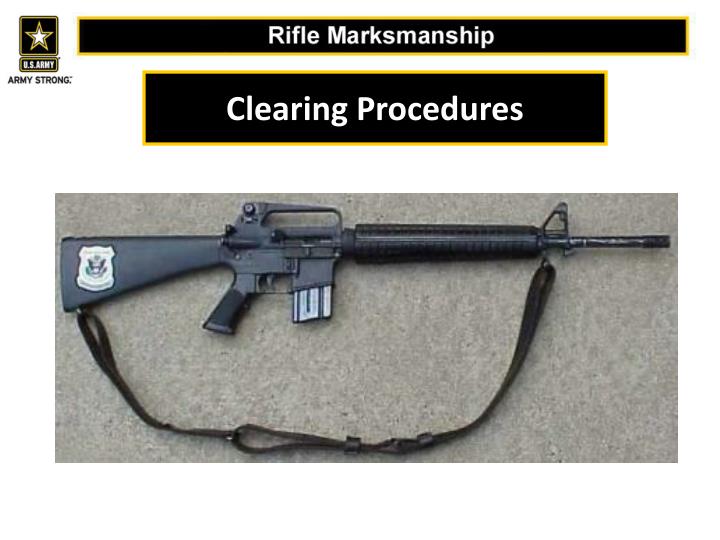
Clearing Procedures. Attempt to put selector on “SAFE”. Remove magazine. Pull charging handle to rear, lock bolt to the rear. USAMU Service Rifle Section. Inspect chamber. Place selector on “SAFE”. Safety Concerns. Everyone is a safety officer Stay alert at all times

E N D
Pull charging handle to rear,lock bolt to the rear USAMU Service Rifle Section
Safety Concerns • Everyone is a safety officer • Stay alert at all times • Follow all range commands • Hearing protection is required
Rifle Safety • Rifle in safe condition: • Magazine removed from rifle • Bolt to the rear • Rifle on safe • Empty chamber indicator inserted
Safety rules • Treat every rifle as if it were loaded • Never point a rifle at anything you do not intend to shoot • Keep your finger straight and off the trigger until you are ready to fire • Keep the rifle on safe until you are ready to fire
The Four Fundamentals • Steady Position • Sight Picture • Breath Control • Trigger Squeeze
#1 Steady Position • If you have good support, your muscles will be relaxed • Less muscle tension means less movement • Comfort equals relaxed
Non-Firing Hand • Rifle Butt • Firing Hand • Stock Weld • Elbow Position
Consistent Sight Alignment is achieved by resting the full weight of your head on the stock in a manner that allows your Dominant Eye to look through the rear sight aperture. INCORRECT CORRECT
Prone • FIRING HAND • Placed high on the pistol grip • Firm handshake grip • Trigger finger should be placed naturally on the trigger • Proper placement of the firing hand on the pistol grip allows the trigger finger to be moved straight to the rear without disturbing sight alignment. • NON FIRING HAND • Handguards rest in the “V” formed between forefinger • Wrist remains straight • Weight of rifle rests on heel of hand • Fingers curled naturally around handguards • Only enough grip pressure to maintain control of rifle • STOCKWELD • This is where your face contacts the stock • Head should be vertical and upright • Consistent from shot to shot • Purpose is to achieve proper achieve eye-sight alignment • Look for excess skin forming a roll • RIFLE BUTT • Place the rifle butt firmly into the pocket formed in the shoulder. • Bring the rifle up to your head, not your head down to the rifle. • The higher the position, the higher the butt is in the shoulder. • ELBOWS • The non-firing elbow should still be positioned as close to directly underneath the rifle as possible to create bone support • The firing elbow should be allowed to rest where it naturally falls after the rest of the position is acquired
Prone Leg Position Bent Knee
Kneeling • FIRING HAND • Placed high on the pistol grip • Firm handshake grip • Trigger finger should be placed naturally on the trigger • Proper placement of the firing hand on the pistol grip allows the trigger finger to be moved straight to the rear without disturbing sight alignment. • STOCKWELD • This is where your face contacts the stock • Head should be vertical and upright • Consistent from shot to shot • Purpose is to achieve proper eye-sight alignment • Look for excess skin forming a roll • NON FIRING HAND • Handguards rest in the “V” formed between forefinger • Wrist remains straight • Weight of rifle rests on heel of hand • Fingers curled naturally around handguards • Only enough grip pressure to maintain control of rifle • ELBOWS • The non-firing elbow should still be positioned as close to directly underneath the rifle as possible to create bone support • Place the elbow either forward of or behind the kneecap, but not on top • The firing elbow should hang as naturally as possible • FEET • Forward foot approx. 45 degrees to target and directly under knee • Rear foot: toe on ground or whole foot flat on ground • RIFLE BUTT • Place the rifle butt firmly into the pocket formed in the shoulder. • Bring the rifle up to your head, not your head down to the rifle. • The higher the position, the higher the butt is in the shoulder. • Left arm and left upper leg form a generally straight line • This allows the weight of the rifle to push straight to the base of the position
The purpose of any good shooting position is to support the two basic principles of marksmanship Sight Alignment Trigger Control
Front Sight In Focus Target Out of Focus CORRECT
Target In Focus Front Sight Out Of Focus INCORRECT
Misalignment of the sights induces an angular error • The change in impact downrange increases with distance
#3 Breath Control • Things to Look for: • Rifle Movement • “Wobbling”
#4 Trigger Squeeze - Do not jerk, yank, pull, etc - Squeeze, smoothly
Finger Placement FINGER NATURALLY PLACED ON THE TRIGGER UNNATURAL FINGER TIP PLACEMENT VS
Troubleshooting Fundamentals Troubleshooting the Fundamentals. The imagination is the only limiting factor in troubleshooting the fundamentals as a coach. The following examples can be used to identify errors in soldier's fundamentals. (1) Aiming. Attach the M16 sighting device and observe while the soldier fires. (2) Breathing. Watch the rise and fall of the firer's chest for consistency. (3) Trigger squeeze. Place your finger over the firer's finger while he fires, feeling for jerking and smooth follow through. (4) Position. Observe the following areas for consistency: ·Placement of the tip of the nose is always the same. ·Placement of the trigger finger is always the same. ·Placement of the non-firing hand is always the same. ·Placement of the legs is always the same. ·Cheek-to-stock position is always the same. ·Positioning of equipment is always the same.
Remedial Action - SPORTS • Slap the Magazine • Pull the Charging Handle • Observe the Chamber • Release the Charging Handle • Tap the Forward Assist • Squeeze the Trigger (pointed at target)