Download
1 / 39
390 likes | 948 Vues
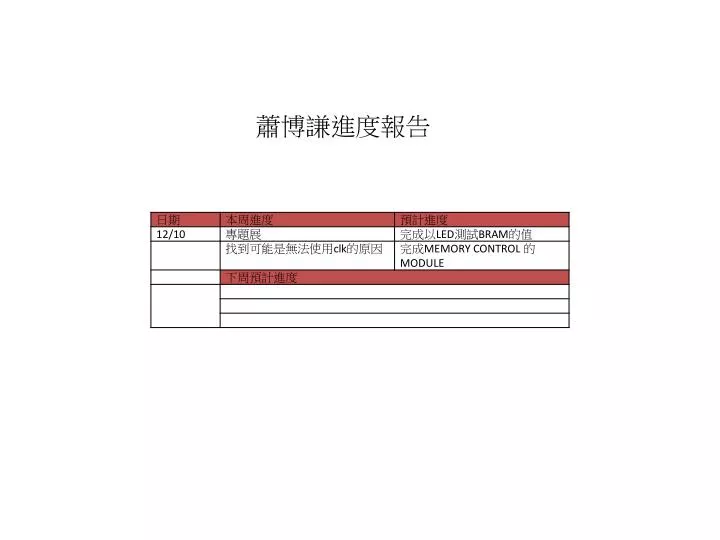
蕭博謙進度報告. 創造 module. Step1. 選擇創立 project. 創造 module. Step2. 選擇 型號與路徑位置. 創造 module. Step3. 創立完的架構圖. 創造 module. Step4. 創立 IP. 創造 module. Step5. 開始介面. 創造 module. Step6. 選擇創立或者匯入. 創造 module. Step7. 選擇創立 xps 或是 sdk module. 創造 module. Step8. 選擇創立版本. 創造 module.

E N D
創造module Step1. 選擇創立project
創造module Step2.選擇型號與路徑位置
創造module Step3. 創立完的架構圖
創造module Step4.創立IP
創造module Step5.開始介面
創造module Step6. 選擇創立或者匯入
創造module Step7.選擇創立xps 或是sdkmodule
創造module Step8. 選擇創立版本
創造module Step9. 剩下都default設定
創造module Step9. 剩下都default設定
創造module Step10. 如果想以verilog創立須在框框內打勾
創造module Step11. 完成module
創造module Step12. 創立的ip會在左側出現
創造module Step13. 將IP掛上去
創造module Step14. 點是
創造module Step15. 自動出現的畫面 (AXI外部介面)
創造module Step16. 選擇CPU
創造module Step17. 在ports tag 裡面會看到剛掛上去的IP
創造module Step18. 修改自己增加的IP的程式
創造module Step19. 因為是使用VHDL所以會有兩個module,若是VERILOG只會有一個
創造module Step 20. 撰寫欲加入的程式碼 (user_logic)
創造module Step 21. 撰寫欲加入的程式碼 (user_logic)
創造module Step 22. 撰寫欲加入的程式碼 (user_logic)
創造module Step 23 撰寫欲加入的程式碼 (user_logic)
創造module Step 24.撰寫欲加入的程式碼 (user_logic)左 (ledtest)右
創造module Step25. 存檔完要撰寫MPD檔
創造module Step26. 撰寫完要讓他掃描 掃描完才會出現
創造module Step27. 檢查腳位(左)檢查前 (右) 檢查後
創造module Step28. 設定頻率 (在clock generator 那邊兩點下左鍵)
創造module Step29. 連接clock
創造module Step30. 連接輸出腳位
創造module Step31. 讓程式自動幫你把腳位包上去 按GENERATE NETLIST
創造module Step32. 包上去後再專案檔的HDL資料夾會有個SYSTEM_STUB 會出現包好的腳位 記下來
創造module Step33. 撰寫UCF 檔
創造module Step34. 解除限制
創造module Step35. 產生BIT檔案後燒錄 (IMPACT)
錯誤-clk不在他的輸入範圍 解決方法: Datasheet 裡面有提到,此ZYNQ的CLK接受輸入為50M~250M 超過就會ERRO