Download
1 / 24
240 likes | 341 Vues
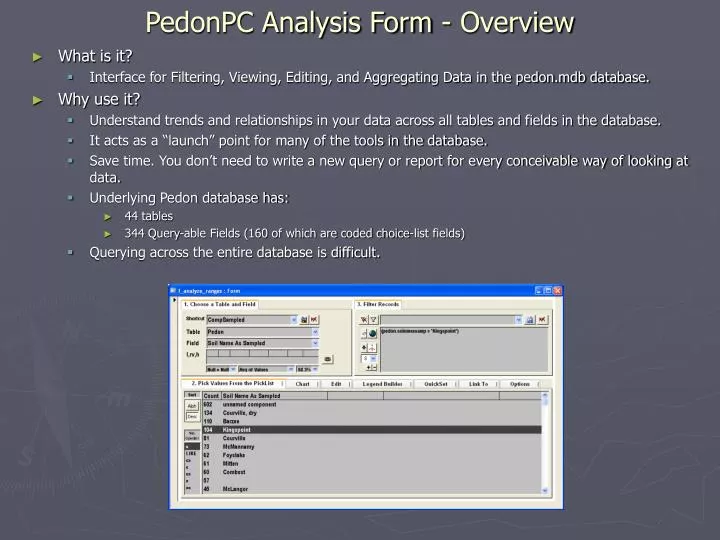
PedonPC Analysis Form - Overview. What is it? Interface for Filtering, Viewing, Editing, and Aggregating Data in the pedon.mdb database. Why use it? Understand trends and relationships in your data across all tables and fields in the database.

E N D
PedonPC Analysis Form - Overview • What is it? • Interface for Filtering, Viewing, Editing, and Aggregating Data in the pedon.mdb database. • Why use it? • Understand trends and relationships in your data across all tables and fields in the database. • It acts as a “launch” point for many of the tools in the database. • Save time. You don’t need to write a new query or report for every conceivable way of looking at data. • Underlying Pedon database has: • 44 tables • 344 Query-able Fields (160 of which are coded choice-list fields) • Querying across the entire database is difficult.
PedonPC Analysis Form - Overview • How does it work? Bottom Up vs. Top Down Query Building • The Access stock query builder uses a “bottom-up“ query building approach. • It’s easy to use for simple queries and databases but it becomes increasingly difficult… • as complexity increases with table joins, domained fields, criteria values, and grouping. • Example: Build the table below using the Access query builder in Design View. • You will need to add 7 tables: • 5 normal tables • 2 domain tables: 1 for pmkind and 1 for texcl. • You will need to change all table joins from “inner” joins to “outer” joins to make sure all records are present. • And make sure to join the domained fields with the domain tables. • You will need to add the choice field from the domain table instead of the coded field from the actual table. • You will also need to tell the query which domain_id to use for each domained field. • Do you know the domain_id’s for pmkind and texcl? Probably not, so you’ll have to look them up in the metadata_domain_detail table.
PedonPC Analysis Form - Overview • How does it work? Bottom Up vs. Top Down Query Building • The PedonPC Analysis Form uses a “top-down” query building approach. • It sits atop a query that joins all the tables in the database together. • When you start a new session, you begin with every permutation of the data in the database. (Cartesian Product = A x B x C x D…) • SEE EXAMPLE BELOW: 1 site x 3 horizons x 1 texture x 2 parent materials = 1 x 2 x 3 x 1 = 6 unique records. • As you filter or “drill-down” through the data… • You select records that meet your SQL “WHERE” or (CRITERIA) clause. In doing so, you exclude all other records. • Examples of a SQL WHERE clause: • WHERE site.usiteid = ‘Site1’ • WHERE site.usiteid = ‘Site1’ AND phorizon.hzname = ‘Bs’ • WHERE site.usiteid = ‘Site1’ AND phorizon.hzname = ‘Bs’ AND sitepm.pmkind = 102 • NOTE: 102 is the NASIS “code” that corresponds to “loess”. • sitepm.pmkind is a domained field where a numeric code is stored. Domained number fields are used in place of text in a database to save disk storage space.
PedonPC Analysis Form - Overview • Basic Features • Filter Data • Drill-down • View Data • Value List (Pick List) • Low, RV, High Values • Sort • Alphabetic (ascending) • Descending Count • Chart
PedonPC Analysis Form - Overview • Advanced Features • Filter Data • Save/Load Filters • Managing SQL WHERE • Operators (=, LIKE, <>, etc.) • Parenthesis • Spatial Filter • Limited List Filter • Edit/Update Data • View Data • Save Shortcuts to Fields • Global Edit/Update
PedonPC Analysis Form - Overview • Extensions • Link To – links to static objects (existing queries, forms, reports) in the database. • QuickSet – create a query on the fly based on Selected Set. • Save/Load Sets of Fields • Legend Builder – method to aggregate point (Pedon) data into aggregate (NASIS) data. • Note: This part of the Analysis form has been moved to the NASIS Legend Builder form
PedonPC Analysis FormBasic Features - Filtering Data • Form Layout • 3 main sections: Field, Value List, Filter Selecting a Field From the Field List (or Shortcut) Populates the Value List. Selecting a Value From the Value List Populates the Filter. Pressing the Filter Button Filters the Set Based on the Filter. The Field List shows every field in the active Table. The Table List shows all the Tables in the database. The Shortcut List shows a list of user-named shortcuts to common fields. Field Filter Value List
PedonPC Analysis FormBasic Features - Filtering Data • Drill Down • Keep refining your Selected Set by changing the field, choosing a value (or values), and filtering. • Example: Look only at the E horizons of Kingspoint records Selecting a Field From the Field List Populates the Value List. Pressing the Filter Button Filters the Set Based on the Filter. Selecting a Value From the Value List Populates the Filter.
PedonPC Analysis FormBasic Features - Viewing Data Selecting a Field From the Field List (or Shortcut) Populates the Value List. You are now viewing the pH values for the Kingspoint E horizons. - Click on the Options tab and turn ON the Chart. - If the Field is a number Field, Low ,RV, and High values are calculated. - Sort the Value List Alphabetically (Ascending) or by Descending Count - Click on the Chart tab to view the current field on the Chart.
PedonPC Analysis FormAdvanced Features – Filter Data • Save the Current Filter • NOTE: Saving of Spatial Filters and Limited List Filters is unavailable. • Load an existing Filter • NOTE: This loads the Filter Parameters in to the SQL WHERE box where it can be used as is or modified. Press the Filter Button to run the filter. • Delete the Current Filter The following Save/Load/Delete Filter instructions are the same for Shortcut and QuickSet (discussed later in the Extension section.). - Click the Delete Filter Button to delete a current saved filter. - Press the Save Filter As Button to save the current filter. - Click the down arrow to see drop-down. Select a Filter from the drop-down. - Enter the Filter Name in to the prompt. Then click OK.
PedonPC Analysis FormAdvanced Features – Filter Data • Managing SQL WHERE for complex querying. • When a value is select from the Value List on the Analysis Form, Default Operator is set to ‘=’ • Parenthesis ( ) are automatically added. • AND vs. OR, Default is ‘AND’…when a NEW value for a DIFFERENT field is added. • OR is added when a 2nd value for the SAME field is added. • Just Like Mathematics, without parenthesis, operators are read left to right. • Add parenthesis ( ) around the section you want to be considered together • Managing SQL WHERE for complex querying. • When using the ‘LIKE’ operator, include a ‘*’ as a wildcard. • Use ‘<>’ as NOT Equal To * ( ) Important Note: AND vs. OR An OR is added when you select a second value from the same field because a field cannot be equal to two values. Example: The Horizon Name cannot = Bs AND C, only Bs OR C. You are selecting records WHERE the User Site ID field equals ‘Sites1’ AND (the Horizon Name field equals ‘Bs’ OR ‘C’). You are NOT selecting sites that have both a Bs and C horizon. This functionality requires a more complex query and is covered later in the Limited List section of this tutorial. Cartesian Product Query Important Note: Parenthesis Placement (site.usiteid = ‘Site1’) AND (phorizon.hzname = ‘Bs’) OR (phorizon.hzname = ‘C’) Read left to right: Returns any ‘Bs’ for sites by the name of ‘Site1’ OR any ‘C’ horizons. This is probably NOT what you want. (site.usiteid = ‘Site1’) AND ((phorizon.hzname = ‘Bs’) OR (phorizon.hzname = ‘C’)) Read left to right: Returns any ‘Bs’ OR ‘C’ horizons for sites by the name of ‘Site1’ The difference between the two is significant. site.usiteid ‘Site1’ = (site.usiteid LIKE ‘Site1*’) (site.usiteid <> ‘Site1’) (site.usiteid = ‘Site1’) AND ((phorizon.hzname = ‘Bs’) OR (phorizon.hzname = ‘C’)) AND (phorizon.hzname = ‘Bs’) OR (phorizon.hzname = ‘C’) SQL WHERE (Filter)
PedonPC Analysis FormAdvanced Features – Spatial Filter • Click on the Spatial Refresh button – this will enable the refresh of tTempAnalyzeSpatial Events layer in ArcMap with the currently filtered records each time the filter button is clicked • Now click on the Filter button to show all your points in ArcMap through the tTempAnalyzeSpatial Events layer • If you have not set up the spatial components in an ArcMap project according to the instructions in the Setup for Pedon PC Spatial Linkage power point, then this process will not work.
PedonPC Analysis FormAdvanced Features – Spatial Filter • All of the points within the pedon database should now be displayed • Now open up the ArcMap project that you have set up for the spatial linkage with the Pedon PC or click the Refresh button if the project is already open
PedonPC Analysis FormAdvanced Features – Spatial Filter • Now go back to the Analysis form in the Pedon PC and make a selection from values in the list of soil name as sampled • Notice that the value select goes up into the filter box • Click the filter button again to limit to the selection
PedonPC Analysis FormAdvanced Features – Spatial Filter • Notice that display of points tracks the records that are currently filtered in the Analysis form • Now go back over to your ArcMap project and click the Refresh button
PedonPC Analysis FormAdvanced Features – Spatial Filter • Looking at the spatial distribution of the documentation for the Chereete series, I notice that there are several locations on the east side of the survey area where Chereete has been described. Chereete occurs on outwash fans derived from granitic rocks and I know that the more representative locations are going to be on the west side of the survey area. • I want to limit the records in the Analysis form to only those that have been selected spatially on the west side of the survey area. • Set your selectable layer to the tTempAnalyzeSpatial Events layer • Make the selection of points • Open the Export Selected Points Model by double clicking on it • The model will export a table of the selected points to the Spatial Link database • The model will run without parameters as long as the spatial link database is located at C:\pedon\spatial_link.mdb on your system • If this requirement cannot be met, then use the parametered version of the model so you can browse to the location of the spatial_link.mdb file on your system • Click Ok to run the model
PedonPC Analysis FormAdvanced Features – Spatial Filter • Now go back to the Analysis form in the Pedon PC • Click the Spatial Filter button (Globe) to depress it – this initiates the spatial filter mode and limits the records to the spatial selection passed to the Pedon PC from ArcMap • Now click the Filter button again and watch the record counts change for Chereete • The record counts decreased from 83 to the 75 spatially selected Chereete documentation points
PedonPC Analysis FormAdvanced Features – Spatial Filter • Now go back over to your ArcMap project and click the Refresh button • Notice that display of points is now limited to the 75 documentation points of Chereete that were spatially selected • This selection of 75 points could be spatially selected from again by repeating the same process • Make a selection in ArcMap • Run the Export Selected Points model • Go back to the Analysis form and click the spatial filter button or toggle it off, then back on if it is currently on. • Click the filter button to limit the records to the spatial filter • As long as the spatial filter button is depressed the records will be limited to the current spatial selection sent from ArcMap by the Export Selected Points model
PedonPC Analysis FormAdvanced Features – Mapunit Symbols • Mapunit symbols can come from three possible sources: • Spatial layer – A spatial intersection of your points against your soil polygons in ArcMap is an efficient way of managing musyms. It does require a soil polygon layer, spatially referenced points, and basic knowledge of ArcMap toolboxes. • Mapunit Overlap records – The pedon database (and NASIS pedon) track mapunit symbols in an overlap table. Keeping these overlap records current during active mapping can be problematic. • Transect records – Since Alaska uses a line-intercept transect (or traverse) to document mapunit polygons, they attribute the mapunit symbol to the entire transect. • All of these sources for mapunit symbols are handled through a query called workspace_site_musym which ranks the sources in the order listed above. • In the example shown, this point still has “90E” stored in the site mapunit overlap table, but in reality it “overlaps” a “Pf” unit (a soil line was moved in ArcMap). • If you have run the Polygon-Point Intersect Model in ArcMap and have a table of points with corresponding mapunit symbols from the spatial data, then within the query those symbols would trump any mapunit overlap records or transect records that had been populated for a site. • Go to the Shortcut list and select Mapunit Overlap to show the mapunit overlap records • Mapunit symbols from the Mapunit Overlap table are displayed for the Chereete records • Notice the Mapunit box with drop down list is set to MU-O for Mapunit Overlaps
PedonPC Analysis FormAdvanced Features – Mapunit Symbols • The Mapunit drop down list has three selections: • MU – S - Sampled • This selection pulls the symbols from the musym as sampled field in the workspace_mapunit table • MU – C - Correlated • This selection pulls the symbols from the musym as correlated field in the workspace_mapunit table • MU – O – Overlaps (default) • This selection pulls the symbols from the mapunit overlap records in the mapunit overlap table
PedonPC Analysis FormAdvanced Features – Limited List Filter • Use a Limited List Filter on the Analysis Form to answer these questions • Select LIBO3 from the Value List. It appears in the SQL WHERE box. Press the Filter Button. • At this point, you could save the filter with a descriptive name like ‘Kingspoint, with LIBO3’. • Pressing the Limited List button will now “tether” the query to a limited list of “parent” records that meet the SQL WHERE requirements. • Use a Limited List Filter on the Analysis Form to answer these questions. • EXAMPLE: Let’s see Kingspoint sites that have both LIBO3-Twinflower and LAOC-Western Larch. • Click the Shortcut drop-down and select Existing Veg. • Scroll down through the species and find 3 occurrences of LIBO3 – Twinflower- Linnaea borealis • In NW Montana, this species is often an indicator of a cooler, moister vegetative community than would be expected at a pedon correlated to a Kingspoint component. • Use a Limited List Filter on the Analysis Form to answer these questions. • At this point, you could “Link To” the Data Entry form and double check the data for the 2 sites. You may find that the 2 profiles had Bw horizons that should have been called Bt horizons. This makes the sites fit the McMannamy concept (inceptic hapludalfs) instead of Kingspoint concept (typic haplustepts). Both occur on steep south-facing slopes, but McMannamy is typically found in moister concave sites. • Use a Limited List Filter on the Analysis Form to answer these questions • Answer ‘Yes’ in the dialog box to continue, answer ‘No’ to use the last-used Limited List. • Now you see the suite of plant species that occur at Kingspoint sites with LIBO3-twinflower. • You could use this as a “launch” point to investigate where these sites are in ArcMap • OR View the photos at these sites • Use a Limited List Filter on the Analysis Form to answer these questions • You can also continue to “drill-down” into a sub-set of this dataset by selecting another value and filtering. Select LAOC-Western larch and filter. • Then press the Limited List-Down button (and answer Yes in the dialog box) to see the species that occurred at the two sites where both Twinflower and Western Larch occurred together. • Use a Limited List Filter on the Analysis Form to answer these questions • Normal queries will return a list of records where a value occurs. • Example: Filtering for ‘Bk’ horizons returns only the ‘Bk’ horizons. • The Limited List Filter returns a list of “parent” records where a value occurs. • Example: Filtering for ‘Bk’ horizons returns a list of sites that have Bk horizons. • How do you make a query that answers the following questions? • What Sites have both Grand Fir and Twinflower? Or Grand Fir but NOT Subalpine Fir? • What Pedons have both aquic and gelic diagnostic horizons? • What Horizons meet the color requirements for a Mollic epipedon? • Use a Limited List Filter on the Analysis Form to answer these question • Use a Limited List Filter on the Analysis Form to answer these questions. • Let’s go ahead and correlate these 2 sites to McMannamy. Click the Shortcut Drop Down and Select “CompCorrelated”. This is a shortcut to the soinmasscorr field in the pedon table. • Click on the Edit tab. This tab allows you to edit/update the actual field values for the records that you have filtered to. Type “McMannamy” in to the first field, click Yes in the dialog box to update all. • Use a Limited List Filter on the Analysis Form to answer these questions. • You’ve now used a Limited List Filter on the Analysis Form to correlate 2 sites to a component with a vegetation community that is more appropriate for the sites. • You were also able to globally edit/update the records.
PedonPC Analysis FormExtention Features • QuickSet • Create a single un-coded table of all the fields in the Set. • Link To • Link to an existing Query, Form, or Report in the database. • Photo Link Manager • Create, View, and Edit Photo hyperlinks. • (covered in another presentation)
PedonPC Analysis FormExtensions – QuickSet • Click the drop down arrow and view the existing QuickSets. • Select one and click the Load Quickset button to View the Fields in the Set. • Let’s view the QuickSet we built. • Click the View QuickSet button to open a query in the Access Datasheet View. • You now see the “q_QuickSet” query. This is a “snapshot” of the data fields in the database. • It is already filtered to the set on the Analysis Form. • It can be manipulated like a stock Access query. • By itself, a QuickSet is just a quick way to view multiple data fields in a tabular datasheet. • But each time you view a new QuickSet, the previous one is overwritten. • You CAN save the QuickSet (collection of field columns) as a permanent query by giving it a name before pressing the View QuickSet button. • Depress the Make Table button to add a table to the database to base the query off of. • QuickSet queries have a “q_QuickSet_” prefix and tables have a “t_QuickSet_” prefix. • Click the QuickSet Tab. • The term “QuickSet” simply refers to a set of fields (or columns) to include in a query. • Each time you change the Active Field, that field is added to the active QuickSet. • Suppose we added the following four fields: Mapunit, Component, VegType, and Subgroup. • Click the Save QuickSet button, name the Set “MU-Comp-Veg-Tax”, and Click the OK button.
PedonPC Analysis FormExtensions – Link To • The Link To Tab. • The Link To functionality allows you to jump to other database objects such as queries, forms, or reports for the records you are currently filtered to. • Say we wanted to jump to the site data entry form for the 83 Chereete records we are currently filtered to • Click on the Link To Tab • Linked objects from the t_analyze_linked_objects table are displayed on the lower part of the Linked To tab. Forms, queries, and reports can be added, changed, or deleted from the table. • Select a database object to link to from the drop down lists here • To jump to the site data entry form, select PC Form from the Forms drop down list • You will be asked if you would like to filter the form to the Selected Set. Click Yes and the form will open with the filtered records. Click No to open the form with all records. • You could also jump to the Photo Link Manager, the NASIS Legend Builder or view your set of filtered records on a textural triangle plot (requires sand, silt, and clay estimates). • There are also a number of queries which can be linked to. You could also develop your own queries, forms or reports and add them to the table as Link To objects.