Download
1 / 110
1.1k likes | 1.35k Vues
Vital Signs. Dentalelle tutoring. Recording of Vital Signs. At the New Patient Exam (and in some cases EVERY appointment) vital signs must be recorded Often vital signs are only recorded for adults and older children – here is the normal range:

E N D
Vital Signs Dentalelle tutoring Dentalelle Tutoring @ www.dentalelle.com
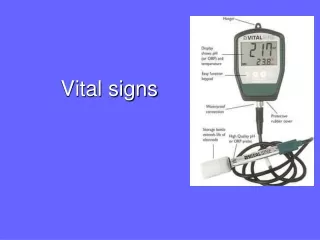
Recording of Vital Signs At the New Patient Exam (and in some cases EVERY appointment) vital signs must be recorded Often vital signs are only recorded for adults and older children – here is the normal range: Blood pressure – 115/75 (or 120/80 depending on the text you read but 115/75 is the normal range under the ‘heart and stroke foundation’. Pulse – 60-90 BPM Respiration – 14-20 RPM Temperature – 97-99 degrees Dentalelle Tutoring @ www.dentalelle.com
Normal Results A normal body temperature taken orally is 98.6°F (37°C), with a range of 97.8–99.1°F (36.5–37.2°C). A fever is a temperature of 101°F (38.3°C) or higher in an infant younger than three months or above 102°F (38.9°C) for older children and adults. Hypothermia is recognized as a temperature below 96°F (35.5°C). Respirations are quiet, slow, and shallow when the adult is asleep, and rapid, deeper, and noisier during and after activity. Average respiration rates at rest are: infants, 34–40 per minute children five years of age, 25 per minute Tachypnea is rapid respiration above 20 per minute. Dentalelle Tutoring @ www.dentalelle.com
Continuation The strength of a heart beat is raised during conditions such as fever and lowered by conditions such as shock or elevated intracranial pressure. The average heart rate for older children (aged 12 and older) and adults is approximately 72 beats per minute (bpm). Tachycardia is a pulse rate over 100 bpm, while bradycardia is a pulse rate of under 60 bpm. Dentalelle Tutoring @ www.dentalelle.com
Blood Pressure To record blood pressure, a person should be seated with one arm bent slightly, and the arm bare or with the sleeve loosely rolled up. The cuff is placed level with the heart and wrapped around the upper arm, one inch above the elbow. If the blood pressure is monitored manually, a cuff is placed level with the heart and wrapped firmly but not tightly around the arm one inch above the elbow over the brachial artery. Positioning a stethoscope over the brachial artery in front of the elbow with one hand and listening through the earpieces, the cuff is inflated well above normal levels (to about 200 mmHg), or until no sound is heard. Alternatively, the cuff should be inflated 10 mm Hg above the last sound heard. The valve in the pump is slowly opened. Air is allowed to escape no faster than 5 mmHg per second to deflate the pressure in the cuff to the point where a clicking sound is heard over the brachial artery. The reading of the gauge at this point is recorded as the systolic pressure. Dentalelle Tutoring @ www.dentalelle.com
Blood Pressure Continuation The sounds continue as the pressure in the cuff is released and the flow of blood through the artery is no longer blocked. At this point, the noises are no longer heard. The reading of the gauge at this point is noted as the diastolic pressure. "Lub-dub" is the sound produced by the normal heart as it beats. Every time this sound is detected, it means that the heart is contracting once. The noises are created when the heart valves click to close. When one hears "lub," the atrioventricular valves are closing. The "dub" sound is produced by the pulmonic and aortic valves. With children, the clicking noise does not disappear but changes to a soft muffled sound. Because sounds continue to be heard as the cuff deflates to zero, the reading of the gauge at the point where the sounds change is recorded as the diastolic pressure. Blood pressure readings are recorded with the systolic pressure first, then the diastolic pressure (e.g., 120/70). Blood pressure should be measured using a cuff that is correctly sized for the person being evaluated. Cuffs that are too small are likely to yield readings that can be 10 to 50 millimeters (mm) Hg too high. Hypertension (high blood pressure) may be incorrectly diagnosed. Dentalelle Tutoring @ www.dentalelle.com
Pulse – Heart Beat The pulse can be recorded anywhere that a surface artery runs over a bone. The radial artery in the wrist is the point most commonly used to measure a pulse. To measure a pulse, one should place the index, middle, and ring fingers over the radial artery. It is located above the wrist, on the anterior or front surface of the thumb side of the arm. Gentle pressure should be applied, taking care to avoid obstructing blood flow. The rate, rhythm, strength, and tension of the pulse should be noted. If there are no abnormalities detected, the pulsations can be counted for half a minute, and the result doubled. However, any irregularities discerned indicate that the pulse should be recorded for one minute. This will eliminate the possibility of error. Pulse results should be noted in the health chart. Dentalelle Tutoring @ www.dentalelle.com
Respirations An examiner's fingers should be placed on the person's wrist, while the number of breaths or respirations in one minute is recorded. Every effort should be made to prevent people from becoming aware that their breathing is being checked. Respiration results should be noted in the medical chart Dentalelle Tutoring @ www.dentalelle.com
Temperature Temperature is recorded to check for fever (pyrexia or a febrile condition), or to monitor the degree of hypothermia. Manufacturer guidelines should be followed when recording a temperature with an electronicthermometer . The result displayed on the liquid crystal display (LCD) screen should be read, then recorded in a person's medical record. Electronic temperature monitors do not have to be cleaned after use. They have protective guards that are discarded after each use. This practice ensures that infections are not spread. Dentalelle Tutoring @ www.dentalelle.com
Ergonomics Dentalelle Tutoring @ www.dentalelle.com
Ergonomics for the Dental Assistant As a dental assistant, ergonomics is important to your health and longevity in the profession. Neutral-sitting position is ideal. This is sitting upright with your back straight and weight evenly distributed over the seat. Legs should be slightly separated with feet flat on the ring around the base of the chair. Your thighs should be parallel to the floor and front edge of the chair even with the patient's mouth. Position your chair close to the side of the patient with knees facing toward the patient's head. The height of the chair should be such that your eye level is 4 to 6 inches above the operator. This will give you a good line of vision into all areas of the patient's mouth. If your chair has an arm support, it should be at the level of your abdomen and be used for reaching and leaning forward. The position of the mobile cart or cabinet top should be over your thighs and as close as possible. Dentalelle Tutoring @ www.dentalelle.com
Five Categories of Motion Class I is using fingers only such as flipping ends of the instrument. Class II is using fingers and wrist. This could be transferring an instrument to the operator. Movement of fingers, wrist and arm are Class III. Oral evacuation is in this classification. Mixing of dental materials involves movement of the entire arm and shoulder. This is classified as Class IV. Class V is movement of the arm and twisting of the body. Twisting behind you to adjust the dental light would be this classification. Dentalelle Tutoring @ www.dentalelle.com
Zones The work area around the patient is arranged into zones representing hours on a clock. The activity zone for the operator is 7 o'clock to 12 o'clock. All activities of the operator at the chairside are performed in this zone. The assisting zone is 2 o'clock to 4 o'clock. In this zone, the assistant is positioned. The assistant transfers materials and instruments in the transfer zone, which is 4 o'clock to 7 o'clock. Ergonomically, the design of the work area is a 20-inch radius. Keep frequently used items such as air-water syringe, high volume evacuator and saliva ejector within easy reach. All equipment and instruments should be within maximum vertical and horizontal reach. This is the sweep of your forearm in a reach of vertical and horizontal direction. Front delivery systems are best. Dentalelle Tutoring @ www.dentalelle.com
Zones Diagram Dentalelle Tutoring @ www.dentalelle.com
Patient Positioning You should keep everything approximately waist high, not above shoulder level or below the waist. Those levels require twisting, turning of your back and shoulders. If a side delivery system is utilized, make it your dominant side. Again, this will require less overextending of your arm and shoulder Do not overlook patient positioning. The position of the patient can greatly affect your posture. When reclining the patient, place his or her head in the same plane as their feet. Many dental practitioners try to perform procedures with the patient in an upright position. This causes practitioners to compensate by twisting their neck and back in order to see. Do not be afraid to ask patients to turn their heads or tilt their chins up or down. Patients are willing to comply if asked. This will allow better access and vision in the oral cavity. Try using indirect vision for those hard to access areas such as buccal of the left side of the mouth and lingual of the right side. Dentalelle Tutoring @ www.dentalelle.com
Other Areas to Consider When deciding on a proper glove size, make sure the glove is not too tight across the palm or too constricting at the wrist. Also, the finger length should be adequate to allow for comfortable finger movement. Handpieces and air/water syringes have hoses that are coiled and can be heavy. Their coiled cord places resistance against the wrist and hand. If the cord is long enough, place it in your lap so the excess is not dangling down. Swiveling devices can be placed on a handpiece. These devices reduce handpiece torque. Newer handpieces are much lighter than the older models. If your air/water syringe has a tightly coiled cord, consider replacing it with a lightweight hose. Climate control of the workplace is important too. Exposure to cold air or drafts can cause muscles to constrict leading to fatigue or overworking of the muscles. This affects muscles of the neck, shoulders and back in particular. Always wash your hands in warm water to decrease hand fatigue. Dentalelle Tutoring @ www.dentalelle.com
Stretching Routine stretching exercises for your neck, shoulders, back, arms and fingers can prevent some work-related injuries and relax the body. Stretching should be performed every hour and slowly while exhaling into the stretch. Dentalelle Tutoring @ www.dentalelle.com
Exercises to Perform Neck Rotation Exercises 1. Head rotation * Drop your head forward * Rotate your head to the right shoulder * To left shoulder * Then return to front * Repeat this 3-5 times Shoulder & Upper Back Exercises 1. Shoulder rotation * Rotate your right shoulder * Then rotate your left shoulder * Repeat this series 3-5 times 2. Shoulder shrug * Shrug your shoulders by raising them * Hold this position for 5 seconds * Repeat 3-5 times Overhead reach * Place your hands and arms straight over your head and stretch * Hold for 5 seconds * Repeat 3-5 times 4. Elbow spread * Interlock fingers behind head * Move elbows backward * Hold for 5 seconds * Repeat 3-5 times Dentalelle Tutoring @ www.dentalelle.com
Continuation of Exercises Arm straightening * Interlock fingers behind your back and straighten arms * Hold for 5 seconds * Repeat 3-5 times Lower Back Exercises 1. Backward lean * Place hands on buttocks and lean backward * Hold for 5 seconds * Repeat 3-5 times Spine rotation * While sitting, place your left hand on right knee * Look over the right shoulder causing spine rotation * Repeat other side * Repeat series 3-5 times 3. Forward bend * Bend forward at waist * Try to touch your toes * Hold for 5 seconds * Repeat 3-5 times Wrist & Finger Exercises Finger curl * Stretch fingers out * Curl them toward palm of hand * Repeat 3-5 times 2. Finger pull * Pull fingertips of one hand back with the other * Repeat with other hand * Repeat 3-5 times Dentalelle Tutoring @ www.dentalelle.com
Dental Procedures Dentalelle tutoring Dentalelle Tutoring @ www.dentalelle.com
Sealants Dentalelle Tutoring @ www.dentalelle.com
Sealants A sealant is a protective, plastic coating that can be placed on the occlusal surfaces and buccal/lingual pits of the teeth Usually done to seal the pits and fissures of the first and second year molars but can be placed on the premolars as well. Ages 6-7 or 11-14. Dentalelle Tutoring @ www.dentalelle.com
Steps for placement of a sealant Wash the tooth with pumice and water to ensure it is clean Wash and dry the tooth Apply your cotton rolls, dry angles, etc. to the area Apply etch and allow to sit for 10-30 seconds depending on the manufacturers instructions Wash the etch very well, dry very well. To ensure proper etching has taken place, the tooth must appear a chalky white and if not, re-etch for 10-20 seconds Dentalelle Tutoring @ www.dentalelle.com
Continuation Apply the sealant material Run an explorer along the sealant to prevent air bubbles from forming Light cure for 10-20 seconds Check sealant with explorer to make sure no voids are present Use bite paper to check the bite (articulation), if the sealant is high, the Dentist can smooth off with a high speed hand piece Dentalelle Tutoring @ www.dentalelle.com
Recall Appointments The sealants will need to be reviewed at recare appointments to make sure no voids or pieces of the sealant have come off The patient and parents must be aware that proper brushing and flossing must still be maintained. A sealant only ‘helps’ prevent decay but will not stop it entirely Dentalelle Tutoring @ www.dentalelle.com
Fillings Dentalelle Tutoring @ www.dentalelle.com
Composite Fillings Since they bond to the tooth, composite fillings restore most of the original strength of the tooth. Silver weakens the teeth, making them more susceptible to breaking. Since broken teeth are very expensive to restore, composites can save a lot of expense over the long run. Composite fillings restore the natural appearance of the tooth. Teeth restored with white fillings are less sensitive to hot and cold than teeth restored with amalgam, if correct techniques are used. Composites are mercury-free. Mercury in the fillings is viewed by some as being toxic. Composites require less removal of tooth structure. Especially with new cavities, the size of the hole made for the filling can be dramatically smaller with composites. Dentalelle Tutoring @ www.dentalelle.com
Amalgam Fillings They are generally less expensive. Composite fillings, if they are done correctly, take about 60% longer, require special expertise and expensive materials, and are more difficult to place, and so they cost considerably more than silver. General dentists can place amalgam without extra training. Composite requires the use of special bonding technology that many dentists are uncomfortable with. The proper placement of a white filling requires that the site for the filling be kept totally isolated from saliva while it is being placed. In the very back of the mouth, on some patients, it is difficult to keep the tooth isolated for the duration of the procedure. This can also be uncomfortable for some patients. A silver amalgam filling does not require this strict isolation of the tooth. The filling by itself is a stronger material, although it weakens the tooth. Silver fillings have a longer history of use than mercury-free fillings, thus some feel that they are more tried and tested. Dentalelle Tutoring @ www.dentalelle.com
Composite vs Amalgam Fillings If a patient has a cavity, the cavity must be removed and an amalgam or composite filling placed. Depending on the tooth and the patient, one might be better then the other The procedure involves: Topical/Local anesthetic Application of the rubber dam Removal of decay using high speed and slow speed handpieces Etch, prime/bond and light cure of the materials Filling material placed and light cured (if composite) The bite is checked with articulating paper and polishing **This is a quick recap of the procedure, please review in your notes from school the exact procedure – questions will be asked in your next session Dentalelle Tutoring @ www.dentalelle.com
Dental Inlays and Onlays Another form of a dental filling that can be used in place of an amalgam or composite Porcelain or goldinlays are used to repair minor damages to the teeth and dental onlays for greater damage. Simplified, one could describe dental fillings or dental inlays/onlays as ‘partial crowns’ that are used in cases when there is enough healthy enamel left on a tooth worth saving rather than inserting a completely new, artificial dental crown. One can say that the dental inlays resemble a small piece of puzzle which is customised, fitted and glued into the remaining enamel in order to restore the tooth’s strength and longevity. The inlays are normally made from either porcelain or gold. Dentalelle Tutoring @ www.dentalelle.com
Inlay and Onlay Procedure To receivedental inlays or dental onlays requires two dentist appointments. During the first one the tooth that is to have the dental inlay is examined and prepared. Once the tooth is prepared an impression is made and sent to a dental technological laboratory where the porcelain or gold inlay/onlay is made. Finally the dentist will fit you with a temporary dental filling and book a time for your next appointment. During the second appointment the temporary dental filling is removed. The porcelain or gold inlay/onlay is then tried out to make sure it fits perfectly. Once the fit is how it should be, it is then cemented into place. Dentalelle Tutoring @ www.dentalelle.com
Crown and Bridge Procedure Dentalelle Tutoring @ www.dentalelle.com
Crown and Bridge Procedure What are Dental Crowns and Tooth Bridges?Both crowns and most bridges are fixed prosthetic devices. Crowns and bridges are cemented onto existing teeth or implants, and can only be removed by a dentist. Crowns are placed on teeth that have very large fillings to begin with and a concern with chipping is apparent, a crown will go over the tooth given it strength Bridges are in place of a tooth – if a tooth is missing and a space results. Bridges are placed to prevent shifting of the teeth and to maintain the proper bite. Dentalelle Tutoring @ www.dentalelle.com
Crowns The dentist may recommend a crown to: Replace a large filling when there isn't enough tooth remaining Protect a weak tooth from fracturing Restore a fractured tooth Attach a bridge Cover a dental implant Cover a discolored or poorly shaped tooth Cover a tooth that has had root canal treatment Dentalelle Tutoring @ www.dentalelle.com
Crown and Bridge Procedure Before either a crown or a bridge can be made, the tooth (or teeth) must be reduced in size so that the crown or bridge will fit over it properly. Normally a rubber dam is placed for this but after the teeth have been reduced in size, the rubber dam is removed to finish. After reducing the tooth/teeth, the dentist will take animpression to provide an exact mold for the crown or bridge. If porcelain is to be used, your dentist will determine the correct shade for the crown or bridge to match the color of your existing teeth. Using this impression, a dental lab then makes your crown or bridge, in the material your dentist specifies. A temporary crown or bridge will be put in place to cover the prepared tooth while the permanent crown or bridge is being made. When the permanent crown or bridge is ready, the temporary crown or bridge is removed, and the new crown or bridge is cemented over your prepared tooth or teeth. Normally it takes two weeks at the most for a crown or bridge to be made. Dentalelle Tutoring @ www.dentalelle.com
Dental Implants Dentalelle Tutoring @ www.dentalelle.com
Dental Implants A Dental Implant is a small titanium screw that serves as the replacement for the root portion of a missing natural tooth. It is available in various sizes (both width and height) for different clinical situations. Dental Implants may be used to replace one or more missing teeth. In case of completely edentulous patients, implants may be used to fix the dentures to the underlying bone. Alternately, implants may be used to provide fixed tooth to edentulous patients without the use of dentures. Needless to say, an implant offers several advantages over conventional treatment options. Dentalelle Tutoring @ www.dentalelle.com
Benefits of Implants Implant supported teeth are more comfortable than conventional dentures because there is no slipping or movement, because the implants are fixed they feel and function like natural teeth. This eliminates some of the key worries of denture wearers and improves self-confidence. Dental implants are an alternative to conventional bridgework. They eliminate the need to prepare healthy teeth and do not place additional loads on the teeth supporting the bridge. When teeth are missing the surrounding bone shrinks. Implants stimulate the bone to be maintained which helps keep shape and structure of the jaw stable. Dentalelle Tutoring @ www.dentalelle.com
Contraindications for Implants Implants are not for everyone! There must be enough bone in the area to hold a dental implant or it will fail A lot of dental surgeons will not perform the implant procedure on a smoker due to the dealing in healing time Also your diabetic patients, healing is reduced so an implant may not be the best option For your dental hygienist – plastic scalers can only be used on and around the implant to avoid scratches Dentalelle Tutoring @ www.dentalelle.com
Root Canal Dentalelle Tutoring @ www.dentalelle.com
Root Canal The root canal procedure can be the most daunting to a new dental assistant, we have outlined some of the basic steps for you: Think of the procedure in steps, what you will be doing will determine what you will need Dentalelle Tutoring @ www.dentalelle.com
Steps Anesthesia. Rubber dam application. Making the area aseptic. Access to pulp chamber. Pulp extirpation. Trial radiograph with instrument in place. Calculating exact measurement. Reaming and filing of root canal to measurement. Irrigation. Desiccation. Selecting, sterilizing, and fitting the point. Trial radiograph with point in place. Cementation of point. Sealing of access opening. Final radiograph. Dentalelle Tutoring @ www.dentalelle.com
Preparing the canal Preparing the Root Canal. In gaining access, provide high and low speed burs. A barbed broach is used for extirpation of the pulp. A monojet syringe or some type of syringe is typically used to irrigate the tooth with sodium hypochlorite. Desiccation or drying of the root canal is done by the use of paper absorbent points: Extra fine, fine, medium, or coarse. The endodontic assistant should set out an assortment of paper points for the dentist. A radiograph with the measured instrument placed in the canal is exposed to determine the exact length of the root canal. The dental assistant then should provide a sequential assortment of reamers and files of increasing size. The beginning size is determined by the dentist. The reamers and files should be provided with rubber stops. A corresponding size point, either silver or gutta-percha, is selected and trial-fitted. Once the point passes the trial fit, it is ready for cementation. The dental assistant should now be prepared to mix the root canal cement. If the zinc oxide and eugenol technique is used, relatively large portions of powder are added to the liquid and spatulated until a heavy, creamy, nongranular mix is obtained. When the mix is complete, the cement should be drawn up from the mixing slab about 1 inch without separating. This test is done by dabbing the spatula into the mix and drawing it up slowly. The cement is given to the dentist who places it in the canal with a reamer. The point is coated with cement and seated into place. Dentalelle Tutoring @ www.dentalelle.com
Filling and Sealing Filling and Sealing the Root Canal. When gutta-percha points are used, cotton forceps are used to place the point. Depending on the technique, a plugger, a spreader, or both, are used to condense the gutta-percha in the canal. In other techniques, both gutta-percha and silver points are used at the same time. A trial radiograph of the root canal filling is taken and, if it is satisfactory, a thick mix of zinc oxide and eugenol or zinc phosphate cement is made and plugged into the access area to completely seal the canal. A number three Ladmore plugger is the instrument of choice for plugging the access opening with the cement. Dentalelle Tutoring @ www.dentalelle.com
Other Method The sequence of treatment for the multiappointment method of endodontic therapy differs from the single appointment method in that the sequence is interrupted at various stages to allow for drainage of infected material, for changing of medications in the root canal, or to alleviate a lengthy appointment. Medications commonly used in endodontic techniques include cresatin and camphorated paramonochlorophenol, which are placed in dappen dishes and then placed into the root canal by using paper points or into the pulp chamber by using cotton pellets. The tooth is then sealed and kept sealed until the next appointment. Dentalelle Tutoring @ www.dentalelle.com
Continued Follow-up Appointments. Upon completion of the treatment by either method, arrangements should be made to recall the patient 6 months later for a follow-up radiograph to determine the success of the treatment. If an abscess forms, the root canal treatment will have to be redone. Sterilization. Successful endodontics depends greatly upon sterility. Anything placed into the tooth must be sterilized. Dentalelle Tutoring @ www.dentalelle.com
Orthodontics Dentalelle Tutoring @ www.dentalelle.com
Orthodontics Orthodontics is done by a specialist – additional training is needed. Working as a dental assistant in an orthodontic office is an exciting experience. Often you will be trained on the job for this but it is wise to know the basics for regular practice. If your patient does not have a ‘Class I’ bite, this will likely need to be corrected. Acquired malocclusions are caused by: Trauma (including delayed weaning from thumb, finger, or pacifier sucking) Mouthbreathing (due to enlarged tonsils or adenoids, blocked nasal passages etc.) Premature loss of baby or adult teeth Dentalelle Tutoring @ www.dentalelle.com
Malocclusions Regardless of whether malocclusions are inherited or acquired, many of these problems affect not only alignment of the teeth but also facial development and appearance as well. A poor bite does not DIRECTLY cause tooth decay, or periodontal disease. It may, however, make it difficult to brush and floss properly which increases the likelihood of dental disease. Although a majority of the population have some type of malocclusion, not all people require or seek orthodontic treatment. For example, with or without a history of orthodontic treatment, 65% of adults develop crowded, crooked lower front teeth. This is a natural result of change over time and does not necessarily require orthodontic treatment. Dentalelle Tutoring @ www.dentalelle.com
Symptoms that may require Orthodontics Permanent teeth coming in (erupting) out of their normal position; Problems with biting the cheek or roof of the mouth; or Difficulty chewing or difficulty aligning teeth; Facial muscle or jaw pain, or speech difficulties. Obvious rotations and crowding of the teeth Remember – LOTS of space, teeth far apart, in a child is a good thing – meaning more room for the permanent teeth to come in Dentalelle Tutoring @ www.dentalelle.com