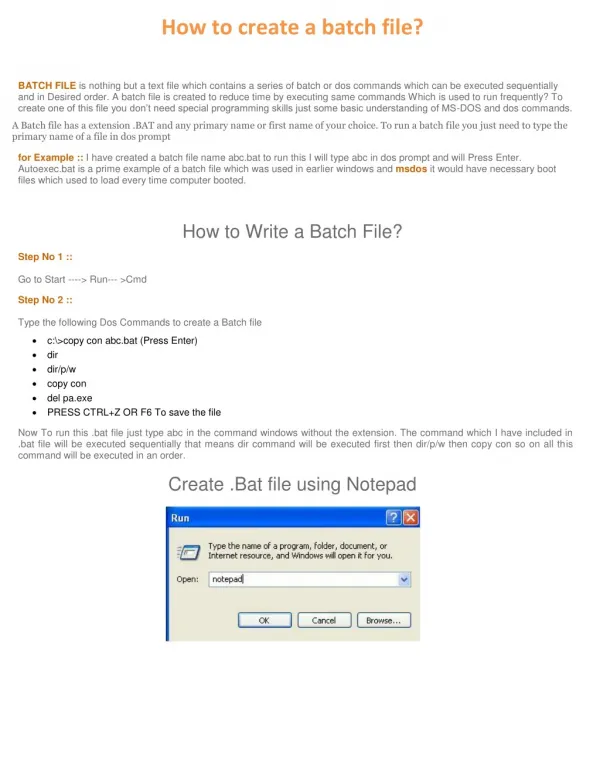
1 / 0

How to File a BPA Worldwide Consumer Circulation Statement Using NEXTGEN

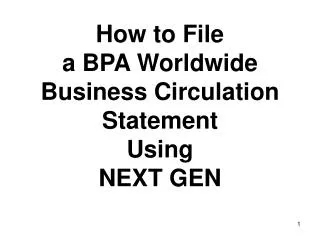
How to File a BPA Worldwide Consumer Circulation Statement Using NEXTGEN. 1. URL: http://efile.bpaww.com. Click Login. 2. Enter User ID and Password, use your bpaww.com member services login. 3.

gerda
Télécharger la présentation

How to File a BPA Worldwide Consumer Circulation Statement Using NEXTGEN

An Image/Link below is provided (as is) to download presentation Download Policy: Content on the Website is provided to you AS IS for your information and personal use and may not be sold / licensed / shared on other websites without getting consent from its author. Content is provided to you AS IS for your information and personal use only. Download presentation by click this link. While downloading, if for some reason you are not able to download a presentation, the publisher may have deleted the file from their server. During download, if you can't get a presentation, the file might be deleted by the publisher.

E N D

Presentation Transcript


  1. How to File a BPA Worldwide Consumer Circulation Statement Using NEXTGEN

    1
  2. URL: http://efile.bpaww.com Click Login 2
  3. Enter User ID and Password, use your bpaww.com member services login 3
  4. Make sure you are logged in as the right user. Click Statement Filing to being inputting data. 4
  5. Stage will display the filing as “In Progress.” Stage will continue to be “In Progress” until you Submit the filing to BPA. You may now begin to enter data. 5
  6. Turning Paid Reporting On Turn paid reporting in paragraphs 4-6 on using this checkbox. Paid and Non-Paid columns will appear in paragraphs 4-6. 6
  7. Table of Contents Table of Contents: Click on paragraph text to start
  8. Publisher’s Info 8
  9. To make changes to the publisher’s information. Select the address, from the drop down list of available locations, as it is to appear on Page 1 of the circulation statement. If the correct address does not appear select NEW from the drop down list and add the current address. To select the currency reported on the statement you can choose the currency from the drop down menu. Remember to click on SAVE at the bottom of the page. 9
  10. Assigning Filing ContactsEach filing must have a Filing Inquiry Contact & a Proof Copy Contact assigned 10
  11. Create an Available Contact Name and Assigning Filing Contacts To edit an already existing contact, click on the pencil icon To create the contact, click on the New Contact button to add a new contact row. Enter in the Contact’s first & last name, title, phone # and email address. Select the check box if the contact is the Filing Inquiry Contact and/or the Proof Copy Contact. There can be multiple contacts for each type. Press the diskette icon to save. 11
  12. Delete an Existing Filing Contact Use the red x’s to delete existing contacts associated with this filing 12
  13. Market Served 13
  14. Select ‘Market Served’ Under ‘Available’ and click on the red arrow to move it over to the field titled ‘Current’. Enter Market Served text into the text box titled ‘Statement’. Click ‘Accept Edits’ to save your changes 4. Click ‘Save’ at the bottom of the screen 14
  15. Once complete, scroll up and use the table of contents to select a new task to work on. 15
  16. To add a * Note that will appear on the Printed Statement below the Paragraph box, i.e. *See Paragraph 8. Type inside the text box, click on Insert. Notes section Click ‘SAVE” when done to save your work. 16
  17. Rate Base and SCS Prices 17
  18. Rate Base and SCS Prices Click ‘Add Row’ Icon to insert a row
  19. Rate Base and SCS Prices Enter Single Copy Sales Price Enter Rate Base Select Currency from drop down Menu Click the SAVE button once complete 19
  20. Paragraph 1-2 20
  21. Adding Issues for the first time Functions to add rows The 1-2 form will appear as shown above when a filing is accessed for the first time. Use the “Add or Remove Rows” and insert row functions to add the desired number of rows.
  22. Adding Issues for the first time Add Issue Name here. Six rows have been added. Notice the scroll bar on the right which will help you navigate the rows. Place a name in the Issue field and click the Save button.
  23. Adding Issues for the first time The 1-2 form will place the issues in numeric order upon save. You may mark a buyers guide or other special issue by using the checkbox provided. Remember to add a Paragraph 8 comment for the Special Issue.
  24. Indicia comment for P4 Set your analyzed issue # Enter your data into the corresponding field by either entering in each numbers manually or copy and pasting using Ctrl+C and Ctrl+V. NEXT GEN won’t accept a comma (,) ALL data entered must be without a place holder.
  25. Printing out the 1-2 Click on the Excel Export tool icon to open the 1-2 in excel format. This feature will allow you to view, save and print out the 1-2. The Excel export tool will also allow you to copy and paste figures from excel into Next Gen. When copying and pasting be sure not to include any commas. You will also find the Excel Export tool located in Paragraphs 3a-3d, 4, 5, and 6. 25
  26. Printing out the 1-2 Click on the Excel Export tool icon to open the 1-2 in excel format. This feature will allow you to view, save and print out the 1-2. The Excel export tool will also allow you to copy and paste figures from excel into Next Gen. When copying and pasting be sure not to include any commas. You will also find the Excel Export tool located in Paragraphs 3a, 3b, 4, 5, and 6.
  27. This is what the 1-2 will look like when you open it up using the excel export tool. 27
  28. Copying and Pasting Figures from Excel Figures from an Excel spreadsheet can be placed into NextGen using the copy and paste function. YOU MUST FORMAT WITHOUT COMMAS/PUNCTUATION The destination fields in NextGen must be the same size as the source fields in Excel. (Ex. If the destination in NextGen is a field that is 4 columns by 3 rows, then the Excel data that is copied must also be 4 columns by 3 rows.) Formulas that exist in Excel will NOT write over those in NextGen. Therefore, sub-total and total cells will be ignored in NextGen. Please allow NextGen to perform the calculations. 28
  29. Paragraph 3a & 3b (Please Note: Paragraph 3b – Length of Subscriptions and Paragraph 3d – How Ordered have now been omitted from the statement. Paragraph 3c – Use of Free Promotional Incentives has now been renumbered to Paragraph 3b)
  30. Paragraph 3a Reporting Paid claims on your statement, select “Paid Subscription Analysis”. Paragraph Selection Drop Down Menu To start, click on “add row” icon. *Note: This section is for Continuous Circulation Only*
  31. Offers (Continuous Circulation Only) over 5% of total offers Update Icon Click on the cell in row 1, “Num. Issues” and begin to enter data. Continue with “Offer Price” & “Total.” Click the update Icon to update the spreadsheet. The add a row icon will then become enabled. To add another row for the next offer, use the add a row icon. Be sure to click on the SAVE button at the bottom of the screen. 31
  32. Offers (Continuous Circulation Only) over 5% of total offers Enter the claim data for Sponsored Circulation: Number of Orders Gross Number of Issues Gross Value of Offers Enter Data Here Enter the claim data for ALL other offers less than 5 %: Number of Orders Gross Number of Issues Gross Value of Offers Enter Data Here Calculations will be shown here 32
  33. Paragraph 3b (Please Note: Renumbered due to updates to the statement. Formerly Paragraph 3c) Enter data in the table above and click the Save button.
  34. Paragraph 4 34
  35. Paragraph 4 – Business/Occupational Breakout 35
  36. Row/Column Paragraph Options Display of the P4 table builder Preview Screen- Not For Data Entry. It is for visual reference only, claimed data entered won’t carry forward to P4 Row Editor – add/delete/edit Column Editor – add/delete/edit 36
  37. Row/Column Paragraph Options - Paragraph 4 Editing a Row To make edits to an existing P4 category:1. Click on the pencil icon, the editing boxes will appear.2. Make the text edits, additions or deletions as needed. Save & Delete Icons Cancel Icon 37
  38. To add a new Row 2. Type in your category, 3. Type any description in the notes 4. Click the Save icon (diskette). 1. Click on the NEW button To move a row up or down use the green and orange arrows. The number provision is the number of spaces that the selected row will move up or down. 38
  39. Making a row SubTotal To create a new row that subtotals more than one (1) claimed category Use the leveling arrows to increase the the number rows included in the subtotal 1. Insert the new row, be sure that WHOLE NUMBER is selected from the drop down menu in the DATA USE column.2. Uncheck the box under Claimed data *.3. Remember to click on SAVE diskette icon for the changes to take effect. 39
  40. Be sure all subtotaling rows & columns have an unchecked box.To have multiple subtotals one under the one, indent by using the leveling arrow and moving it to the right. Remember there is a helpful preview table above in the Row/Column builder to see if the layout is as you want it to appear on the printed statement. 40
  41. Row/Column Paragraph Options – Changing the P4 table name 1.) Click on the pencil icon next to the table name. 2.) Type in new name. 3.) Press the diskette icon to save. 41
  42. Row/Column Paragraph Options – Adding a new Column 42 Click on the NEW button same as with adding a row.
  43. Paragraph 4 Data Entry Screen Remember claimed data MUST be entered on Paragraph 3a, not the builder. Be sure to SAVE your data clicking the SAVE button at the bottom of the screen. 43 43
  44. Adding Notches to Paragraph 4 Sample Paragraph 4 with notched section Additional data is included at the bottom of Paragraph 4, which is included in the qualified circulation, but not included in the crosshatch. 44
  45. 1. After Clicking the ‘Edit’ icon for the row you would like the notch to begin, click the button under the ‘Notch’ column’ 2.) Click the diskette icon to Save. To delete notch, click on ‘Clear Notch’ button. 45
  46. In the Preview Screen at the top of the Row Builder section, you will see the area that is notched in two shades of RED. The lighter hue are editable cells. The darker shade are locked cells (for totals or percentages) that will not appear on the output of the statement. (Please keep in mind that this is a preview screen only, the data must be entered in the Paragraph 4 section of the statement filing, not the Row/Column Paragraph Options page) 46
  47. Adding Additional Paragraph 4’s 47
  48. 1.) Click the ‘New’ button to add a new Additional Data table to the ‘Paragraph Tables’ section at the top of the Row/Column Builder section To delete a table, after clicking on the ‘pencil’ icon, press the ‘X’ button. 2.) Select the Unnamed Table and create the table in the Row/Column Builder as you would a standard Paragraph 4. 48
  49. Adding Supplementary Data 1. Choose Supplementary Data from the Paragraph Tables section at the top. 2. Add the rows and columns like you would a standard Paragraph 4 breakout. 3. Select the Paragraph 4 section from the Table of Contents. Then enter the Indicia in the box right above the breakout table. Don’t forget to press Save! 49
  50. Adding Supplementary Data 1. Choose Supplementary Data from the Paragraph Tables section at the top. 2. Add the rows and columns like you would a standard Paragraph 4 breakout. 3. Select the Paragraph 4 section from the Table of Contents. Then enter the Indicia in the box right above the breakout table. Don’t forget to press Save! 50
  51. Paragraph 5 – New Reporting Format (*Please Note: This paragraph has now been condensed. Please see Slide 53 for instructions on how to expand to the original format) 1.) Enter claims in this area and Save. IMPORTANT: The Licensees category has now been omitted from Section V on the Paragraph 3b breakout. 2.) Enter high/low figures in this area and Save.
  52. If Applicable, enter in the number of sources and the data from the smallest and largest sources into the appropriate boxes. Click on the SAVE button at the bottom of the screen. If a source needs to be disclosed, select the corresponding source type from the drop down menu and click on the Add Item button. Then type in applicable source(s) in source text field.
  53. Paragraph 5 – To switch to original format Click the check box and then the SAVE button if you would like to expand the Source breakout. This will show Paragraph 5 in the original format.
  54. Paragraph 5 – Original Reporting Format 1.) Enter claims in this area and Save. 2.) Enter high/low figures in this area and Save. IMPORTANT: The Licensees category has now been omitted from Section V on the Paragraph 3b breakout.
  55. If Applicable, enter in the number of sources and the data from the smallest and largest sources into the appropriate boxes. Click on the SAVE button at the bottom of the screen. If a source needs to be disclosed, select the corresponding source type from the drop down menu and click on the Add Item button. Then type in applicable source(s) in source text field.
  56. Paragraph 6 56
  57. Geographic Tables selected to appear on the statement. Multiple tables can be selected. Available Geographic Tables Order Arrows. Use these arrows to place selected tables in the desired order. Add/Remove arrows. 57
  58. Highlight a table from the “Available Geos” list and click the green arrow. The highlighted table will move to the “Selected” list Adjust the order the tables appear by using the Up/Down arrows on the extreme left. 58
  59. The highlighted table will load in the data entry below. Be sure to save your data before you toggle between multiple tables. 59
  60. United States Breakout Enter claim data into the TQ Column for each corresponding Geographic location and save data. 60
  61. International Breakout by Region/Country Choose International by Region/Country from the Menu as discussed above Each of 9 global regions are available in the Region Filter. Select the 1st region you need to report from the drop down menu and click on SAVE at the bottom of the screen. Enter in the claims and click SAVE before moving onto select another region to report from the menu. Once all the geographic regions have been reported, click on Save. If you would like to report geographic info by Continent only, enter the claimed circulation in the unspecified cell at the bottom of each region. 61
  62. Paragraph 7 62
  63. Claimed data needs to be entered here in the editable cells. The color key is provided. ***If you wish to REPORT Post Expire % on your printed statement in P7, please enter in the provision provided. Type in the % you wish to claim inside the text field labeled, “Post expire copies included in Paid circulation:” Average Annual Order Price can also be entered into the cell provided. Remember to click on the SAVE button Post Expire Copies AAOP 63
  64. Paragraph 8 64
  65. Using the P8 glossary 1. From the drop down view the available Paragraph headings and select the desired heading. 2. From the Glossary drop down view the list of pre-populated P8 comments available. 3. After finding the P8 comment, click on the SELECT button above. 4. The Note text box will populate. You can fill-in the blanks and make edits or revisions inside this area that pertain to your filing. 5. Click on ‘Insert’ to see the P8 comment move to the area above. 6. Click on the SAVE button. 65
  66. Creating your own P8 comment (not in the glossary) 1. Enter the Paragraph # or heading in ALL CAPITAL letters inside the ‘Caption’ field . 2. Type in the P8 comment as it is to appear on the circulation statement in the NOTE area. If there are multiple sentences, to appear on separate lines, use ENTER on your keyboard to create a new line. 3. Click on ‘Insert’ to move the P8 comment above. 4. Click on the SAVE button. 66
  67. To make changes to an existing P8 comments Click on Select for the existing P8 comment you wish to alter. The selected P8 comment will appear as highlighted. You can delete the P8 comment entirely, by clicking on the Delete button Make text changes by using the Update button. To save changes, press the Save button. 67
  68. Logo & Cover Images 68
  69. To submit a LOGO, Cover Image or Qualification form, select the type of image that you would like to upload from the drop down menu and click “Add New Image.” 69
  70. 1. Click Browse to find the graphic to associate with this filing. 2. Click Save Image to assign find the graphic to the filing. 70
  71. Designate your 4-color or black & white printing preferences using the buttons provided. If a black & white image is uploaded, the buttons will not be present as shown in the Cover Image example. Please note: there is an additional e-services fee for including 4-color art images on the printed statement and for including a cover image on the printed statement. **IMPORTANT** Please make sure cover shots and logos are uploaded as a “png” file and saved at 300 dpi. 71
  72. Charts, Graphs & Maps 72
  73. Charts, Graphs and Maps To add graphics to your circulation statement, please click the Charts, Graphs & Maps link
  74. Use the interface provided to indicate that charts, graphs or maps should be included on the circulation statement. 74
  75. The “Type of Chart” drop down menu allows the user to select the type of chart desired for a particular paragraph. Please note that only the charts available for that paragraph, will appear in the drop down menu. 75
  76. The B&W or Color option can be used to designate if a particular graphic should be rendered in Black & White or in Color. 76
  77. Please note that Charts, Graphs and Maps will not appear on the rendering of the statement, when “Data Review” is selected. Maps to be included on statements should be emailed, with circulation figures included to: logo@bpaww.com 77
  78. Print and Ship Order Form 78
  79. Once form is complete, click on the save icon located within the table. Select Hardcopy & Website or Website Only using buttons provided at the top of the page. Fill in shipping information in the fields provided. Designate the quantity to be sent to this location. Notice the Total Quantity of Hardcopies for your reference. Press the save icon at the right of the page. 79
  80. Edit an existing ship to location or qty by clicking on the edit icon. Add an additional shipping qty or location by clicking the new link 80
  81. Send Your Comments to BPA Use the Comments section to communicate to BPA instructions, questions, or errors you found while filing.1. Type your comment to BPA inside the Note text box.2. Click on Insert3. Click on SAVEYou can type as many separate comments as you wish. These comments will be viewable by BPA staff and others reviewing historically submitted filings.
  82. Data Review After login, click on the Statement Review link at the top of the page. 82
  83. Data Review Click on the name of the publication. 83
  84. On this screen, you will be able to review the circulation statement in a similar format as the final version that will be printed and released on BPA’s website. 84
  85. When finished reviewing the statement review, scroll down all the way to the bottom of the screen and fill in the appropriate fields. When all fields have been filled in, click on ‘Release Statement to BPA.’
  86. Submitting your filing to BPA Worldwide After clicking on ‘Release Statement to BPA.’ Click the ‘Confirm Release to BPA’. The statement has now been submitted to BPA. Red errors need to be corrected on your filing before it can be submitted. The warning messages in blue and black type are reminders to review your claims in situations where Next Gen cannot determine if a rule is being broken. You can still submit your filing with the blue warning messages.
  87. NEXT GEN will time out after approximately 45 minutes of inactivity, be sure to save changes before leaving for lunch, a meeting, going home for the day, etc. 87
  88. Training and FAQ section Click on these links to see upcoming training or archived webinars that are available. You can also search our FAQ and add any questions you may have regarding your filing in Next Gen. 88
  89. Training and FAQ section Click on Search FAQ Use the drop down menu to select the section you have a question regarding and then click on the Search button. To view ALL FAQ’s, select ALL and then click on the Search button. 89
  90. Training and FAQ Section Click on My Questions Click on New Question A box will appear to enter your question Once complete save your question by clicking the Save icon Someone from our Help Desk will answer your question. Check back by selecting My Questions to view the response. 90
  91. INTERNET EXPLORER version 8.0 users(Please note that if you are using IE 8 then you will need to click the conversion button to the right of the address bar. This will set your browser to be compatible with Next Gen)
  92. INTERNET EXPLORER version 7.0 & NEXT GEN This is a workaround for a known occurrence between IE v.7.0 and NEXT GEN’s FarPoint Spread software. MicroSoft is presently working to correct this and will be releasing a patch to automatically perform this workaround. Until the patch’s release here are the manual steps to the workaround:Current State of IE v.7.0 Internet Explorer 7 opens a message box asking if you want to access the clipboard whenever you click a cell in FarPoint Spread between page refreshes, it appears like this. It defaults to “Don’t Allow” which could make copy paste operations impossible. 92
  93. The Fix From the file menu bar, click on Tools\InternetOptions (If the menu bar isn’t showing on your screen, press the Alt key and the menu bar will appear.) 93
  94. Click the Security tab 94
  95. Click the “Custom level…” button 95
  96. Scroll down to the Scripting section, located almost at the bottom of the security settings list. In the Allow Programmatic clipboard access section, change the selection from Prompt to Enable and click OK. 96
  97. You will be prompted with this message box… Click Yes.  Click OK in any remaining open dialogs until you get back to the Internet Explorer browser window and you are done. 97
  98. Questions on using NEXT GEN to file? Help Desk Analyst – Jim Beecher 203.447.2835 email: jbeecher@bpaww.com OR Production Specialist – Randi Bayne 203.447.2856 email: rbayne@bpaww.com 98
More Related