Download
1 / 21
210 likes | 396 Vues
Visual Supports for Supporting Student Learning. What are visual supports?. Simply put, visual supports are a way of making auditory information visual. Visual Supports are an effective instructional tool….

E N D
What are visual supports? • Simply put, visual supports are a way of making auditory information visual.
Visual Supports are an effective instructional tool… • “Visual supports organize a sequence of events, enhancing the student’s ability to understand, anticipate and participate in those events. • Visual supports supplement verbal instruction, clarifying the information for the student and increasing comprehension. • Visual supports can be used to cue communication, providing reminders of what to do and say in a situation.” Quill, 1995
“If you’ve told a child a thousand times and he still does not understand, then it is not the child who is the slow learner.” Attributed to Walter Barbee Visual supports are a way to solve problems… • What do you hear yourself saying over and over? • What do you hear students asking over and over? • Where are student performances breaking down?
Students with autism and students who are visual learners need visual supports…but most of our students would benefit from them. Who needs visual supports? • We all do! • Think about the visual supports we use every day…cookbooks, maps, day planners and calendars, phone books, grocery lists, memos, notes and reminders.
When do we use visual supports? • Throughout the day. • Visual supports need to be portable so they can go wherever the student goes. • Throughout our lives. • Once the student is successful we may be tempted to remove visual supports, but experience has shown us that as students enter new environments and face new challenges it is much easier to modify existing visual supports than to reintroduce supports which had been taken away.
Visual Supports come in many forms. • Written words • Pictures: photos, color pictures, black and white pictures, picture-symbols like those used in the Mayer Johnson Boardmaker program • Gestures • Objects in the environment: i.e. supplies that are needed for the next activity are sitting on the table or desk where that activity will occur: • Arrangement of the environment: i.e., the chairs are set up in the reading circle
Why use visual supports? • Visual supports consider the preference and strength of individuals : • When we present information verbally, the words are available for a brief moment. • When we present information visually it can be there for as long as the student needs it.
A few points to remember: • It is only by using the visuals that students will attach meaning to them. • Sometimes you will see immediate results. Sometimes it takes days, weeks or months before you see results. STICK WITH IT but be thinking about the possibility of making modifications. Sometimes one little change can make a big difference. • Some visual supports may be used less over time but it’s a good idea to keep them handy for those times when the student needs a little extra support because they aren’t feeling well, haven’t had enough sleep or are just having an “off day”. If the supports are kept in place they can be easily changed when the student transitions to a new, more challenging environment.
Make visual supports age appropriate. Consider the size and portability of the visual as well as the kind of visual symbols you use (i.e. objects, pictures, line drawings, words). Be sure they “fit the environment”. • Take all school settings into consideration. Don’t forget recess, study hall, lunch, inclusion, etc. You should make visual supports portable and easy to access.
The higher the stress level the more need for visuals. Using spoken language usually serves to increase rather than decrease stress levels. Using pictures allows us to communicate effectively with the student without adding to their stress. • Independence is our goal! Visual supports promote independence by providing visual cues which can eventually be used by the student for self-prompting. Verbal cues alone can create dependence on other people.
Visual Schedules • The goal of a visual schedule is for the student to transition independently to the next activity. Or could be as simple as writing on the board the schedule for the class session • Schedules need to be portable and easy to access and use. They should not be faded out as the student “learns” their schedule. • You can use pictures, words, colored-coded cards or whatever works best for the individual student. Usesymbols at the child’s level of understanding.
Example #1 1. A “check schedule” card is kept right next to the schedule. When it is time for the student to transition to the next activity the card is handed to the student with the request to “check your schedule”. The student will bring the card back to the place where it belongs, thus bringing him to his schedule. 2. Once the student is at their schedule they can be cued or physically assisted to take the next card on the schedule. 3. The picture in their hand tells them where they are going. A “receiver envelope” is kept at the site where the activity will occur. The student puts the picture in the envelope and then he is right there where the activity takes place—transition complete!
Example #2 This schedule is both portable and flexible. It is made from an inexpensive folder like any student would carry with them. As each activity is completed the card is turned around in the mini-pocket (made from pieces of cardboard taped on the folder). Students can put their assignments “to be done” in the left pocket and “completed” assignments in the right pocket. Can be as simple as “To Do” and “Complete”, color coded for subject
Things to do. All Done Warm-Up Work Task Break Community Lunch Example #3This schedule clearly communicates what needs to be done. It can be attached to a notebook or clipboard so it is portable and easy to use. As each activity is completed the card is moved to the “All Done” column.
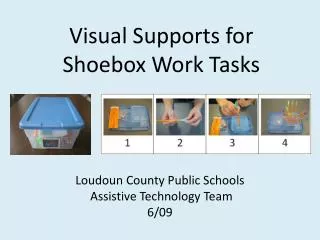
Mini-Schedules *notecard with a step by step reminder *post it notes *Steps with/or without photos for science experiments or other procedural lessons(writing process math problems etc. *List laminated • Mini-schedules break down • an activity into manageable • steps. They are a visual form • of task analysis. • *Whoever needs them can use them
Make it Concrete • Any concept that is abstract in nature is typically challenging to our students with learning disabilities. We tend to use a lot of words when a few words paired with a picture or gesture or demonstration would be more effective.
Home School Calendar Imagine getting up in the morning and not knowing if it’s a work day. You get dressed, eat breakfast and then if your carpool shows up you know you’re going to work. If they don’t show up you figure it must be the weekend.
Picture Sources/Velcro Sources We found the most effective way to use the Velcro is to keep the soft loop (female) Velcro on the home surface and the rough hook (male) Velcro on the movable pictures. The important thing is to be consistent in how you apply the Velcro throughout your program so that all of your pictures can be used with any home surface. • Picture sources for creating visual supports: • Boardmaker computer program from Mayer Johnson (www.mayer-johnson.com) • images.google.com • Writing With Symbols computer program • PixWriter computer program • digital camera photos • magazine and catalog pictures • labels etc. • Velcro sources: • www. feinersupply.com • www.fastenation.com (Dual Lock clear Velcro) • www.textol.com • www.hookandloop.com
Web-Sites • www.dotolearn.com • This site has many ready-made visuals which are easy to print and use. • www.usevisualstrategies.com • This site has pictures to download and lots of resources. • www.mayerjohnson.com • Check out this site to find out more about Boardmaker and other resources. • www.images.google.com • This site literally has thousands of pictures you can access. • www.tinsnips.org • This site has some simple picture recipes.