Download
1 / 19
220 likes | 486 Vues
Sorting E-Mail with Outlook Rules. Lunch and Learn. Workshop Outline. Defining Key Terms Running the Wizard Testing the Rule. Defining Key Terms. A Rule is a feature in which Outlook enables the user to sort mail automatically with specific words, circumstances and/or e-mail addresses.

E N D
Sorting E-Mail with Outlook Rules Lunch and Learn
Workshop Outline • Defining Key Terms • Running the Wizard • Testing the Rule
Defining Key Terms • A Rule is a feature in which Outlook enables the user to sort mail automatically with specific words, circumstances and/or e-mail addresses. • The Rules Wizard is an Outlook tool that assists the user in creating and modifying rules.
Defining Key Terms • Forethought is highly important. You’ll never create a rule without it. • Typically, you’ll create a rule because you realize: • I need a rule right now. • I will need a rule very soon. • In both cases, you’re thinking ahead to realize you don’t want your Inbox to be a mess.
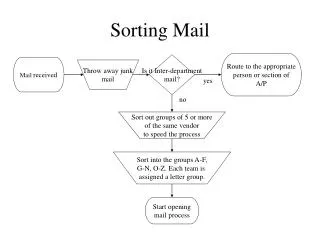
Defining the Process • Determine why you need the rule. • Launch the wizard. • Identify conditions. • Declare what you want to do with the mail in question. • Define any exceptions to the rule. • Name the rule.
Defining the Process • Determine why you need the rule. • I don’t want to flood my Inbox with Jeff’s TechTips, but I will want to read them later. • Launch the wizard. • Identify conditions. • Include all messages with the subject TechTip. • Declare what you want to do with the mail in question. • Move it to a new folder called TechTips. • Define any exceptions to the rule. • Name the rule.
Launching the Wizard • Switch to the Inbox. • Access the Tools menu. • Choose Rules Wizard.
Creating a New Rule • Note the new window. As with any wizard, all of your options will be presented on separate screens in this window. • Click the New button to create a new rule.
Creating a New Rule • Note the Office Assistant (the cat in this example). Since this is a training workshop, we’ll turn this feature off.
Using a Rule Template • Choose from two options: • Start creating a rule from a template (pre-defined examples) • Start from a blank rule • Select the first option.
Choosing a Rule Template • Select a template from the top list. • Use Move messages based on content for subject-based rules. • Click any links in the lower box to apply details to the rule. Each link will result in a new window.
Defining Specific Keyword(s) • Click the Specified Words link. • Type in the appropriate word(s). • Click the Add button to add the word(s) to the criteria list. • Click the OK button to continue.
Defining a Specific Folder • Click the Specified link to identify a particular folder. • Select the desired folder for your rule. To create a new folder, click the New button and name the folder. • Click the OK button to continue. • Click the Next button.
Identifying Conditions • Change or add to the selected conditions by clicking in the appropriate checkbox(es). • Reapply or Re-input words as needed. • Click the Next button to continue.
Defining an Action • Change or add to the target action as needed. • Click the Next button to continue.
Declaring an Exception • Declare any exceptions. • Remember to define the details for any link you select. • Click the Next button to continue.
Naming and Reviewing the Rule • Rename the rule as needed. • Check the appropriate box to Run this rule now, if needed. • Leave the rule turned on. • Verify you included the correct details. • Click the Finish button.
Closing the Rules Wizard • See your new rule in the list. • Click the OK button to exit the wizard.
Testing the Rule • Test each rule as you create it. • See the new mail re-route into the appropriate folder.