Download

1 / 17
170 likes | 179 Vues
This OLM to PST converter is an outstanding piece of technology that dedicatedly converts the OLM files to PST format without any glitch. This means that the final files have all their content intact in the form of contacts, calendars, nested messages, graphics, Unicode content, etc. The overall folder hierarchy structure is preserved as well.

E N D
Gladwev Software Here is the best tutorial on how to transfer OLM to PST files from Mac to Windows
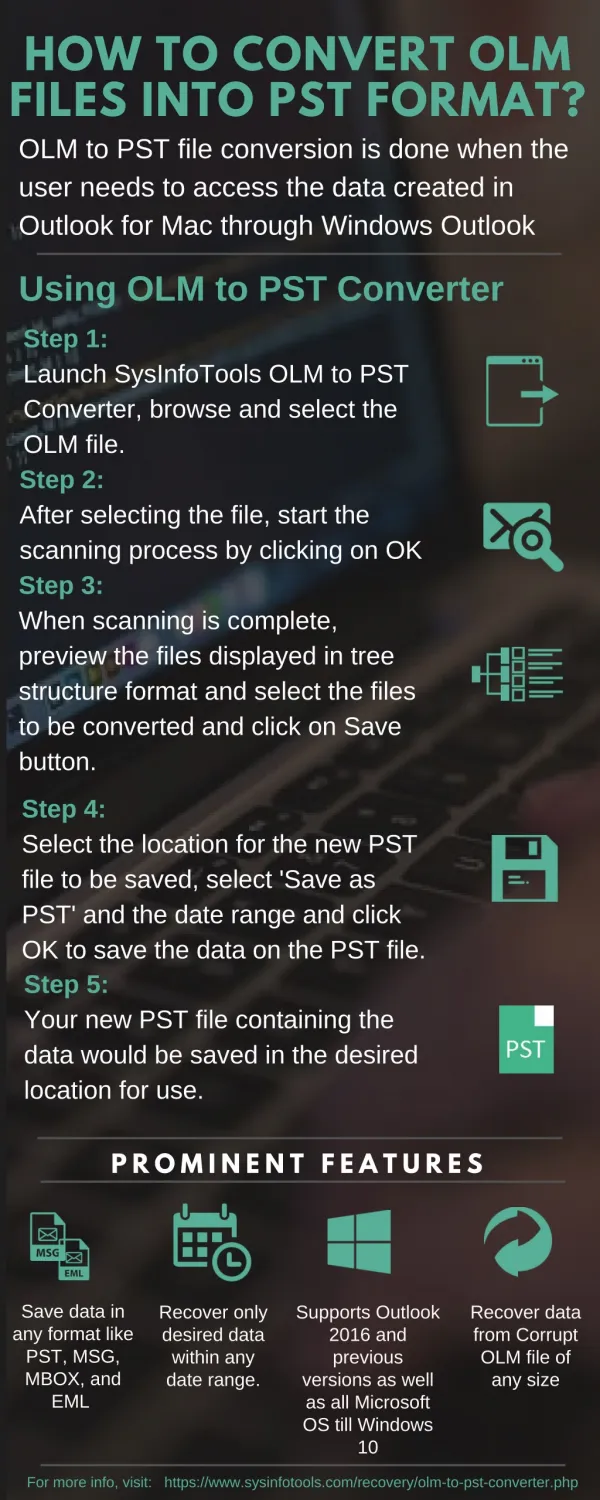
If you are looking for the best tutorial to transfer OLM to PST files then you are at the right place. Gladwev OLM to PST Converter Ultimate is the best OLM to PST Converter to migrate your data from Mac to Windows. Below are the stepwise instructions to transfer your data from Mac to Windows. Step 1Download the OLM to PST tool from the official website. Click on the below tab of free download to begin the process
Step 3The introduction screen of the tool opens up. Click continue to begin the conversionprocess
Step 4The installation type section opens up where you can change the location using Change Install Location by clicking on button at the bottom of the screen. It will direct to Destination Select section. Click on Install.
Step 5Enter your system password to permit that the OLM to PST conversion tool is downloaded with user’s consent. Click on Install Software.
Step 7Find the OLM to PST converter Ultimate tool from the Spotlight
Step 8A window will open that will ask for the OLM file source to transfer OLM to PST files. You can choose the options out of those. Outlook: Mac 2011-> With this option, you can transfer the files directly from the Outlook Mac 2011 Main Identity.Outlook 2016/Office 365-> While Outlook 2011 had mail folders in Main Identity, the Outlook2016/Office 365 models are located under “Profiles”.With this option, the user can export OLM to PST format directly from the “Profiles” folder.Custom:Apart from Migrating OLM to PST format, directly from the main database of the system, this tool can convert the data in two other ways. OLM File: Using this option, you can migrate OLM files to PST from the archived OLM files of Outlook Mac 2011/2016 and Office 365.Outlook: Mac database/Identity Folder.: This option gives you the flexibility to transform your .olm extensions to .pst format directly from the Outlook Identity/ database from a backup disk, even on a separate Mac system.
Step 9The next screen shows all the mail folders with their subfolders. You can deselect the unwanted folders.
The bottom of the screen gives you three checkboxes.1. The first checkbox allows you to merge all the contacts in the Default “Contacts” folder. With this feature all your contacts will be merged together before conversion.
2.The next checkbox merges all the calendar events thus saving them all while transferring the olm files to pst.
3. The last option let you ignore the folders containing no email. This saves your space and time.
Step 10If you are on a trial version, you will see the below window. You can either purchase the license for a full-fledged conversion by clicking “Register License”; or you can take a free trial by clicking “Try it”. The free version lets you convert up to 10 mails per folder.
Step 11Wait until the OLM to PST Converter converts your emails correctly.
Step 12The next screen displays the reports. You can click on the “Locate” button to find the exported mails’ location. You can also find the log report in detail. For the same, click on “Open” button.