Download
1 / 25
250 likes | 349 Vues
Navigation Guide for NSTAR Version 10. February 2014. Navigating in NSTAR Version 10. Some of the verbiage has changed in Version 10. Below is a table to connect the new terminology with the old:. Navigating in NSTAR Version 10.

E N D
Navigation Guide for NSTAR Version 10 February 2014
Navigating in NSTAR Version 10 • Some of the verbiage has changed in Version 10. Below is a table to connect the new terminology with the old:
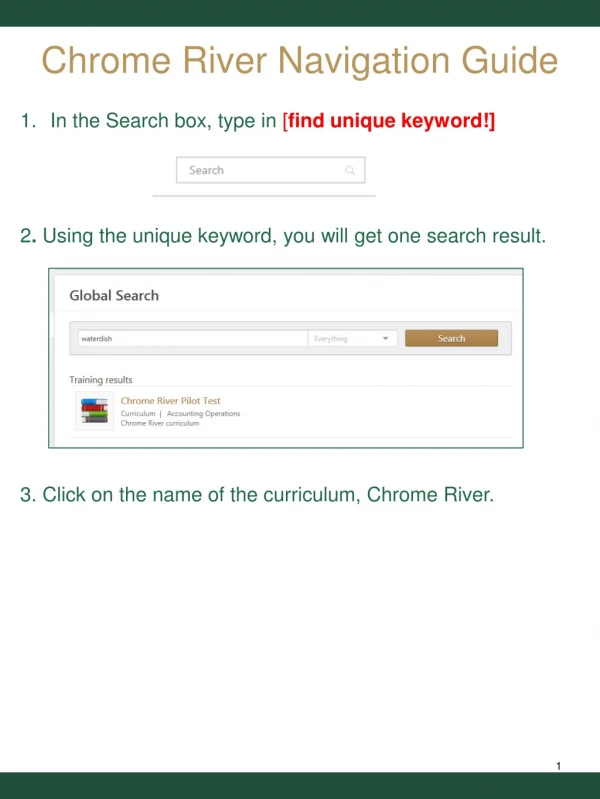
Navigating in NSTAR Version 10 Now that you have installed NSTAR Version 10 you can navigate to it in two ways: • 1. Through the website at https://pinon.nau.froot.nau.edu/sap/bpc/weband clicking on ‘EPM Office Add-in Excel’ Make sure you are in the A_NAU_PROD Environment.
Navigating in NSTAR Version 10 • Pick your connection and click ok.
Navigating in NSTAR Version 10 • 2. Through Excel on the ‘EPM’ tab, click on ‘Log On Connection’
Navigating in NSTAR Version 10 • In the connection box, click the continue square • Choose the connection • Click OK
Navigating in NSTAR Version 10 • Click the ‘Log On’ button
Navigating in NSTAR Version 10 • You are now in NSTAR in Excel. You should see a EPM Context bar across the top of your screen. This shows you what Model you are in.
Navigating in NSTAR Version 10 • The EPM box on the right side of your screen allows you to change Models.
Navigating in NSTAR Version 10 • You can minimize the EPM Context bar and EPM box. To have them reappear use the ‘Show pane and context’ button.
Navigating in NSTAR Version 10 You should have two connections to choose from: • HR-A_NAU_PROD for HR Budgeting • Finance-A_NAU_PROD For Finance Budgeting To change connection use the ‘Data Connection’ dropdown
Navigating in NSTAR Version 10 • For both the HR and Finance Model you have Input Templates and Reports. They can be found under the EPM tab. Use the ‘Open’ dropdown and select ‘Open Server Root Folder’
Navigating in NSTAR Version 10 • The Local input template and all the reports for both the HR and Finance Model can be found in the Company folder. The State input template is in the State User folder.
Navigating in NSTAR Version 10 • The table below lists the location and name of all of the input templates.
Navigating in NSTAR Version 10 • There are two HR Reports located in the Company Folder.
Navigating in NSTAR Version 10 • Both State and Local Finance Reports are located in the Company Folder
Navigating in NSTAR Version 10 • To open a template or report click and highlight the title and click Open, or just double click
Navigating in the Templates • Choose your department ID by double clicking on the yellow choice box • Enter data only in the yellow columns
Navigating in the Templates • Click Refresh to bring back the information for that department ID. • Click Submit to save and send information to NSTAR. • Click through additional boxes to complete submit process. • You can submit as many times as needed • Do not enter pennies or cents in the dollar amount. Round to the nearest dollar.
HR Template • The HR Template allows you to budget salary and FTE for state and local benefit eligible positions. • Make changes to the FTE in the ‘FTE Change’ column
HR Template • Salary changes can be made in these four columns depending on the type of change. • You can add comments in the ‘Comments’ column
Local Finance Budget Template • The Local Finance template allows you to budget for all revenue and expense classes for a department ID. • You will enter values for both the Estimated YE budget for the current year and the new budget for the coming year.
State Finance Budget Template • The State Finance template allows you reallocate budget from one expense class to another or to reallocate to another department ID within your cabinet.
Navigating in NSTAR Version 10 • If you need help please contact your Budget Analyst.