Download
1 / 10
150 likes | 483 Vues
Fabricating Temporary Restorations. DA122 Dental Materials. Provisional Crowns:. Also known as temporary crowns worn over the prepped tooth while the permanent crown is being fabricated in the dental lab Why? It is necessary for many reasons: To protect the tooth from damage

E N D
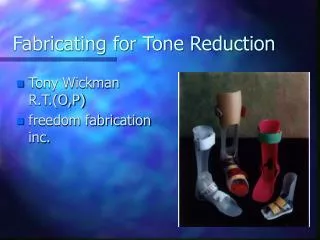
Fabricating Temporary Restorations DA122 Dental Materials
Provisional Crowns: • Also known as temporary crowns • worn over the prepped tooth while the permanent crown is being fabricated in the dental lab • Why? It is necessary for many reasons: • To protect the tooth from damage • To provide coverage to prevent sensitivity • To prevent drifting • To prevent hyper-eruption • To prevent gingival overgrowth • To prevent injury or irritation to the gingiva
Some Basic Armamentarium: • Extruder Gun with Resin cartridge • Surgical scissors • Vaseline • Cotton tipped applicators • Slow speed handpiece • Trimming and polishing burs • Sand paper discs • Matrix made from original unprepped tooth • Articulating paper/ holder • Mirror, explorer, spoon excavator • Temporary Cement
There are many ways to make a Temporary: • Acrylic Monomer (powder and liquid) • Bis-acryl • Resin based temporary material • Preformed temporary shells • Polycarbonate temporaries
Basic procedure: • Form a matrix on patient’s tooth before prepping with alginate • A quadrant impression can be taken if tooth structure is not lost • After final impression is taken, use matrix and place whichever material you choose in the area of prepped tooth • Place impression accurately over the prepped tooth
Basic procedure: • After specified manufacturer’s time, remove from mouth carefully • Remove from matrix, and trim excess from margins, using a lab bur or disc • Remove excess from contacts, which will allow temp to seat better (be careful not to open contact though!) • Now, try temp on prepped tooth, adjustments may still be necessary
Basic procedure: • Check the occlusion with articulating paper. Any dark blue spots on occlusal surface need to be removed to prevent sensitivity • Once occlusion is complete, polish temporary • Cement in place, remove excess cement, and give patient post-op instructions
Post-Op instructions: • The temporary should remain in place for 2-4 weeks • Instruct patient to: • Floss by sliding floss through contact • Not eat anything crunchy, sticky or chewy • Rinse with warm salt water to sooth irritated gums • Take Ibuprophen or Tylenol to help w/ sensitivity (this should be said by the dentist) • Call the office if you have any problems: • If temp falls off • Do you have the temp?
Words to know: • Polymerization: reaction that allows the material to set or cure. Can be light cure, self cure or dual cure • Flash: thin layer of mixture extending our beyond the gingival line • Margin: edge of temporary crown that fits into the gingival sulcus • Seat: placing the temporary crown over the prep completely