Download
1 / 4
40 likes | 297 Vues
AV Marker for Cell Blocks. Catalogue# 09-991-AVM100 AV marker for cell blocks (100 AV markers per unit). www.BioInnovationLLC.com. AV Marker

E N D
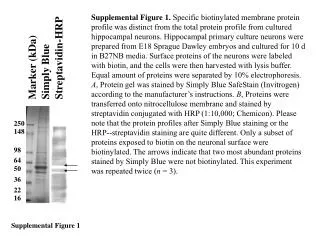
AV Marker for Cell Blocks Catalogue# 09-991-AVM100 AV marker for cell blocks (100 AV markers per unit) www.BioInnovationLLC.com AV Marker AV marker is a dark beacon which is incorporated in the cell block for facilitating the proper monitoring of depth while cutting the cell blocks on the microtome [1]. Without the AV marker, the depth of most of the cell blocks with scant, colorless cellular material may be difficult to judge. This leads to cutting too deep in to the cell block with loss of diagnostic cells or too superficial without any cells in the sections. [1] AV marker also acts as a reference point to orient the sections on different slides while interpreting the coordinate immunostaining with SCIP (Subtractive Coordinate Immunoreactivity Pattern) approach [2] for evaluating the immunocytochemistry in the cell block sections. References: 1. Varsegi G.M., Shidham V. (2009). Cell Block Preparation from Cytology Specimen with Predominance of Individually Scattered Cells. J Vis Exp. (JoVE- Journal of Visualized Experiments) 2009 Jul 21;(29). pii: 1316. doi: 10.3791/1316. PMID: 19623160 Video article is available FREE on web as open access at- http://www.jove.com/index/Details.stp?ID=1316 2. Shidham VB, Atkinson BF. Immunocytochemistry of effusion fluids: Introduction to the SCIP approach. In:Shidham VBand Atkinson BF. Editors ‘Cytopathologic Diagnosis of Serous Fluids’ First edition, Elsevier (W. B. Saunders Company); 2007. Ch 5, pp. 55-78. 26277 East River Road Grosse Ile, MI, 48138, USA Phone (262) 797 0323
AV Marker for Cell Blocks www.BioInnovationLLC.com Piece of tissue paper 26277 East River Road Grosse Ile, MI, 48138, USA Phone (262) 797 0323 Decant excess storage fluid associated with AV-marker by placing on an absorbent such as tissue paper. Transfer the AV-marker to cell-block sediment Pick upthe AV marker with specially provided pipette. Pick up the AV-marker Directions on how to pick up and handle the AV markers (The AV markers are relatively friable and should not be picked with crushing pressure such as with forceps) For cell block making protocols with HistoGelTM and with Plasma-Thrombin method- see next pages.
Concentrate the cells in LBC & transfer to flat bottom glass tube 5 12 9 10 13 11 6 1 2 3 7 8 4 This is an example for showing protocol application using HistoGelTM However, it may be modified for other methods after appropriate modifications. Modification for Plasma-Thrombin method is shown separately. Add molten HistoGel (to get the column of about 3 mm) & Mix quickly with the sediment Add AV-marker (After decanting excess storage fluid associated with AV-marker) Centrifuge at 1800 G (3000 rpms, rotor radius- 17 cm for 5 minutes) [cups should be swivelling (& not fixed angle) so that the cells fall perpendicularly on the bottom of flat bottom glass tube] 3 mm Cap the glass tube and transfer to the bigger plastic tube. Add warm (450C) water to outer plastic tube. The gel button is relatively stable and can be handled easily to adjust the processing such a way that the cutting surface of final paraffin block coincides with the surface along which most of the cells are concentrated Squirt 10% formalin to separate the gel button Let the HistoGel Cool & solidify Centrifuge at 1800 G (3000 rpms, rotor radius- 17 cm for 5 minutes ) The summary of different steps for preparing cell block by Shidham’s protocol using HistoGelTM For FREE video visit- J Vis Exp 2009 Jul 21;(29). pii: 1316 http://www.jove.com/index/Details.stp?ID=1316
Modification for Plasma-Thrombin method. Concentrate the cells in LBC & transfer to flat bottom glass tube 12 13 11 10 4 8 6 7 3 2 1 5 9 Centrifuge at 1800 G (3000 rpms, rotor radius- 17 cm For 5 minutes) [cups should be swivelling (& not fixed angle) so that the cells fall perpendicularly on the bottom of flat bottom glass tube] Add 1-2 drops of Thrombin Add AV-marker (After decanting excess storage fluid associated with AV-marker) Squirt 10% formalin to separate the clotted plasma button with layer of sedimented specimen along the bottom In comparison with HistoGel, the gel button is flimsy and not stable to be handled without distorting so one cannot control the cutting surface Immediately cap the glass tube and transfer to the bigger plastic tube similar to step 4 without significant delay. Centrifuge at 1800 G (3000 rpms, rotor radius- 17 cm) for 5 minutes Add 4-5 drops (to get column of 3 mm) of Plasma without disturbing the sedimented layer along the bottom. Cap the glass tube and transfer to the bigger plastic tube similar to step 4. Centrifuge at 1800 G (3000 rpms, rotor radius- 17 cm) for 5 minutes 3 mm