Download
1 / 21
210 likes | 345 Vues
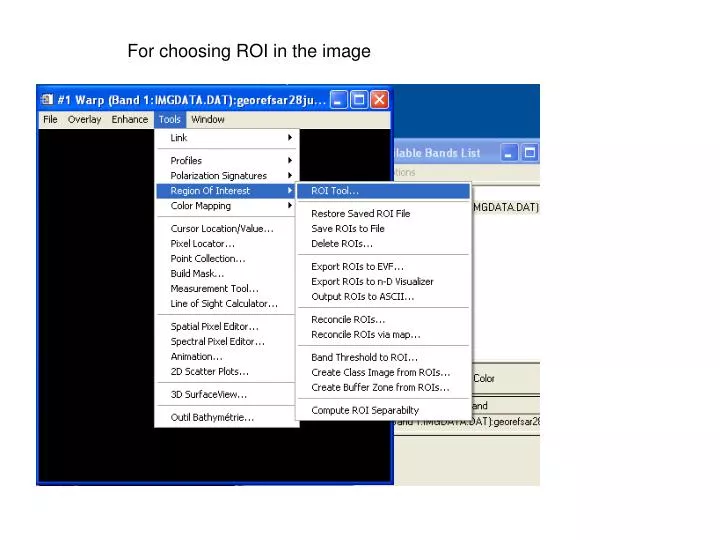
For choosing ROI in the image. ROI tool box opens. Click on ROI type Types of ROI lists down You can choose any shape for ROI according to application Rectangle is preferred if It is a bigger area Polygon is preferred if the area is small and when you have to choose ROI carefully.

E N D
Click on ROI type Types of ROI lists down You can choose any shape for ROI according to application Rectangle is preferred if It is a bigger area Polygon is preferred if the area is small and when you have to choose ROI carefully
ROI of rectangle shape (choose ROI type->rectangle, then on the image window, using mouse draw the rectangle and right click on the centre of the rectangle to choose roi
Choose scroll or zoom here and you can select ROI in the corresponding window. When you want to choose ROI accurately, these windows helps.
If you want to choose ROI with the help of topographic sheet (in case, you want to analyze water areas, then these areas can be chosen with the help of ground truth image and imported on to the image. • Steps to follow • Method of importing ROI on to the image depends on the size of ground truth image and size of the image on to which we want to import ROI • In case, both images are of equal size • Choose roi in the ground truth and save as .roi file • Then open the image, choose tools->roi->restore rois , open the saved roi file • The roi gets imported to the image.
ROIs corresponding to water area are chosen using topo sheet These are selected using polygon roi
Then, open the image on which you want to import ROIs. Load band in new display
Choose tools ->region of interest-> roi tool for the image 2 (on which roi to be imported)
If the sizes of ground truth and SAR image are different • One way of tackling this problem is (i) resize either of the images to that of the other one. Then, follow the same procedures as explained for images of equal size This resizing should not disturb image quality. In case, image is becoming poor and ROI is not accurate, then follow the procedure explained in successive slides
When images are of different size Up to the point of choosing roi, procedure is same
Saving rois Choose file->output rois to ASCII
Saving rois Choose ROIS Then, click on edit output ASCII form
Saving rois You can select or deselect any of these parameters ID, ROI location, geolocation etc. For importing ROI to an image of different size, geo location alone is needed If you want to do analysis on Digital numbers (DNs) corresponding to this area, you can save both geolocation and band values.
Saving rois Choose the file name as *.txt file
Importing ROIs Open the image in display 2, choose roi-type-> input points from ASCII as shown.
When text file is chosen, It is displayed in input ASCII file. Change to these settings: Xpoints column:2 (this Should correspond to latitude) Y points column: 1 (longitude) These points comprise a single point
ROIs are now imported on to the SAR image with different image dimensions